Thymeleaf 模板引擎
Thymeleaf 模板引擎
官方文档
Thymeleaf 是主流的模板引擎之一。
官网首页:Thymeleaf,
开发文档:Documentation - Thymeleaf
Thymeleaf 开发文档:Tutorial: Using Thymeleaf
Thymeleaf+Spring 开发文档:Tutorial: Thymeleaf + Spring
对后端开发人员比较友好,非常贴近 JSP 的语法
缺点是不是高性能的模板引擎
基本概念
开箱即用,支持 6 种文件类型的模板:
-
HTML
-
XML
-
TEXT
-
JAVASCRIPT
-
CSS
-
RAW
默认不支持 Java 这种编程语言,而主要支持与浏览器显示相关的格式,看来Thymeleaf 主要使用场景是页面显示
将渲染逻辑应用于具体的标记(标签、文本、注释、或者一个占位符)的对象叫做处理器(processor),处理器的集合(可能还有别的东西),就叫一种方言(dialect)。
Thymleaf 的核心库提供了一种称为标准方言(Standard Dialect)的方言,这对大多数用户来说应该足够了。
当然,如果用户想在利用核心库的高级特性的同时自定义自己的处理逻辑,则可以创建自己的方言 (甚至继承标准方言)。
Thymeleaf还可以配置为一次同时使用几种方言。
标准方言的大多数处理器都是属性处理器。这允许浏览器在处理之前正确地显示 HTML 模板文件,因为它们会简单地忽略额外的属性。这可以帮助设计人员和开发人员处理相同的模板文件,并减少将静态原型转换为工作模板文件所需的工作。这也是 Thymleaf 的一大特性,叫做自然模板(Natural Templating)。
Web 项目 - 简单例子
thymeleaf/examples/core/thymeleaf-examples-gtvg-jakarta at 3.1-master · thymeleaf/thymeleaf · GitHub
注意,
jakarta.servlet-api:5.0.0需要配合tomcat-10及以上版本一起使用。
这个项目的 web 架构非常简单,直接在 web.xml 中声明一个过滤所有请求的过滤器,然后在过滤器初始化的时候(Filter#init)初始化模板引擎,在过滤的逻辑中,首先通过路由找到具体的控制器,然后调用控制器的处理方法处理请求,这个过程如果顺利,就不调用 chain.doFilter(request, response); 了,到此结束,如果处理过程不顺利,说明报错了,则调用 chain.doFilter(request, response);,让其自然报错,将错误展示到客户端。
在调用控制器的处理方法处理请求的时候,会把模板引擎实例(ITemplateEngine)和响应的消息体的写入流(Writer)都传入,控制器的处理方法的主要工作是设置页面内容(WebContext)和指定模板名(是不是有 SpringMVC 的 ModelAndView 那味儿了),最后调用 ITemplateEngine#process 将模板渲染的结果写入响应的消息体,ITemplateEngine#process 这个方法有多个重载,一般用这个:templateEngine.process("order/details", ctx, writer);
web 层差不多就是这个意思。
Java API 结构
从 Web 项目那个例子中,我们可以知道模板引擎的使用只有两步:
-
初始化模板引擎
- 初始化模板解析器
-
处理模板
初始化模板引擎
直接看示例代码
private static ITemplateEngine buildTemplateEngine(final IWebApplication application) {

    final WebApplicationTemplateResolver templateResolver = new WebApplicationTemplateResolver(application);

    // 设置 模板模式,也就是这个 TemplateEngine  要用来渲染什么拓展名的文件,这里我们指定的是 HTML(默认就是HTML)
    templateResolver.setTemplateMode(TemplateMode.HTML);
    // 设置模板名称的前缀和后缀。
    // 我们在调用 ITemplateEngine#process方法的时候都要指定模板名称,这里配置的前缀和后缀就是用来确定模板名称对应的文件的实际路径的
    // 根据下面的配置,视图名称为"home"的视图会去 "/WEB-INF/templates/home.html" 这个位置查找
    templateResolver.setPrefix("/WEB-INF/templates/");
    templateResolver.setSuffix(".html");
    // 模板名称跟实际路径的信息会进行缓存,这里设置缓存时间,如果没有设置,会根据LRU算法进行移除
    // TTL (Time To Live) ;LRU (Least Recently Used,谁被缓存的最早,谁被消除)
    templateResolver.setCacheTTLMs(Long.valueOf(3600000L));

    // 默认进行缓存,
    templateResolver.setCacheable(true);

    final TemplateEngine templateEngine = new TemplateEngine();
    templateEngine.setTemplateResolver(templateResolver);

    return templateEngine;

}
我们来看看其中涉及到的重要的对象和概念。
模板解析器 Template Resolver
主要负责通过模板名称找到模板对应的资源。
顶级接口:org.thymeleaf.templateresolver.ITemplateResolver
核心方法是 ITemplateResolver#resolveTemplate,
作用是通过通过名称 (或内容) 和 (可选) 模板的所有者模板(当被解析的模板是另一个模板的片段的时候)来解析模板,将模板解析为 TemplateResolution 对象。该对象包含与模板相关的附加信息,如
-
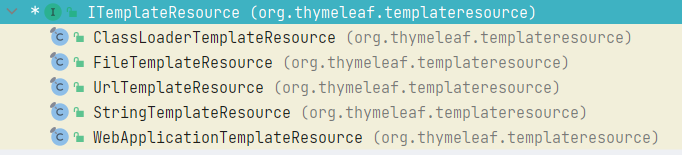
模板对应的资源类(
ITemplateResource,不保证模板对应的资源一定存在) -
使用的模板模式(
TemplateMode) -
此模板是否能被缓存
-
如果能被缓存,TTL 是多少
如果模板解析器不能处理该模板,则返回 null。
模板解析器返回 TemplateResolution 这一事实并不一定意味着已解析的模板资源存在。只有在模板解析器被配置为在返回解析结果之前对资源执行存在性检查 (通过调用 ITemplateResource.exists()) 时才可能是这样,每个 ITemplateResolver 实现都可以配置是否需要进行存在性检查(实际上就是设置 AbstractTemplateResolver#checkExistence)。默认情况下,实现可能选择不检查资源是否存在,以避免对资源的双重访问可能带来的性能影响。
一个模板引擎(Template Engine)可以配置几个模板解析器(Template Resolver),这些解析器将按顺序 (根据 getOrder() 返回的值) 进行请求,为每个模板名称返回一个 TemplateResolution 对象。如果模板解析器对于特定的解析返回 null,则调用解析器链中的下一个解析器(如果返回的不是 null,则不会请求解析器链中的下一个解析器,所以当存在多个解析器的时候,解析器的顺序就很重要)。未按顺序配置的模板解析器将在链中最后执行。
ITemplateResolver 有多个实现类,不同的实现类的区别在于通过不同的方式获取模板名称对应的资源,而且不同的实现类最终返回的模板资源的类型也不同。
所有实现类:
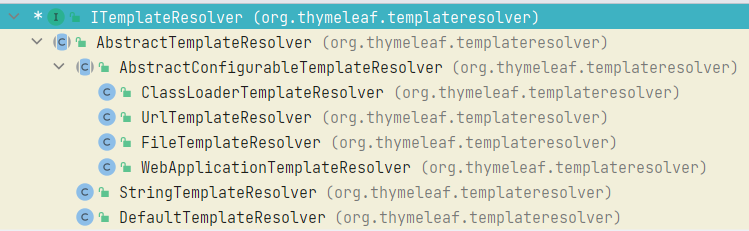
对应的模板资源类型(ITemplateResource):
从 AbstractConfigurableTemplateResolver 开始,添加了配置资源名称 (从模板名称,添加前缀后缀)、模板模式(template mode)、缓存有效性(cache validity)和字符编码(character encoding)的方法。在实际的使用中,我们也会在创建 ITemplateResolver 之后对相关的属性进行配置。
常见设置:
-
setTemplateMode
-
setPrefix
-
setSuffix
-
setCacheTTLMs
-
setCacheablePatterns
-
setNonCacheablePatterns
缓存行为和大小可以由用户通过实现
ICacheManager接口或修改StandardCacheManager对象来管理默认缓存来定义。
StandardCacheManager实际上也是ICacheManager接口的实现类。可通过
TemplateEngine#getCacheManager获取。初始化
TemplateEngine的时候直接配置缓存大小:TemplateEngine engine = new TemplateEngine(); StandardCacheManager cacheManager = new StandardCacheManager(); cacheManager.setTemplateCacheMaxSize(300); engine.setCacheManager(cacheManager);
我们接下来就来看看这个类下的实现类。
WebApplicationTemplateResolver
Web项目-简单例子 小节中我们使用的是 WebApplicationTemplateResolver,最终返回的模板资源类型是 WebApplicationTemplateResource。
初始化 WebApplicationTemplateResolver 需要指定 IWebApplication,因为 WebApplicationTemplateResolver 需要从 web 应用程序根目录解析资源。
ClassLoaderTemplateResolver
从类路径中加载资源,在初始化 ClassLoaderTemplateResolver 的时候你可以指定 ClassLoader,如果不指定,使用的就是默认的 ClassLoader
简单实践:
在 \src\main\resources 下创建 \templates 文件夹,并创建 txt 模板 simpleText.txt:
Hello World ,I'm [(${name})]
from: [(${from})]
------------------------------------------
TemplateMode.TEXT的模板语法跟TemplateMode.HTML的模板用法是不一样的,请参考 Tutorial: Using Thymeleaf - textual-template-modes
编写渲染代码:
private static void rederFromClasspath() {
    // 在类路径中加载模板
    ClassLoaderTemplateResolver classLoaderTemplateResolver = new ClassLoaderTemplateResolver();
    classLoaderTemplateResolver.setTemplateMode(TemplateMode.TEXT);
    classLoaderTemplateResolver.setPrefix("/templates/");
    classLoaderTemplateResolver.setSuffix(".txt");
    final TemplateEngine templateEngine = new TemplateEngine();
    templateEngine.setTemplateResolver(classLoaderTemplateResolver);

    Context ctx = new Context();
    ctx.setVariable("name", "xiashuo");
    ctx.setVariable("from", "renderFromClasspath");
    String simpleText = templateEngine.process("simpleText", ctx);
    System.out.println(simpleText);
}
输出:
Hello World ,I'm xiashuo
from: renderFromClasspath
------------------------------------------
FileTemplateResolver
跟 ClassLoaderTemplateResolver 不同,直接指定绝对路径来获取模板资源。
txt 模板参考 ClassLoaderTemplateResolver 小节,渲染代码
private static void rederFromFile() {
    // 从绝对路径中加载模板
    FileTemplateResolver fileTemplateResolver = new FileTemplateResolver();
    fileTemplateResolver.setTemplateMode(TemplateMode.TEXT);
    // 默认的工作目录是工程路径,而不是模板路径
    // 当前工程路径是 E:\IDEAProject\Thymeleaf
    String prefix = System.getProperty("user.dir") + "/TemplateResolver/src/main/resources/templates/";
    fileTemplateResolver.setPrefix(prefix);
    fileTemplateResolver.setSuffix(".txt");
    final TemplateEngine templateEngine = new TemplateEngine();
    templateEngine.setTemplateResolver(fileTemplateResolver);

    Context ctx = new Context();
    ctx.setVariable("name", "xiashuo");
    ctx.setVariable("from", "renderFromFile");
    String simpleText = templateEngine.process("simpleText", ctx);
    System.out.println(simpleText);
}
输出:
Hello World ,I'm xiashuo
from: renderFromFile
------------------------------------------
StringTemplateResolver
这个模板解析器会将被解析的模板(也就是 ITemplateEngine#process 方法的 template 参数)视为模板本身,也就是它的内容。因此,不会访问任何外部文件或资源。无法缓存
这是 ITemplateEngine 默认的模板解析器,
简单实践
private static void readFromString(){
    // 不设置 TemplateResolver ,默认会使用 StringTemplateResolver
    final TemplateEngine templateEngine = new TemplateEngine();

    Context ctx = new Context();
    ctx.setVariable("name", "xiashuo");
    ctx.setVariable("from", "renderFromString");
    String simpleText = templateEngine.process("Hello World ,I'm [(${name})] from: [(${from})]", ctx);
    System.out.println(simpleText);
}
输出
Hello World ,I'm xiashuo from: renderFromFile
这样当我们只想格式化某个字符串的时候就很方便。
模板引擎 Template Engine
主要负责模板的渲染
顶级接口 org.thymeleaf.ITemplateEngine,
实现类就一个 org.thymeleaf.TemplateEngine。
接口方法
public interface ITemplateEngine {


    // 获取模板引擎正在使用(或将要使用)的用来处理模板IEngineConfiguration实例。
    // 注意,在TemplateEngine(ITemplateEngine接口默认的唯一的)实现上调用此方法将初始化TemplateEngine对象,因此从那时起将禁止对配置进行任何修改。修改了也无效。
    public IEngineConfiguration getConfiguration();

// --------------------------------- 渲染结果写入 String -----------------------------------------------------

    // 处理指定的模板,由template参数指定(通常是模板名)。一旦模板渲染完成,输出将被写入此方法返回的String中。
    // 这实际上是一个方便的方法,它将在内部创建一个TemplateSpec,然后调用委托给process(TemplateSpec, IContext)。
    public String process(final String template, final IContext context);


    // 应用一组模板选择器处理指定的模板(通常是模板名)。一旦模板处理完成,输出将被写入此方法返回的String中
    // 这实际上是一个方便的方法,它将在内部创建一个TemplateSpec,然后调用process(TemplateSpec, IContext)。
    // 模板选择器允许只处理指定模板的一部分,用类似jQuery、CSS或XPath选择器的语法来表示这个选择。注意,这只适用于标记模板模式(HTML, XML)。
    // 有关模板选择器语法的更多信息,请参阅attparser的标记选择器文档。
    public String process(final String template, final Set<String> templateSelectors, final IContext context);


    // 上面看到了都委托给process(TemplateSpec, IContext)。这就是process(TemplateSpec, IContext)。
    // 从TemplateSpec开始处理模板。一旦模板处理完成,输出将被写入此方法返回的String中。
    // 模板相关的信息将被用作模板解析器的输入,在模板解析链中查询,直到其中一个成功解析了模板,然后再进行渲染。
    // context将包含可用于模板内表达式执行的变量。
    public String process(final TemplateSpec templateSpec, final IContext context);


// --------------------------------- 渲染结果写入 Writer -----------------------------------------------------


    //  处理指定的模板(通常是模板名)。输出将被写入指定的Writer中。在web环境特别有用。因为方便对接响应的输出流
    // 这实际上是一个方便的方法,它将在内部创建一个TemplateSpec,然后调用process(TemplateSpec, IContext, Writer)。
    public void process(final String template, final IContext context, final Writer writer);


    // 同 process(final String template, final Set<String> templateSelectors, final IContext context) 只不过输出写入到 Writer 中
    public void process(final String template, Set<String> templateSelectors, final IContext context, final Writer writer);


    // 同 process(final TemplateSpec templateSpec, final IContext context),只不过输出写入到 Writer 中
    public void process(final TemplateSpec templateSpec, final IContext context, final Writer writer);


// --------------------------------- 带渲染结果调节功能的处理方法 -----------------------------------------------------


    // 处理指定的模板(通常是模板名)。输出将根据返回的IThrottledTemplateProcessor对象对模板的进一步的处理而生成,并将被写入到IThrottledTemplateProcessor对象处理模板时指定的输出对象中。
    // 这特别适用于响应式架构等场景,其中输出字节的生产可以通过反向压力的方式进行调节。
    // 这实际上是一个方便的方法,它将在内部创建一个TemplateSpec,然后调用 processThrottled(final TemplateSpec templateSpec, final IContext context)
    public IThrottledTemplateProcessor processThrottled(final String template, final IContext context);


    // 懒得重复了
    public IThrottledTemplateProcessor processThrottled(final String template, final Set<String> templateSelectors, final IContext context);


    // 懒得重复了
    public IThrottledTemplateProcessor processThrottled(final TemplateSpec templateSpec, final IContext context);

}
简单看一下接口方法中提到的概念:
IEngineConfiguration:接口,该接口定义了主配置对象,该对象指定 ITemplateEngine 实例应该如何行动(渲染模板)。只有一个实现类 EngineConfiguration。
TemplateSpec:规范类,包含模板引擎所需的与待处理模板相关的所有内容。该类的对象通常用作 ITemplateEngine 中不同 process(…) 方法的参数。
TemplateSpec 中唯一必须的构造函数参数是 template,它通常表示模板名称,但如果模板打算指定为字符串并由 org.thymeleaf.templateresolver.StringTemplateResolver 解析,则 template 可以是整个模板内容。
// 模板名称
private final String template;
// 渲染部分选择器
private final Set<String> templateSelectors;
// 模板模式
private final TemplateMode templateMode;
// 模板解析过程相关属性
private final Map<String,Object> templateResolutionAttributes;
// 输出内容格式 MediaType
private final String outputContentType;
// 是否支持 Server-Sent Events
private final boolean outputSSE;
IThrottledTemplateProcessor:当一个模板的渲染被 节流 时,客户端可以通过调用 IThrottledTemplateProcessor#process 方法来告诉引擎它们准备处理多少字节的输出。作为对此的响应,引擎将只渲染部分的模板以达到 IThrottledTemplateProcessor#process 方法中指定的最多的字符节数。输出将以字符的形式写入 Writer,或以字节的形式写入 OutputStream。一旦写入了所需的输出量,引擎就会在最小或没有挂起输出缓存的情况下停止,并将控制权返回给调用者,以便客户机可以处理输出并为后续调用做准备。注意,整个过程都是单线程的。
这应该允许 Thymeleaf 在响应式架构中有效地集成为后端驱动的渲染框架。
IThrottledTemplateProcessor 的具体的接口方法就不去看了,以后有需要再了解,这里简单看一下其效果
模板:
I'm [(${name})], I'm from: [(${from})]
渲染程序:
private static void rederFromClasspath() {
    // 在类路径中加载模板
    ClassLoaderTemplateResolver classLoaderTemplateResolver = new ClassLoaderTemplateResolver();
    classLoaderTemplateResolver.setTemplateMode(TemplateMode.TEXT);
    classLoaderTemplateResolver.setPrefix("/templates/");
    classLoaderTemplateResolver.setSuffix(".txt");
    final TemplateEngine templateEngine = new TemplateEngine();
    templateEngine.setTemplateResolver(classLoaderTemplateResolver);

    Context ctx = new Context();
    ctx.setVariable("name", "xiashuo");
    ctx.setVariable("from", "renderFromClasspath");
    IThrottledTemplateProcessor processThrottled = templateEngine.processThrottled("simpleText", ctx);
    StringWriter stringWriter = new StringWriter();
    // 一次只读一个字节的内容
    while (processThrottled.process(1, stringWriter) != 0) {
        // 一个字节一个字节地累计输出
        System.out.println(stringWriter.toString());
    }
}
输出日志,一次读取一个字符,很有意思:
I
I'
I'm
I'm
I'm x
I'm xi
I'm xia
I'm xias
I'm xiash
I'm xiashu
I'm xiashuo
I'm xiashuo,
I'm xiashuo,
I'm xiashuo, I
I'm xiashuo, I'
I'm xiashuo, I'm
I'm xiashuo, I'm
I'm xiashuo, I'm f
I'm xiashuo, I'm fr
I'm xiashuo, I'm fro
I'm xiashuo, I'm from
I'm xiashuo, I'm from:
I'm xiashuo, I'm from:
I'm xiashuo, I'm from: r
I'm xiashuo, I'm from: re
I'm xiashuo, I'm from: ren
I'm xiashuo, I'm from: rend
I'm xiashuo, I'm from: rende
I'm xiashuo, I'm from: render
I'm xiashuo, I'm from: renderF
I'm xiashuo, I'm from: renderFr
I'm xiashuo, I'm from: renderFro
I'm xiashuo, I'm from: renderFrom
I'm xiashuo, I'm from: renderFromC
I'm xiashuo, I'm from: renderFromCl
I'm xiashuo, I'm from: renderFromCla
I'm xiashuo, I'm from: renderFromClas
I'm xiashuo, I'm from: renderFromClass
I'm xiashuo, I'm from: renderFromClassp
I'm xiashuo, I'm from: renderFromClasspa
I'm xiashuo, I'm from: renderFromClasspat
I'm xiashuo, I'm from: renderFromClasspath
TemplateEngine
ITemplateEngine 唯一的实现 TemplateEngine:
-
创建:
创建
TemplateEngine实例,可随时随地调用TemplateEngine templateEngine = new TemplateEngine();创建,但是创建和配置TemplateEngine实例是一个很重的操作,因此,建议只创建一个实例 (或者每个方言/配置至少创建一个实例),并使用它来处理多个模板。而不是要到的时候再去创建(这就很适合用 Spring IOC 来管理)。 -
配置
主要从这几个方面进行配置:
-
模板解析器(
Template Resolvers),如果不指定,默认使用StringTemplateResolver关于模板解析器的作用,请看
模板解析器 Template Resolver小节关于
StringTemplateResolver,请看StringTemplateResolver小节。 -
方言(
Dialects)模板将根据一组配置好的 dialect (
IDialect的实现) 进行处理,如果没有显式地设置方言,则将使用StandardDialect(标准方言)什么是方言?
方言定义了处理模板的方式:(属性)处理器、表达式对象等。模板将根据一组配置好的 dialect (
IDialect的实现) 进行处理-
方言定义了一个默认前缀,如果没有特别指定的话,这个前缀将被使用,比如
StandardDialect#PREFIX,值为th。 -
当添加或者设置多个方言的时候,每一个方言都可以指定不同的非默认前缀,(意思是不同的方言靠前缀来区分)
-
当然,也可以几种方言使用相同的前缀,这样实际用起来就像是这几个方言集合成了一个方言。(确实是不同的方言靠前缀来区分)
-
-
有的模板中使用了外置的消息(指使用了消息表达式
#{}),那么TemplateEngine就需要配置消息解析器(Message Resolvers),如果没有指定,则默认使用StandardMessageResolver。 -
模板中(主要是 HTML)中使用了链接表达式(
@{}),则需要(link builder),如果没有指定,则默认使用StandardLinkBuilder -
缓存管理器(
Cache Manager),用于管理解析过的模板的缓存和解析过的表达式的缓存,如果没有指定,默认使用StandardCacheManager
基本上就是配置这几个方面,
TemplateEngine的字段也就包含这几个方面的信息。 -
-
渲染
渲染分两步:
-
创建上下文(
IContext),上下文至少包含两个部分的信息-
locale(地区信息),用于消息国际化
-
context variables(上下文变量),用于解析模板中的表达式
这里要重点说一下 Web 场景和非 Web 场景下的上下文的区别,
IContext接口有两个默认实现:Context标准实现,WebContextWeb 场景下的实现(实现IContext接口的子接口IWebContext),这个接口主要是为了在特殊的表达式对象中(${})提供对基于 web 的山下文属性 (简而言之就是 request, session, application) 的访问。当使用Thymeleaf在基于 web 容器 API(例如 servlet API) 的 web 应用程序中生成 HTML 时,就需要使用IWebContext的实现。同时WebContext的构造必须有IWebExchange类型的参数。 -
-
渲染模板
TemplateEngine中有多个重载的TemplateEngine#process方法满足渲染模板的需求,这个我们在前面的接口分析中已经看过了。
-
我们简单看一下 TemplateEngine#initialize 方法,这个方法在 TemplateEngine 中很重要,我们从这里开始了解 TemplateEngine。
TemplateEngine#initialize 初始化模板引擎实例的内部方法。这个方法在第一次执行 process(String, IContext) 或 processThrottled(String, IContext) 之前被调用,以便创建执行模板所需的所有信息。(不仅仅是 process 方法,很多方法的调用都会触发 initialize 方法,比如 getConfiguration)。
如果 TemplateEngine 的子类需要额外的初始化步骤,则应该重写 initializspecific() 方法。
在与 Spring 进行整合的时候,
TemplateEngine的子类SpringTemplateEngine就重写了initializspecific方法,具体请查看《Thymeleaf 整合 SpringBoot.md》的SpringTemplateEngine小节。
// initialized 由 volatile 修饰,跨线程可见
private volatile boolean initialized = false;

// 初始化方法
final void initialize() {
    // 并发环境下的单例实现方式,我们通常可以采用双重检查加锁的方式
    // 这里与之有异曲同工只意
    if (!this.initialized) {
        synchronized (this) {
            if (!this.initialized) {
                // 开始初始化
                logger.debug("[THYMELEAF] INITIALIZING TEMPLATE ENGINE");

                // First of all, give subclasses the opportunity to modify the base configuration
                // 钩子,由子类实现
                initializeSpecific();

                // We need at least one template resolver at this point - we set the StringTemplateResolver as default
                if (this.templateResolvers.isEmpty()) {
                    // 如果模板解析器为空,则添加默认的模板解析器,即 StringTemplateResolver
                    this.templateResolvers.add(new StringTemplateResolver());
                }

                // Build the EngineConfiguration object
                // 构造 EngineConfiguration 对象,并初始化
                this.configuration =
                        new EngineConfiguration(
                                this.templateResolvers, this.messageResolvers, this.linkBuilders,
                                this.dialectConfigurations, this.cacheManager, this.engineContextFactory,
                                this.decoupledTemplateLogicResolver);
                // 初始化后,任何对 configuration 的修改都是禁止的
                ((EngineConfiguration)this.configuration).initialize();

                // 初始化完毕
                this.initialized = true;

                // Log configuration details
                ConfigurationPrinterHelper.printConfiguration(this.configuration);

                logger.debug("[THYMELEAF] TEMPLATE ENGINE INITIALIZED");

            }
        }
    }
}
处理模板
我们来看看在 Web 例子中,在 Controller 中式如何渲染模板的
public void process(final IWebExchange webExchange, final ITemplateEngine templateEngine, final Writer writer)
        throws Exception {

    // 构造web场景的上下文
    WebContext ctx = new WebContext(webExchange, webExchange.getLocale());
    ctx.setVariable("today", Calendar.getInstance());

    // 调用TemplateEngine的process方法,将模板渲染结果写入到 writer 中
    templateEngine.process("home", ctx, writer);

}
具体的分析我们在 模板引擎 Template Engine 小节中已经学习过了,这里我们就不多说了。
基本语法
HTML
首先,任何一个 HTML 模板都是可以直接用浏览器打开的,因为我们在 HTML 模板中主要是通过编写标签属性的方式来实现标记,而不是增加新的浏览器不懂的标签,所以即使不通过模板引擎渲染,模板依然可以正常显示。
浏览器会忽略所有它们不理解的标签属性,比如
th:text,而不会报错
但是你可能也注意到这个我们的 HTML 模板并不是一个真正符合规范的的 HTML5 文档,因为我们用的这些 th:* 格式的非标准属性是 HTML5 规范不允许的。那如何符合 HTML5 规范呢?切换到 thymleaf 的 data attribute 语法,使用 data- 前缀作为属性名,使用连字符 (-) 分隔符代替分号 (:)。
例如
<p th:text="#{home.welcome}">Welcome to our grocery store!</p>
替换成
<p data-th-text="#{home.welcome}">Welcome to our grocery store!</p>
外置消息,提前学习一下如何在 SpringBoot 中配置消息解析器。
具体请看《Spring-MessageSource 相关解析.md》
TODO
配置好了。
从第四章开始就是重点了。
官方文档:Tutorial: Using Thymeleaf
实践
SpringBoot 自己用 Java 写一个纯 JavaSE 的渲染程序,简单来说就是获取模板,渲染,然后输出文件到桌面。
通过 systemproperties 获取桌面地址。
System.getProperty("user.home")
要是能支持 Java 的文件的渲染就好了。