第二篇:控制器方法(handler)映射
第二篇:控制器方法(handler)映射
@RequestMapping 注解
@RequestMapping 基础概念
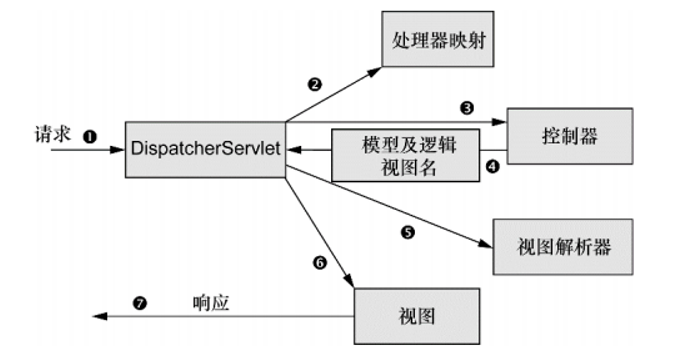
@RequestMapping 注解的作用是将请求和处理请求的控制器方法关联起来,建立映射关系。即下图中的第②步
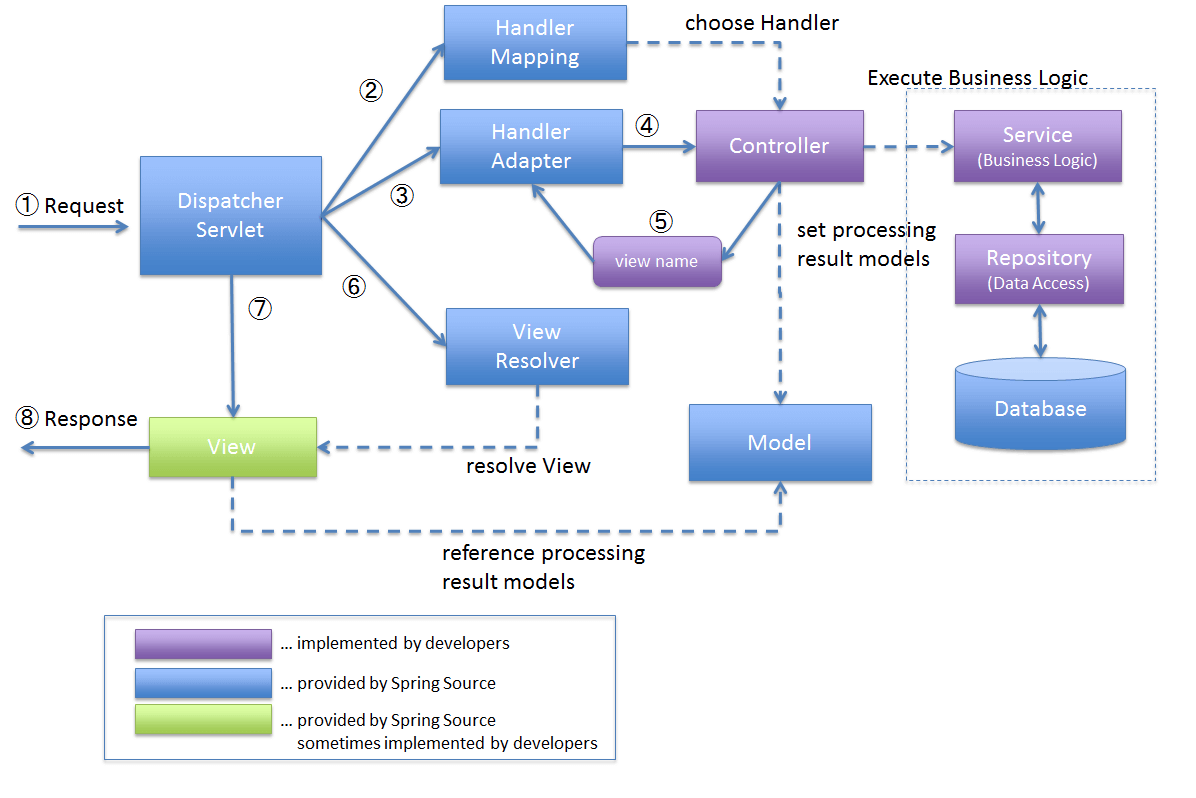
详细版
@RequestMapping 基本属性
value 属性
@RequestMapping 注解的 value 属性可以通过请求的 URL 匹配请求,value 值为 / 表示的是当前工程的上下文路径,比如当前项目的上下文路径是 localhost:8080/SpringMVC-requestmapping/ ,那么 @RequestMapping 中 value 值为 / 的时候匹配的路径,就是 localhost:8080/SpringMVC-requestmapping/,这个路径的 localhost:8080 很好理解,就是 ip+ 端口,那 SpringMVC-requestmapping 是什么呢?这是 web 应用的名称,在 tomcat 中,应用的名称默认就是 war 包的名称,那这个项目打出的 war 包的名称是在哪里确定的呢?答案是,在 maven 的 pom 文件中配置的,就是 <name> 标签的内容,也是 <artifactId> 标签的内容。
注意,全局范围内,两个控制器方法不可以处理相同的请求 URL。不然就会报错 Ambiguous mapping
如果两个方法的
@RequestMapping完全相同,那肯定是不行的,但是,如果只是 value 属性相同,其他配置不同,SpringMVC 还是可以正常处理的,更准确的原则应该是,不应该同时出现两个@RequestMapping的配置跟一个具体的请求匹配,不然就会报错Ambiguous mapping
@RequestMapping 可同时使用在类声明上和方法声明上,一个控制器方法的访问路径是其所在类的 @RequestMapping 注解中配置的路径加上控制器方法上 @RequestMapping 的路径,类上的 @RequestMapping 注解的 values 属性,通常用于进行模块的区分,常规做法是不同的模块的控制器方法放到不同的 Controller 类中,在这些 Controller 上使用带有不同 value 值的 @RequestMapping 注解。
同时 @RequestMapping 的 value 属性为数组,即,可以处理多个请求路径,非常方便。
控制器:
@Controller
@RequestMapping("/testvalue")
public class TestValueController {

    @RequestMapping(value = {"/arequest", "/brequest"})
    public String testequest() {
        return "success";
    }

}
请求链接:
<a th:href="@{/testvalue/arequest}">A 请求</a>
<br/><br/>
<a th:href="@{/testvalue/brequest}">B 请求</a>
在 URL 中添加版本参数,并任意切换
在实际上生产中,我们往往需要同时包含多个版本的请求处理逻辑,用户通过在 URL 中指定不同的版本参数来访问不同的版本的实现,我们可以通过获取 URL 的路径并转化为参数来判断到底要提供那个版本的 API,这个实现很简单,参考后文的 使用路径中的占位符来获取路径作为参数,这里我们想要实现的是服务端控制器动态地绑定不同版本的 URL 请求。
参考 Spring5 框架中 @PropertySoure 部分提到了在注解中使用外部属性的做法,
在 springMVC.xml 中引入外部属性:extra.properties
<context:property-placeholder location="classpath:extra.properties"/>
extra.properties 的内容:
apiVersion=1.0
编写控制器:
@Controller
@RequestMapping("/testvalue/${apiVersion}")
public class TestValueVersionController {

    @Value("${apiVersion}")
    String apiVersion;

    @RequestMapping(value = {"/arequest", "/brequest"})
    public String testequest() {
        System.out.println(apiVersion);
        return "success";
    }


}
请求链接:
<a th:href="@{/testvalue/1.0/brequest}">请求带版本参数</a>
当服务端想提供第二个版本的控制器的时候,修改 extra.properties 的 apiVersion 值,然后重启 SpringMVC 容器即可
values 属性支持通配符
-
?:表示任意的单个字符 -
*:表示任意的 0 个或多个字符 -
/**:表示任意的 0 层或多层目录,**的前面必须是/,注意,/path**path/中,中间的两个*是两个单独的*,可以匹配 0 个多个字符,但是不能匹配多级路径。
这三种通配符都可以作为路径的结尾。
其实这个规则,主要是由
AntPathMatcher决定的,AntPathMatcher是PathMatcher的唯一实现类,用于将请求路径中的用于进行 handler 映射的片段跟 handler 声明的映射路径进行匹配,当 handler 为HandlerMethod类型,也就是控制器方法的时候,handler 声明的映射路径就是控制器方法的@RequestMapping 的 value 属性具体请看《SpringMVC- 第十篇:基于注解配置 SpringMVC》的
pathMatcher 和 defaultPathMatcher小节
控制器示例:
@RequestMapping(value = {"/testAnt/api?"})
public String testAntOneWord() {
    return "success";
}

@RequestMapping(value = {"/testAnt/user*"})
public String testAntMultipleWords() {
    return "success";
}

@RequestMapping(value = {"/testAnt/path/**"})
public String testAntMultiplePath() {
    return "success";
}
请求:
<a th:href="@{/testvalue/testAnt/api8}">测试value属性?匹配单个字符</a>
<br/><br/>
<a th:href="@{/testvalue/testAnt/user12}">测试value属性*匹配单个字符</a>
<br/><br/>
<a th:href="@{/testvalue/testAnt/path/aaa/bbb}">测试value属性**匹配多层路径</a>
使用路径中的占位符来获取路径作为参数 - @PathVariable
{} 表示一层路径的占位符,既然是占位符,那么这里就必须有一层路径,不能省略。
主要用于 rest 风格的 API,rest 习惯用路径 URL 表示我们当前访问的资源和需要参数,即,要访问的资源和携带的参数,都放到路径里面,用 / 分开。然后在控制器方法中声明一个 @PathVariable 类型的参数即可。
如果控制器方法的
@PathVariable修饰的参数的类型是Map<String, String>,那么这个参数将被所有路径变量名和路径变量值填充。如果路径变量为多个用
,分割的变量,比如get/{allName},实际的路径为get/bob,alice,jack,我们可以再控制器方法中用@PathVariable("allName") List<String> allName接收,这应该是通过 Spring 的默认的类型转换器实现的。
控制器:
@RequestMapping(value = {"/testPathVariable/{username}/{userpassword}"})
public String PathVariable(@PathVariable("username")String username, @PathVariable("userpassword")String userpassword, @PathVariable Map<String, String> allPathVariable) {
    System.out.println(allPathVariable.toString());
    System.out.println("username:"+username+" password:"+userpassword);
    return "success";
}
前端请求:
<a th:href="@{/testvalue/testPathVariable/bob/12346}">测试value属性路径参数匹配</a>
注意,这个跟前面的在 value 属性中使用外部属性 ${property} 是不一样的,要注意区分。
查看 SpringMVC 项目中所有的控制器和其处理的请求路径
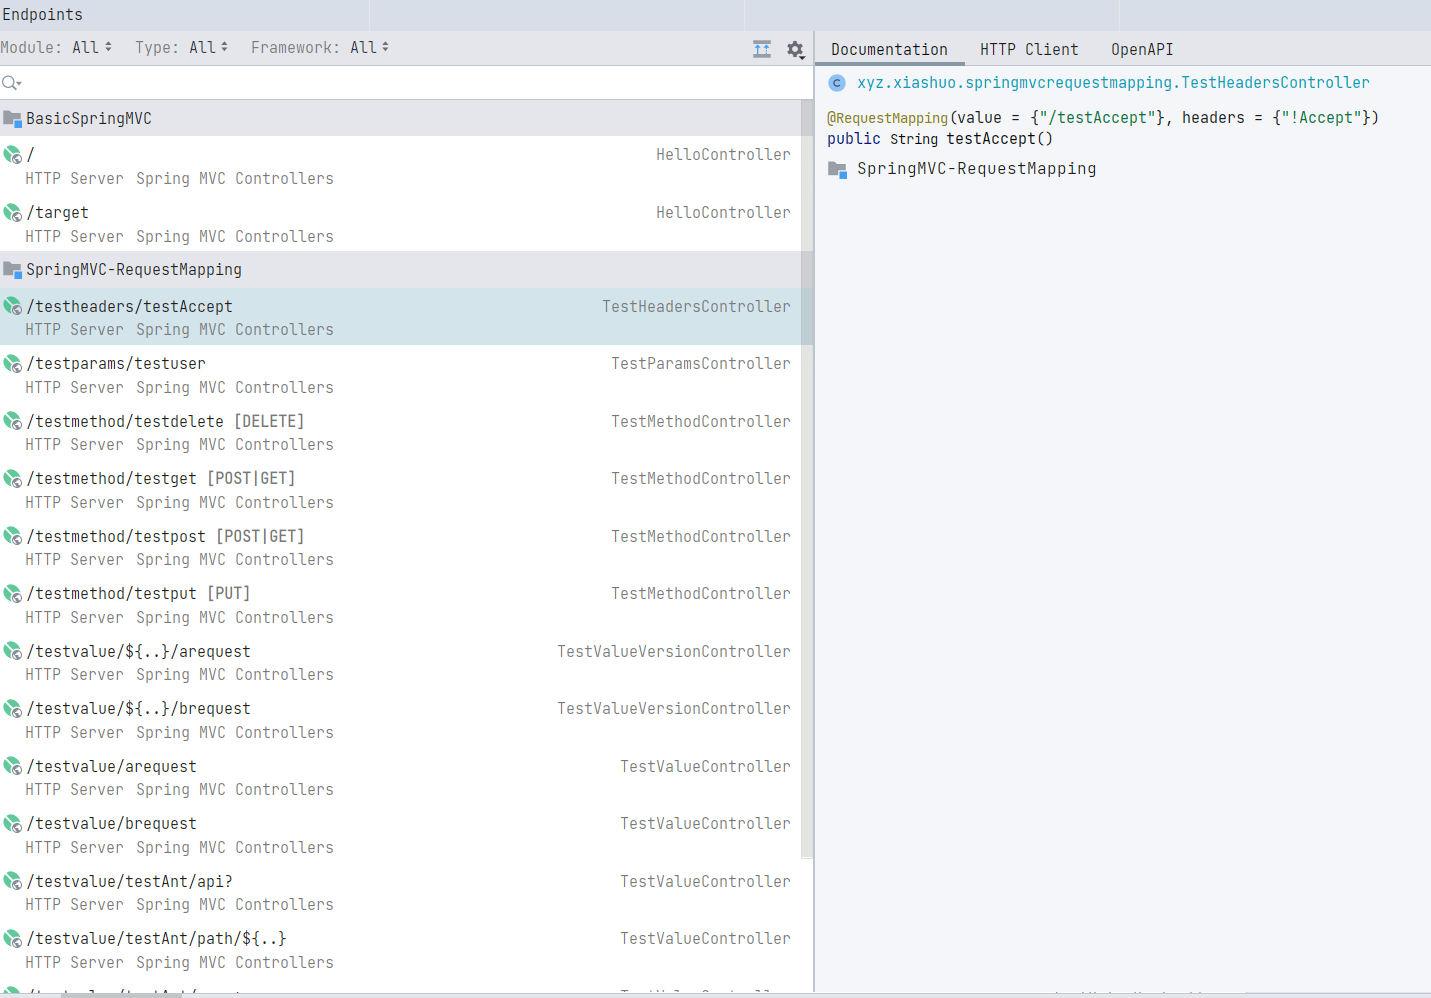
在 IDEA 的 Endpoints tool window 中可以看到 SpringMVC 中所有的控制器监听的路径以及他们对应的处理器。注意,这个路径是解析过的,比如控制器所在类上有 @RequestMapping 注解,控制器本身也有 @RequestMapping 注解,那么这个控制器最终的映射的请求路径实际上就不怎么好查询,但是在 Endpoints 中,就把路径完整地显示出来了,方便查看和查找
method 属性
对应 HTTP 协议中的请求方法,其值是一个 RequestMethod 类型的数组,表示可以匹配多种请求方法,注意,value 属性也是一个数组。
如果不设置 method 属性,意思就是不以 method 属性为条件过滤请求,即任意请求方法的指定 URL 都由该控制器处理。
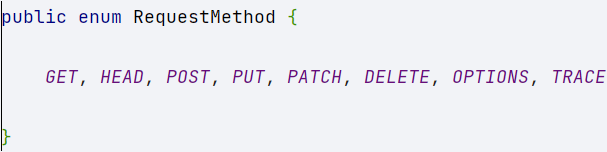
RequestMethod 是一个枚举,对应常用的 HTTP 请求方法
控制器
@Controller
@RequestMapping("/testmethod")
public class TestMethodController {

    @RequestMapping(value = {"/testget","/testpost"},method = {RequestMethod.POST,RequestMethod.GET})
    public String testequest() {
        return "success";
    }

}
前端请求
<a th:href="@{/testmethod/testget}">get请求</a>
<br/><br/>
<form th:action="@{/testmethod/testpost}" method="post">
    <input type="submit" value="post请求">
</form>
发送 put 和 delete 请求
在前端中无法简单创造使用这种请求方法的 HTTP 的请求,不过可以通过 ApiPost 实现。
添加控制器:
@RequestMapping(value = {"/testdelete"},method = {RequestMethod.DELETE})
public String testdelete() {
    return "success";
}

@RequestMapping(value = {"/testput"},method = {RequestMethod.PUT})
public String testput() {
    return "success";
}
发起 put 请求:
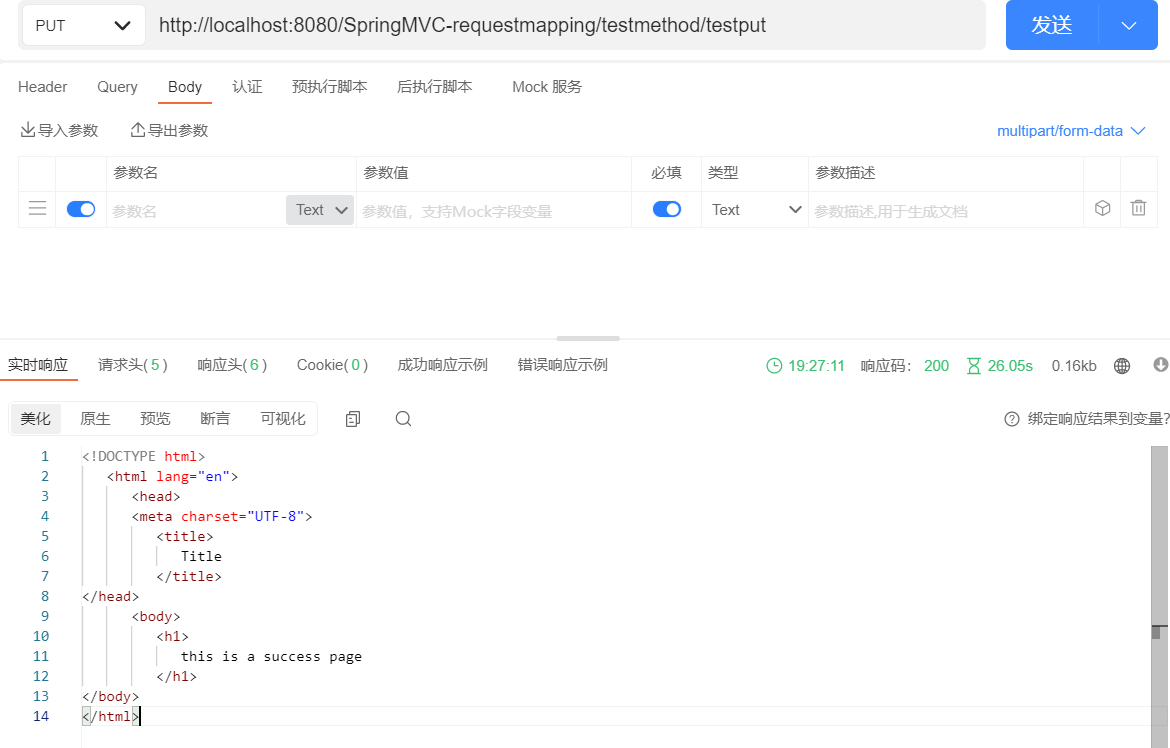
在 put 方法中的断点成功触发。

delete 请求方法也同理。
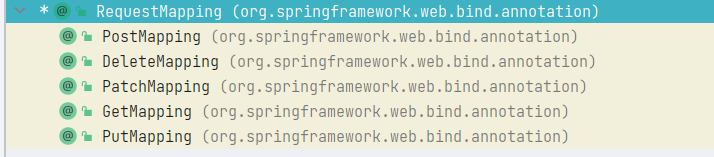
子注解
对于处理指定 HTTP 请求方法的控制器,SpringMVC 中提供了@RequestMapping 的子注解
其中
-
处理 get 请求的映射 -->@GetMapping
-
处理 post 请求的映射 -->@PostMapping
-
处理 put 请求的映射 -->@PutMapping
-
处理 delete 请求的映射 -->@DeleteMapping
其实这些注解就是特定请求方法的 @RequestMapping 的一个快捷方式,以 @PostMapping 为例,就是 @RequestMapping(method = RequestMethod.POST) 的简写。

params 属性
@RequestMapping 注解的 params 属性是一个字符串类型的数组,跟前面 value 属性和 method 属性一样,但是请求必须满足 params 属性中所有的字符串表示的条件,才会映射到当前请求方法,即value 属性和 method 属性的多条件是或的关系,而 params 的属性的多条件,是与的关系。属性与属性之前,也是与的关系,是需要同时满足的。
不管是什么 GET 请求还是 POST 请求(不同的请求方法,参数存放的位置不一样),都可以获取请求参数,并放到统一的地方,也就是说参数的获取与 HTTP 请求方法无关,这就是框架带来的好处。
PS:@RequestMapping 的属性除了 name 基本上都是数组
params 的字符串条件表达式:
-
"param":要求请求映射所匹配的请求必须携带 param 请求参数
-
"!param":要求请求映射所匹配的请求必须不能携带 param 请求参数
-
"param!=value":要求请求映射所匹配的请求必须携带 param 请求参数但是 param!=value
-
"param=value":要求请求映射所匹配的请求必须携带 param 请求参数且 param=value
这个属性可以用来做什么呢,可以用来做基本的参数校验,对于一些非常重要的基础参数,如果没有,那就连访问都不让他访问,直接报 4xx。
控制器
@Controller
@RequestMapping("/testparams")
public class TestParamsController {

    @RequestMapping(value = {"/testuser"},params = {"name", "!value","age!=18","gender=male"})
    public String testuser() {
        return "success";
    }

}
前端请求:
<a th:href="@{/testparams/testuser(name='aaa',value='worker',age=20,gender='male')}">get请求的params测试</a>
<br/><br/>
<form th:action="@{/testmethod/testpost}" method="post">
    <input type="hidden" name="name" value="bbb"/>
    <input type="hidden" name="value" value="employee"/>
    <input type="hidden" name="age" value="20"/>
    <input type="hidden" name="gender" value="male"/>
    <input type="submit" value="post请求的params测试">
</form>
headers 属性
跟 params 基本相同,值为字符串数组,请求必须满足所有字符串表达式的条件,才能通过匹配,匹配规则如下:
-
"header":要求请求映射所匹配的请求必须携带 header 请求头信息
-
"!header":要求请求映射所匹配的请求必须不能携带 header 请求头信息
-
"header=value":要求请求映射所匹配的请求必须携带 header 请求头信息且 header=value
-
"header!=value":要求请求映射所匹配的请求必须携带 header 请求头信息且 header!=value
使用 headers 进行处理器匹配确实用的少,很少有直接在控制器代码上对 http 请求头进行控制的。
我们先简单看一下 HTTP 请求中的 Header:

然后,我们挑 Accept 进行匹配控制
@Controller
@RequestMapping("/testheaders")
public class TestHeadersController {

    @RequestMapping(value = {"/testAccept"},headers = {"!Accept"})
    //@RequestMapping(value = {"/testAccept"},headers = {"Connection=keep-alive"})
    public String testAccept() {
        return "success";
    }

}
前端请求:
<a th:href="@{/testheaders/testAccept}">get请求的headers测试</a>
consumes
根据媒体类型匹配控制器方法。由一种或多种媒体类型组成,其中至少有一种媒体类型必须与请求的消息头的 Content-Type 字段匹配
媒体类型就是请求的消息体的格式,对应请求消息头的
Content-Type字段,对应的 Java 枚举为 MediaTypeContent-Type 的值还可以指定编码类型,比如
text/html;charset=UTF-8,指定的编码类型为UTF-8,此时request.getCharacterEncoding()返回的就是UTF-8,
媒体类型表达式可以使用 "!" 操作符来求反,如 "!"text/plain”,它匹配除“text/plain”以外的所有内容类型的请求。
@RequestMapping(value = "/testNotJSON", consumes = "!application/json")
此配置可以在类级别和方法级使用,如果在两个级别都指定,则方法级别的配置将覆盖类型级别的配置。
实践
控制器
@Controller
@RequestMapping("/testConsumes")
public class TestConsumesController {

    @RequestMapping(value = "/testForm", consumes = MediaType.APPLICATION_FORM_URLENCODED_VALUE)
    public String testForm(Model model) {
        model.addAttribute("enterHandler", "true");
        return "success";
    }

    @RequestMapping(value = "/testJSON", consumes = MediaType.APPLICATION_JSON_VALUE)
    public String testJSON(Model model) {
        model.addAttribute("enterHandler", "true");
        return "success";
    }

    @RequestMapping(value = "/testNotJSON", consumes = "!application/json")
    public String testNotJSON(Model model) {
        model.addAttribute("enterHandler", "true");
        return "success";
    }

    @RequestMapping(value = "/testFormJSON", consumes = {MediaType.APPLICATION_FORM_URLENCODED_VALUE, MediaType.APPLICATION_JSON_VALUE})
    public String testFormJSON(Model model) {
        model.addAttribute("enterHandler", "true");
        return "success";
    }

}
测试类
@SpringJUnitWebConfig(locations = "classpath:springMVC.xml")
class TestConsumesControllerTest {
    MockMvc mockMvc;

    @BeforeEach
    void setup(WebApplicationContext wac) {
        this.mockMvc = MockMvcBuilders.webAppContextSetup(wac).build();
    }

    @Test
    void testForm() throws Exception {
        // 未指定 请求的 contentType ,无法访问对应的控制器
        //mockMvc.perform(get("/testConsumes/testForm")).andDo(print());
        mockMvc.perform(get("/testConsumes/testForm").contentType(MediaType.APPLICATION_FORM_URLENCODED)).andExpect(model().attribute("enterHandler", "true")).andDo(print());
    }

    @Test
    void testJSON() throws Exception {
        mockMvc.perform(get("/testConsumes/testJSON").contentType(MediaType.APPLICATION_JSON_VALUE)).andExpect(model().attribute("enterHandler", "true")).andDo(print());
    }

    @Test
    void testNotJSON1() throws Exception {
        mockMvc.perform(get("/testConsumes/testNotJSON").contentType(MediaType.APPLICATION_FORM_URLENCODED)).andExpect(model().attribute("enterHandler", "true")).andDo(print());
    }

    @Test
    void testNotJSON2() throws Exception {
        mockMvc.perform(get("/testConsumes/testNotJSON").contentType(MediaType.APPLICATION_JSON_VALUE)).andExpect(model().attribute("enterHandler", "true")).andDo(print());
    }

    @Test
    void testFormJSON() throws Exception {
        mockMvc.perform(get("/testConsumes/testFormJSON").contentType(MediaType.APPLICATION_JSON_VALUE)).andExpect(model().attribute("enterHandler", "true")).andDo(print());
        mockMvc.perform(get("/testConsumes/testFormJSON").contentType(MediaType.APPLICATION_FORM_URLENCODED)).andExpect(model().attribute("enterHandler", "true")).andDo(print());
    }

}
测试结果为

分析
-
testForm 方法的 contentType 匹配
/testConsumes/testForm的控制器方法的@RequestMapping的 consumes 配置,所以可以正常进入并返回 -
testJSON 方法的 contentType 匹配
/testConsumes/testJSON的控制器方法的@RequestMapping的 consumes 配置,所以可以正常进入并返回 -
testNotJSON1 方法的 contentType 为
MediaType.APPLICATION_FORM_URLENCODED,/testConsumes/testNotJSON的控制器方法的@RequestMapping的 consumes 配置为!application/json,可以匹配,所以可以正常进入并返回 -
testNotJSON2 方法的 contentType 为
MediaType.APPLICATION_JSON_VALUE,/testConsumes/testNotJSON的控制器方法的@RequestMapping的 consumes 配置为!application/json,正好不能匹配,所以无法正常进入,测试方法报错 -
testFormJSON 方法中发起了两个请求,一个的 contentType 为
MediaType.APPLICATION_FORM_URLENCODED,一个为MediaType.APPLICATION_JSON_VALUE,/testConsumes/testFormJSON的控制器方法的@RequestMapping的 consumes 配置为数组,这两个 contentType 都在里面,所以这两个请求都可以正常进入控制器方法并返回。
同一个请求路径,根据不同的 consumer,映射到不同的控制器方法进行处理
添加控制器方法
//    同一个映射请求,不同的consumes,进行区分
@RequestMapping(value = "/test", consumes = MediaType.APPLICATION_FORM_URLENCODED_VALUE)
public String testFrom(Model model) {
    model.addAttribute("functionFlag", "form");
    return "success";
}

@RequestMapping(value = "/test", consumes = MediaType.APPLICATION_JSON_VALUE)
public String testJson(Model model) {
    model.addAttribute("functionFlag", "json");
    return "success";
}
测试方法
@Test
void testFrom() throws Exception {
    mockMvc.perform(get("/testConsumes/test").contentType(MediaType.APPLICATION_FORM_URLENCODED)).andExpect(model().attribute("functionFlag", "form")).andDo(print());
}

@Test
void testJson() throws Exception {
    mockMvc.perform(get("/testConsumes/test").contentType(MediaType.APPLICATION_JSON_VALUE)).andExpect(model().attribute("functionFlag", "json")).andDo(print());

}
测试结果
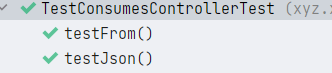
分析
这两个方法带着不同的 contenttype 进入了不同的控制器方法,contentType(MediaType.APPLICATION_FORM_URLENCODED) 的请求进入了 testFrom 方法,在 Model 中设置了属性 functionFlag 为 form;contentType(MediaType.APPLICATION_JSON_VALUE) 的请求进入了 testJson 方法,在 Model 中设置了属性 functionFlag 为 json;
produces
根据控制器方法生成的响应的消息体的媒体类型匹配控制器方法。由一种或多种媒体类型组成,produces 指定的媒体类型会和请求的消息头的 Accept 字段中记录的媒体类型进行对比(简单来说就是取交集),或者称为内容协商(content negotiation),至少要有一个能通过协商,否则就无法与请求匹配。
媒体类型就是请求的消息体的格式,对应响应消息头的
Content-Type字段,对应的 Java 枚举为 MediaType
在深入学习请求的处理器中的内容协商之后,可以得知,指定
Accept消息头的效果,其实等同于指定 URL 后缀或者请求参数format。这些配置都可以跟 produces 进行匹配,默认的配置优先级是 URL 后缀 》请求参数format》Accept消息头
produces 的例子:
produces = "text/plain"
produces = {"text/plain", "application/*"}
produces = MediaType.TEXT_PLAIN_VALUE
produces = "text/plain;charset=UTF-8"
注意:如果声明的媒体类型包含参数 (例如:"text/plain;charset=UTF-8","type=feed","type=entry"),同时来自请求的中的媒体类型也有该参数,那么参数值必须匹配。否则,如果来自请求的媒体类型不包含该参数,则假定客户端接受任何值。即永远匹配。
媒体类型表达式可以使用 "!" 操作符来求反,如 "!"text/plain”,它匹配除“text/plain”之外的所有请求。
此配置可以在类级别和方法级使用,如果在两个级别都指定,则方法级别的配置将覆盖类型级别的配置。
实践
控制器
@Controller
@RequestMapping("/testProduces")
public class TestProducesController {

    @RequestMapping(value = "/testHTML", produces = MediaType.TEXT_HTML_VALUE)
    public String testHTML(Model model) {
        model.addAttribute("responseContentType", "html");
        return "success";
    }

    @ResponseBody
    @RequestMapping(value = "/testJSON", produces = MediaType.APPLICATION_JSON_VALUE)
    public List<String> testJSON(Model model) {
        model.addAttribute("responseContentType", "json");
        List<String> result = new ArrayList<String>();
        result.add("xiashuo");
        result.add("xyz");
        result.add("666");
        return result;
    }

}
测试类
@SpringJUnitWebConfig(locations = "classpath:springMVC.xml")
class TestProducesControllerTest {

    MockMvc mockMvc;

    @BeforeEach
    void setup(WebApplicationContext wac) {
        this.mockMvc = MockMvcBuilders.webAppContextSetup(wac).build();
    }

    @Test
    void testHTML() throws Exception {
        mockMvc.perform(get("/testProduces/testHTML").accept(MediaType.TEXT_HTML_VALUE)).andExpect(model().attribute("responseContentType", "html")).andDo(print());
    }

    @Test
    void testJSON() throws Exception {
        // 返回JSON类型的请求,是没有ModelAndView,只有返回视图进行视图解析的时候,才会有ModelAndView
        mockMvc.perform(get("/testProduces/testJSON").accept(MediaType.APPLICATION_JSON_VALUE)).andDo(print());
    }

}
测试结果为:

分析
-
testHTML 方法 accept 指定的 MediaType 匹配
/testProduces/testHTML的控制器方法的@RequestMapping的 consumes 配置,所以可以正常进入并返回 -
testJSON 方法 accept 指定的 MediaType 匹配
/testProduces/testJSON的控制器方法的@RequestMapping的 produces 配置,所以可以正常进入并返回
内容协商
看《SpringMVC-ContentNegotiation 内容协商》中关于请求映射过程中的内容协商
在深入学习请求的处理器中的内容协商之后,可以得知,指定 Accept 消息头的效果,其实等同于指定 URL 后缀或者请求参数 format。这些配置都可以跟 produces 进行匹配,
一个内容协商的简单例子
首先开启请求参数的内容协商策略,在 SpringMVC.xml 中添加
<mvc:annotation-driven content-negotiation-manager="contentNegotiationManager"/>
<bean id="contentNegotiationManager"
      class="org.springframework.web.accept.ContentNegotiationManagerFactoryBean">
<!--        <property name="favorPathExtension" value="false" />-->
    <property name="favorParameter" value="true"/>
<!--        <property name="parameterName" value="mediaType"/>-->
<!--        <property name="ignoreAcceptHeader" value="true" />-->
<!--        <property name="defaultContentType" value="application/json" />-->
<!--        <property name="useJaf" value="false" />-->

    <property name="mediaTypes">
        <map>
            <entry key="json" value="application/json" />
            <entry key="xml" value="application/xml" />
        </map>
    </property>
</bean>
控制器
@RequestMapping(value = "/user",produces = MediaType.APPLICATION_JSON_VALUE)
@ResponseBody
public User getUserWithProducesForJSON() {
    User user = new User("xiashuo", "female", "[email protected]", 20);
    return user;
}
测试类
@Test
@SneakyThrows
void getUserWithProducesForJSONTakeOtherParameter() throws Exception {
    //mockMvc.perform(get("/ContentNegotiation/user").accept(MediaType.APPLICATION_JSON_VALUE)).andExpect(content().contentType(MediaType.APPLICATION_JSON_VALUE)).andDo(print());
    mockMvc.perform(get("/ContentNegotiation/user").queryParam("format","json")).andExpect(content().contentType(MediaType.APPLICATION_JSON_VALUE)).andDo(print());
}
日志
MockHttpServletRequest:
      HTTP Method = GET
      Request URI = /ContentNegotiation/user
       Parameters = {format=[json]}
          Headers = []
             Body = <no character encoding set>
    Session Attrs = {}

Handler:
             Type = xyz.xiashuo.springmvccontentnegotiation.controller.ContentNegotiationController
           Method = xyz.xiashuo.springmvccontentnegotiation.controller.ContentNegotiationController#getUserWithProducesForJSON()

Async:
    Async started = false
     Async result = null

Resolved Exception:
             Type = null

ModelAndView:
        View name = null
             View = null
            Model = null

FlashMap:
       Attributes = null

MockHttpServletResponse:
           Status = 200
    Error message = null
          Headers = [Content-Type:"application/json"]
     Content type = application/json
             Body = {"name":"xiashuo","gender":"female","email":"[email protected]","age":20}
    Forwarded URL = null
   Redirected URL = null
          Cookies = []
不仅可以正常匹配 produces 属性,还可以正常输出 json 格式的消息体的响应
异常处理单独返回特定类型的响应
配置第一个 StringHttpMessageConverter,这个 MessageConverter 的第一个 supportedMediaTypes,会作为在客户端没有指定响应中需要的 MediaType 时(例如 Accept="*/*" 的时候),服务器响应的消息体的默认 MediaType。,这里指定为 JSON 格式
<mvc:annotation-driven>
    <mvc:message-converters>
        <!-- 处理响应中文内容乱码 -->
        <bean class="org.springframework.http.converter.StringHttpMessageConverter">
            <property name="defaultCharset" value="UTF-8"/>
            <property name="supportedMediaTypes">
                <list>
                    <value>application/json</value>
                    <value>text/html</value>
                </list>
            </property>
        </bean>
    </mvc:message-converters>
</mvc:annotation-driven>
控制器方法
@RequestMapping(value = "/testHTMAndExceptions")
public String testHTMAndExceptions(Model model) {
    System.out.println(1 / 0);
    return "success";
}
添加全局异常监听程序
@ControllerAdvice
public class ExceptionController {

    @ResponseBody
    @ExceptionHandler(ArithmeticException.class)
    public String handleMethodArgumentNotValid(ArithmeticException ex) {
        return "return from exception handler ";


}
测试类
/**
 * 不报错的时候,响应的消息头 Content-Language:"en", Content-Type:"text/html;charset=UTF-8"
 * 报错的时候,响应的消息头 Content-Type:"application/json", Content-Length:"30"
 * @return
 */
@Test
void testHTMAndExceptions() throws Exception {
    // 返回JSON类型的请求,是没有ModelAndView,只有返回视图进行视图解析的时候,才会有ModelAndView
    mockMvc.perform(get("/testProduces/testHTMAndExceptions")).andExpect(status().isOk()).andDo(print());
}
结果
-
不报错的时候,响应的消息头 Content-Language:"en", Content-Type:"text/html;charset=UTF-8"
-
报错的时候,响应的消息头 Content-Type:"application/json", Content-Length:"30"
@RequestMapping 注解总结(重点)
@RequestMapping 的属性除了 name 基本上都是数组,有的属性中,数组中的表达式必须全部满足,才能通过匹配,有的注解中,是只要通过一个,就可以匹配,比如value 属性和 method 属性的多条件是或的关系,而 params 的属性的多条件,是与的关系。而属性与属性之前,也是与的关系,是需要同时满足的。当然不指定属性,就表示不考虑这个属性代表的过滤条件。
@RequestMapping 注解,可同时使用在类级别和方法级别,当同时存在的时候,方法级别的 @RequestMapping 的所有的属性值都会继承类其所在类的类级别 @RequestMapping 的对应属性值,注意是所有属性。
请求处理映射中的内容协商
查看《SpringMVC-ContentNegotiation 内容协商》
处理静态资源的请求
默认请求处理器
使用 xml 配置的时候,添加 <mvc:default-servlet-handler/>,对应在使用纯 Java 进行配置的时候,配置 DefaultServletHandlerConfigurer。
<!-- 处理静态资源,例如html、js、css、jpg 若只设置该标签,则只能访问静态资源,其他请求则无法访问 此时必须设置<mvc:annotation-driven/>解决问题 -->
<mvc:default-servlet-handler/>

<!-- 开启mvc注解驱动 -->
<mvc:annotation-driven>
    <mvc:message-converters>
        <!-- 处理响应中文内容乱码 -->
        <bean class="org.springframework.http.converter.StringHttpMessageConverter">
            <property name="defaultCharset" value="UTF-8"/>
            <property name="supportedMediaTypes">
                <list>
                    <value>application/json</value>
                    <value>text/html</value>
                </list>
            </property>
        </bean>
    </mvc:message-converters>
</mvc:annotation-driven>
这个注解配置的其实是配置了一个 handler:DefaultServletHttpRequestHandler。这个 HttpRequestHandler 的作用跟控制器方法是一样的,作用是处理请求,不过其作用是专门用来处理静态的请求,这个 handler 的具体作用是将请求转发到 Servlet 容器(一般是 Tomcat)的 "default" 的 Servlet:org.apache.catalina.servlets.DefaultServlet,用于服务静态资源的请求处理。
这个
HttpRequestHandler具体是怎么跟静态资源的 http 请求对应上(建立映射)的,其实是因为注册了了一个SimpleUrlHandlerMapping,具体细节,请查看《SpringMVC- 第九篇:基于 XML 配置 SpringMVC》中的DefaultServletHandlerBeanDefinitionParser
为什么这么干,这是因为 Spring MVC DispatcherServlet 被映射到 / 的时候,而 Servlet 容器对静态资源的处理使用的 DefaultServlet 也是映射到 /,这样,对 DefaultServlet 的映射就被覆盖了,所以需要在 Spring MVC 中,建立一个映射,将静态资源的处理引向 DefaultServlet,这个映射,就是 DefaultServletHttpRequestHandler。
由于 DefaultServletHttpRequestHandler 以最低优先级配置,因此它实际上允许所有其他处理程序映射处理请求,如果没有一个 Handler 这样做,这个 Handler 可以将请求转发给 "default" 的 ServletDefaultServlet。
结合《Servlet3.1-Specification》中的
Tomcat的web.xml和应用中的web.xml的关系
静态资源映射
官方文档:
<mvc:resources> 标签的作用,其实是配置一个类型为 ResourceHttpRequestHandler 的 bean,这个 HttpRequestHandler 的作用跟控制器方法是一样的,作用是处理请求,不过其作用是专门用来处理静态资源的请求的。
这个
HttpRequestHandler具体是怎么跟资源的 http 请求对应上(建立映射)的,其实是因为注册了了一个SimpleUrlHandlerMapping,具体细节,请查看《SpringMVC- 第九篇:基于 XML 配置 SpringMVC》中的ResourcesBeanDefinitionParser关于
<mvc:resources>等价的 Java 配置,请看《SpringMVC- 第十篇:基于注解配置 SpringMVC》中的addResourceHandlers方法,和《SpringMVC 中的静态资源处理.md》
简单实践
在 SpringMVC 的配置文件中,添加配置,注意 location 中配置的地址必须以 / 结尾。
<!--  cache-period 设置响应的消息头的Cache-Control,单位为s-->
<mvc:resources mapping="/resources/**"
                location="/resources/, classpath:/static/"
                cache-period="10" />
当你修改了
cache-period配置的时候,浏览器需要清空缓存才能生效
前端测试
<a target="_blank" th:href="@{/resources/js/echarts.js}">查看静态资源echarts.js</a>
<br/>
<a target="_blank" th:href="@{/resources/images/aaa.jpg}">查看静态资源aaa.jpg</
其中 <mvc:resources> 的配置中,mapping 配置的匹配请求的 url 的表达式,而 location 中配置匹配的 URL 请求的是静态资源的查找位置,如果有多个,可以用英文逗号 , 分隔开,查找位置既可以指定在项目的 web 资源目录下,即 src\main\webapp 下,也可以指定在编译输出路径下,即 src\main\resources,也可以在操作系统的文件系统中,不过当指定编译输出路径的时候,需要带上 classpath: 的前缀。当一个路径在 web 资源路径和编译输出路径下都能找到的时候,哪个路径配置在前面,就输出那个路径下的资源。cache-period 配置的是此静态资源的缓存时间,对应第一次获取此资源的时候的响应的消息头的 Cache-Control,上文中的配置对应的消息头为 Cache-Control:max-age=10,表示此静态资源在浏览器缓存中的保留时间是 10s,10s 内浏览器访问此资源(新开一个 tab 页,将 URL 复制过来然后回车,不按 F5 或者 Ctrl+F5),不会请求服务器,10s 才会请求服务器。
背景知识:HTTP 缓存
Cache-Control: 在 HTTP 消息头中,用于指示代理和 UA 使用何种缓存策略, 表示了资源是否可以被缓存,以及缓存的有效期。
no-cache 为本次响应不可直接用于后续请求(在没有向服务器进行校验的情况下)
no-store 为禁止缓存(不得存储到非易失性介质,如果有的话尽量移除,用于敏感信息)
private 为仅 UA 可缓存
public 为大家都可以缓存。
当 Cache-Control 为可缓存时,同时可指定缓存时间(比如 public, max-age:86400)。 这意味着在 1 天(60x60x24=86400)时间内,浏览器都可以直接使用该缓存(此时服务器收不到任何请求)。
Last-Modified :表示资源的最后修改时间,如果请求资源的请求的响应的消息头中带有 Last-Modified ,下一次请求此资源的时候就会带上 If-modified-since 的消息头 。与服务器上的资源的最新的修改时间进行比较,如果请求消息头中的时间在资源最新的需改时间之前,则表示浏览器缓存过期,服务器返回最新的资源,如果请求消息头中的时间和资源最新的需改时间相同或者在其之后,则表示浏览器缓存还是最新的,不需要更新,服务器会直接返回 304,意思是没事儿,让浏览器继续用之前的缓存。
这部分代码,在
ResourceHttpRequestHandler#handleRequest方法中写的清清楚楚Cache-Control 和 Last-Modified 一起生效,当对静态资源发起请求的时候,浏览器首先会检查 Cache-Control,看浏览器本地是否有缓存,同时缓存有没有过期,如果缓存没有过期,那么直接使用缓存,这个时候不会发起对服务器的请求,如果 Cache-Control 已经过期,则直接发起对服务器的请求,同时带上 If-modified-since 的消息头 。与服务器上的资源的最新的修改时间进行比较,如果请求消息头中的时间在资源最新的需改时间之前,则表示浏览器缓存过期,服务器返回最新的资源,如果请求消息头中的时间和资源最新的需改时间相同或者在其之后,则表示浏览器缓存还是最新的,不需要更新,服务器会直接返回 304,意思是没事儿,让浏览器继续用之前的缓存。
这里需要注意
当使用 F5 刷新请求资源的 URL 的时候,请求头会带上
Cache-Control: max-age=0
表示浏览器缓存强制过期(强制 Cache-Control 失效),直接发起对服务器的请求,此时 Last-Modified 还是有效的,如果请求消息头中的 If-modified-since 时间和资源最新的需改时间相同或者在其之后,依然会返回 304
当使用 Ctrl+F5 刷新请求资源的 URL 的时候,请求头会带上
Cache-Control: no-cache
表示不使用缓存,此时 Cache-Control 和 Last-Modified 都失效,服务器直接返回服务器中的资源内容。
勾选 Network 下的 Disable cache 也是一样的效果:
其他跟浏览器缓存相关的 HTTP 消息头
Etag : 消息头中代表资源的唯一标识标签,在服务器端生成。如果响应的消息头中带有 Etag ,下一次请求同一个资源的时候在消息头带 Etag ,如果 Etag 没有变化,将收到 304 的响应,从缓存中读取。
Etag 在使用时要注意相同资源多台 Web 服务器的 Etag 的一致性。
Expire 是消息头中代表资源的过期时间,由服务器段设置。如果响应的消息头带有 Expire ,则在 Expire 过期前不会发生 Http 请求,直接从缓存中读取。用户强制 F5 或者 Ctrl+F5 例外。
Last-Modified,Etag,Expires 三个同时使用时。先判断 Expire ,然后发送 Http 请求,服务器先判断 last-modified ,再判断 Etag ,必须都没有过期,才能返回 304 响应。

高级使用
资源处理程序还支持一个 ResourceResolver 实现链和 ResourceTransformer 实现链,您可以使用它们创建一个工具链来使用优化的资源。实际上就是对应 ResourceHttpRequestHandler#resourceResolvers 和 ResourceHttpRequestHandler#resourceTransformers。
VersionResourceResolver 是一个 ResourceResolver 实现,用于实现对带有版本信息的 URL 的解析,这个类中包含了一个 VersionStrategy 列表,VersionStrategy 表示版本信息的生成和解析的策略,其中 ContentVersionStrategy 是其中最常用的策略,表示基于资源内容生成 MD5 哈希值作为版本。
你可以使用 VersionResourceResolver 来实现对带有版本信息的 URL 的解析,版本信息可以是基于从内容计算的 MD5 哈希值,也可以是固定的应用程序版本或其他东西。ContentVersionStrategy (MD5 哈希) 是一个很好的选择,但有一些值得注意的例外,比如与模块加载器(module loader)一起使用的 JavaScript 资源。
然后,您可以使用 ResourceUrlProvider 重写 url,并应用解析器和转换器的完整链,例如,插入版本。MVC 配置提供了一个 ResourceUrlProvider bean,这样它就可以被注入到其他 bean 中。你也可以使用 ResourceUrlEncodingFilter 对 Thymeleaf、jsp、FreeMarker 和其他依赖于 HttpServletResponse#encodeURL 的 URL 标记使重写透明。
具体实现,请看《SpringMVC 中的静态资源处理》
控制器方法(handler)拦截器
HandlerInterceptor
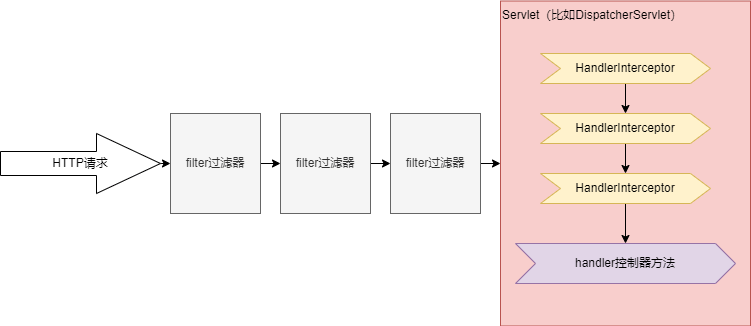
拦截器的作用是,在进入控制器方法(Handler)之前对请求对象和响应对象进行一些预处理,大部分的实现类,都是通过在拦截器中设置请求域属性来实现功能。
SpringMVC 概念中的 Interceptor 和 Handler 的关系有点像原生 Servlet API 中 Filter 和 Servlet 的关系。只不过 filter 过滤后面是 DispatcherServlet,而 Interceptor 则是在 DispatcherServlet 中生效,过滤的后面是对 handler。
SpringMVC 中的拦截器需要实现 HandlerInterceptor 接口,HandlerInterceptor 只有三个方法
-
preHandle:控制器方法前置方法,其 boolean 类型的返回值表示是否拦截或放行,返回 true 为放行,即调用控制器方法;返回 false 表示拦截,即不调用控制器方法
-
postHandle:控制器方法后置方法,在渲染视图之前执行,因此可以在这里对当前的 ModelAndView 添加额外的 Model 属性,即:我们可以把一些统一设置的域对象放到这里。
-
afterCompletion:控制器方法执行完之后执行的方法,在视图渲染之后,不论控制器方法的执行结果怎么样,都会执行(报错了也会执行)。因此可以做一些资源清理工作
HandlerInterceptor 的常见实现类

实现类也不复杂,大多都是有着特定用途的拦截器,比如
-
MappedInterceptor是<mvc:interceptor>对应的实现类,根据具体的路径判断是否需要对控制器方法进行拦截,项目中大量使用的,就是这种 Interceptor. -
ConversionServiceExposingInterceptor,在请求域中添加一个名字为org.springframework.core.convert.ConversionService的属性,类型为DefaultFormattingConversionService,DefaultFormattingConversionService实现了ConversionService接口,这个 Interceptor 默认添加到所有的控制器方法的拦截器列表的头部,是一个很重要的拦截器。

-
LocaleChangeInterceptor用于设置当前控制器方法处理的请求的区域信息 -
ResourceUrlProviderExposingInterceptor,在请求域中添加一个ResourceUrlProvider属性,名字是org.springframework.web.servlet.resource.ResourceUrlProvider -
WebContentInterceptor用于设置 response 中关于缓存的消息头 -
AsyncHandlerInterceptor异步控制器方法拦截器-
WebRequestHandlerInterceptorAdapter -
HandlerInterceptorAdapter
-
大多都很简单,除了 AsyncHandlerInterceptor
ConversionServiceExposingInterceptor
拦截器的初始化流程
这个 Interceptor 默认添加到所有的控制器方法的拦截器列表的头部,可是我们并没有手动添加相关的 Interceptor,这个拦截器是哪里添加的呢?我们来看看拦截器的初始化流程
在 DispatcherServlet 的 doDispatch 方法中,通过 getHandler(processedRequest); 获取 HandlerExecutionChain mappedHandler
DispatcherServlet 的 getHandler 方法则是通过遍历字段 handlerMappings,调用 HandlerMapping 的 getHandler 方法,来获取控制器方法的执行链,找到了就返回,所以 handlerMappings 中的 HandlerMapping 的顺序很重要。
@Nullable
protected HandlerExecutionChain getHandler(HttpServletRequest request) throws Exception {
    if (this.handlerMappings != null) {
        for (HandlerMapping mapping : this.handlerMappings) {
            // 遍历 handlerMappings 字段,调用 HandlerMapping 的 getHandler 方法,获取控制器方法执行链,找到了就返回
            HandlerExecutionChain handler = mapping.getHandler(request);
            if (handler != null) {
                // 获取控制器方法执行链,找到了就返回
                // 所以 handlerMappings 的顺序很重要
                return handler;
            }
        }
    }
    return null;
}
实际调试过程中,有三种

HandlerMapping 有很多实现类,我们主要看 AbstractHandlerMapping 的子类。
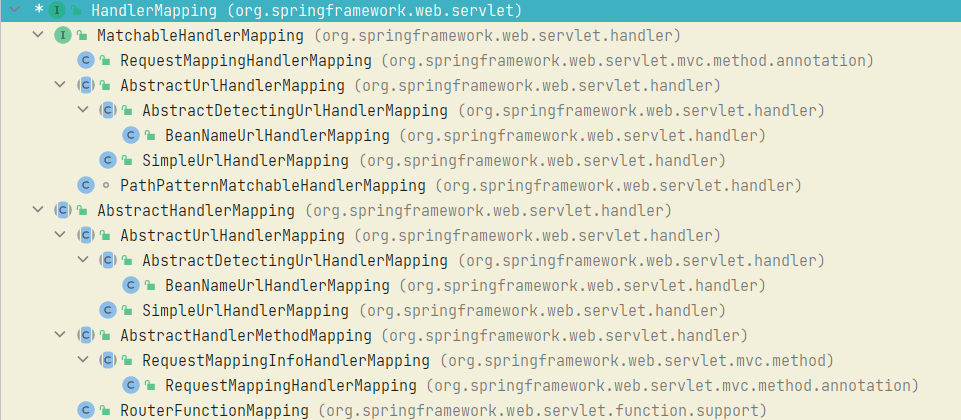
有关 HandlerMapping 的更多源码细节,看《SpringMVC 控制器方法(handler)的映射 - HandlerMapping》
我们从 AbstractHandlerMapping 开始看
AbstractHandlerMapping 有两个属性用于 HandlerInterceptor
-
interceptors 接收最原始的拦截器对象,拦截器对象是
Object类型的,因此需要适配器,也就是下面这个属性 -
adaptedInterceptors,通过
AbstractHandlerMapping#initInterceptors适配,是配成HandlerInterceptor类型,后续也只使用adaptedInterceptors
初始化过程直接看 AbstractHandlerMapping 的 initApplicationContext 方法
@Override
protected void initApplicationContext() throws BeansException {
    // 钩子, 空方法, 方便子类拓展,自定义添加或者修改 拦截器对象
    extendInterceptors(this.interceptors);
    // 自动检测当前IOC容器中配置的所有MappedInterceptor类型的bean
    detectMappedInterceptors(this.adaptedInterceptors);
    // 将 interceptors 中的拦截器,添加到 adaptedInterceptors 中
    initInterceptors();
}
detectMappedInterceptors 方法使用 IOC 容器工具类,自动检测当前 IOC 容器中配置的所有 MappedInterceptor 类型的 bean,其中就会检测到 ConversionServiceExposingInterceptor 和我们自己自定义的 Interceptor。
注意,自定义的,直接实现
HandlerInterceptor接口的 Interceptor,因为在 SpringMVC 的 XML 配置中,使用<mvc:interceptor进行配置,所以也是被包装成 MappedInterceptor
detectMappedInterceptors 方法的结果里为什么会出现代理 ConversionServiceExposingInterceptor 的 MappedInterceptor,我们需要看下一小节 AnnotationDrivenBeanDefinitionParser,这里,我们先跟上面的内容连起来。
在 AbstractHandlerMapping 的 getHandler 方法中,核心是调用 AbstractHandlerMapping 的 getHandlerExecutionChain 方法
protected HandlerExecutionChain getHandlerExecutionChain(Object handler, HttpServletRequest request) {
    HandlerExecutionChain chain = (handler instanceof HandlerExecutionChain ?
            (HandlerExecutionChain) handler : new HandlerExecutionChain(handler));

    // 遍历 adaptedInterceptors
    for (HandlerInterceptor interceptor : this.adaptedInterceptors) {
        if (interceptor instanceof MappedInterceptor) {
            MappedInterceptor mappedInterceptor = (MappedInterceptor) interceptor;
            //  如果是 MappedInterceptor,则需要根据 request 的请求路径进行匹配,匹配的,才将委托在此MappedInterceptor拦截器中的拦截器添加到请求的拦截器列表中
            if (mappedInterceptor.matches(request)) {
                chain.addInterceptor(mappedInterceptor.getInterceptor());
            }
        }
        else {
            // 不是 MappedInterceptor 类型的拦截器,直接添加
            chain.addInterceptor(interceptor);
        }
    }
    return chain;
}
在 AbstractHandlerMapping 的 getHandler 方法中,还会根据跨域配置,在 HandlerExecutionChain 执行链的最前面添加 CorsInterceptor 跨域拦截器,具体代码在 AbstractHandlerMapping#getCorsHandlerExecutionChain 方法中。
AnnotationDrivenBeanDefinitionParser - 处理 <annotation-driven/>
基于 XML 配置的 SpringMVC 在解析 <annotation-driven/> 之后,代理 ConversionServiceExposingInterceptor 的 MappedInterceptor 已经注册进 IOC 容器中了,因为 includePatterns 和 excludePatterns 皆为空,所以此 MappedInterceptor 默认匹配所有控制器方法。具体请查看文件《SpringMVC- 第九篇:基于 XML 配置 SpringMVC》。
使用注解配置 SpringMVC 的时候,使用的是
WebMvcConfigurationSupport,也会添加ConversionServiceExposingInterceptor,这个我们在《SpringMVC- 第十篇:基于注解配置 SpringMVC》的addInterceptors章节再了解
ConversionService 的作用
ConversionServiceExposingInterceptor 只是一个壳,所有的工作都是委托给 ConversionService 完成。ConversionService 的功能故名思与,就是转换服务,提供将一个类型转换为另一个类型的服务,核心方法是 convert(Object, Class),实际上所有的转换工作都是根据转换的类型委托给特定的转换器 Converter,实际的比较器实例类型为 GenericConverter,两者通过 ConverterAdapter 转化。基本上在 GenericConversionService 中就已经把 convert 方法实现的差不多了,后面的实现类都是在拓展 GenericConverter`。
用的最多的是 DefaultFormattingConversionService,

类型转化的,主要也是一些字符串,日期之类的数据。
关于类型转换的详细内容,查看《SpringMVC 中的类型转换》
AsyncHandlerInterceptor - 异步拦截器
TODO
HandlerExecutionChain 和 DispatcherServlet 中的源码分析
HandlerExecutionChain 的源码分析
public class HandlerExecutionChain {

    // 日志
    private static final Log logger = LogFactory.getLog(HandlerExecutionChain.class);

    // 被拦截的控制器方法
    private final Object handler;

    // 在执行控制器方法前,需要按顺序执行的拦截器
    private final List<HandlerInterceptor> interceptorList = new ArrayList<>();

    // 拦截器执行到哪儿了
    private int interceptorIndex = -1;


    // 构造函数
    ......

    // 获取被拦截的控制器方法
    public Object getHandler() { return this.handler; }

    // Interceptor 的添加和获取方法
    ......

    // 依次调用所有的拦截器的 preHandle 方法,
    // 要么所有的拦截器的 preHandle 都通过(返回true),最终到达 控制器方法, interceptorIndex 为拦截器列表的长度-1
    // 要么中途有一个拦截器的 preHandle 返回 false,就调用 triggerAfterCompletion 开始 从 interceptorIndex 标记的拦截器列表的位置往回倒序执行拦截器的 afterCompletion 方法
    boolean applyPreHandle(HttpServletRequest request, HttpServletResponse response) throws Exception {
        for (int i = 0; i < this.interceptorList.size(); i++) {
            HandlerInterceptor interceptor = this.interceptorList.get(i);
            if (!interceptor.preHandle(request, response, this.handler)) {
                triggerAfterCompletion(request, response, null);
                return false;
            }
            this.interceptorIndex = i;
        }
        return true;
    }

    // 倒序应用拦截器列表中所有拦截器的 postHandle 方法
    void applyPostHandle(HttpServletRequest request, HttpServletResponse response, @Nullable ModelAndView mv)
            throws Exception {

        for (int i = this.interceptorList.size() - 1; i >= 0; i--) {
            HandlerInterceptor interceptor = this.interceptorList.get(i);
            interceptor.postHandle(request, response, this.handler, mv);
        }
    }

    // 从 interceptorIndex 标记的拦截器列表的位置往回倒序执行拦截器的 afterCompletion 方法,
    // PS:interceptorIndex  表示最后一个 preHandle 方法返回 true 的 拦截器在拦截器列表中的下标
    void triggerAfterCompletion(HttpServletRequest request, HttpServletResponse response, @Nullable Exception ex) {
        for (int i = this.interceptorIndex; i >= 0; i--) {
            HandlerInterceptor interceptor = this.interceptorList.get(i);
            try {
                interceptor.afterCompletion(request, response, this.handler, ex);
            }
            catch (Throwable ex2) {
                logger.error("HandlerInterceptor.afterCompletion threw exception", ex2);
            }
        }
    }

    // 倒序执行拦截器列表中所有异步拦截器的 afterConcurrentHandlingStarted 方法
    void applyAfterConcurrentHandlingStarted(HttpServletRequest request, HttpServletResponse response) {
        for (int i = this.interceptorList.size() - 1; i >= 0; i--) {
            HandlerInterceptor interceptor = this.interceptorList.get(i);
            if (interceptor instanceof AsyncHandlerInterceptor) {
                try {
                    AsyncHandlerInterceptor asyncInterceptor = (AsyncHandlerInterceptor) interceptor;
                    asyncInterceptor.afterConcurrentHandlingStarted(request, response, this.handler);
                }
                catch (Throwable ex) {
                    if (logger.isErrorEnabled()) {
                        logger.error("Interceptor [" + interceptor + "] failed in afterConcurrentHandlingStarted", ex);
                    }
                }
            }
        }
    }


    // toString方法
    ......

}
HandlerExecutionChain 主要在 DispatcherServlet 的 doDispatch 方法中进行调用
protected void doDispatch(HttpServletRequest request, HttpServletResponse response) throws Exception {
        HttpServletRequest processedRequest = request;
        HandlerExecutionChain mappedHandler = null;
        ...

        WebAsyncManager asyncManager = WebAsyncUtils.getAsyncManager(request);

        try {
            ModelAndView mv = null;
            Exception dispatchException = null;

            try {
                ...

                // Determine handler for the current request.
                mappedHandler = getHandler(processedRequest);
                if (mappedHandler == null) {
                    noHandlerFound(processedRequest, response);
                    return;
                }

                // Determine handler adapter for the current request.
                HandlerAdapter ha = getHandlerAdapter(mappedHandler.getHandler());

                // Process last-modified header, if supported by the handler.
                String method = request.getMethod();
                boolean isGet = "GET".equals(method);
                if (isGet || "HEAD".equals(method)) {
                    long lastModified = ha.getLastModified(request, mappedHandler.getHandler());
                    if (new ServletWebRequest(request, response).checkNotModified(lastModified) && isGet) {
                        return;
                    }
                }

                // 1. 先调用 HandlerExecutionChain 的 applyPreHandle
                // 但凡有一个拦截器的preHandle不通过,直接返回
                if (!mappedHandler.applyPreHandle(processedRequest, response)) {
                    return;
                }
                // 通过了,说明所有的拦截器的preHandle都通过了

                // 2. 开始执行控制器方法,也就是 handler
                // Actually invoke the handler.
                mv = ha.handle(processedRequest, response, mappedHandler.getHandler());

                if (asyncManager.isConcurrentHandlingStarted()) {
                    return;
                }

                ...

                // 3. 执行 HandlerExecutionChain 的 applyPostHandle
                mappedHandler.applyPostHandle(processedRequest, response, mv);
            }
            catch (Exception ex) {
                ......
            }
            catch (Throwable err) {
                ......
            }
            // 4. 在 processDispatchResult中,调用 render(mv, request, response);渲染视图之后,调用 HandlerExecutionChain 的 triggerAfterCompletion
            processDispatchResult(processedRequest, response, mappedHandler, mv, dispatchException);
        }
        catch (Exception ex) {
            // 5. 如果中途报错,直接调用 HandlerExecutionChain 的 triggerAfterCompletion
            triggerAfterCompletion(processedRequest, response, mappedHandler, ex);
        }
        catch (Throwable err) {
            // 5. 如果中途报错,直接调用 HandlerExecutionChain 的 triggerAfterCompletion
            triggerAfterCompletion(processedRequest, response, mappedHandler,
                    new NestedServletException("Handler processing failed", err));
        }
        finally {
            if (asyncManager.isConcurrentHandlingStarted()) {
                // Instead of postHandle and afterCompletion
                if (mappedHandler != null) {
                    // 6. 执行 HandlerExecutionChain 的 applyAfterConcurrentHandlingStarted 方法
                    //  异步拦截器
                    mappedHandler.applyAfterConcurrentHandlingStarted(processedRequest, response);
                }
            }
            else {
                // Clean up any resources used by a multipart request.
                if (multipartRequestParsed) {
                    cleanupMultipart(processedRequest);
                }
            }
        }
    }
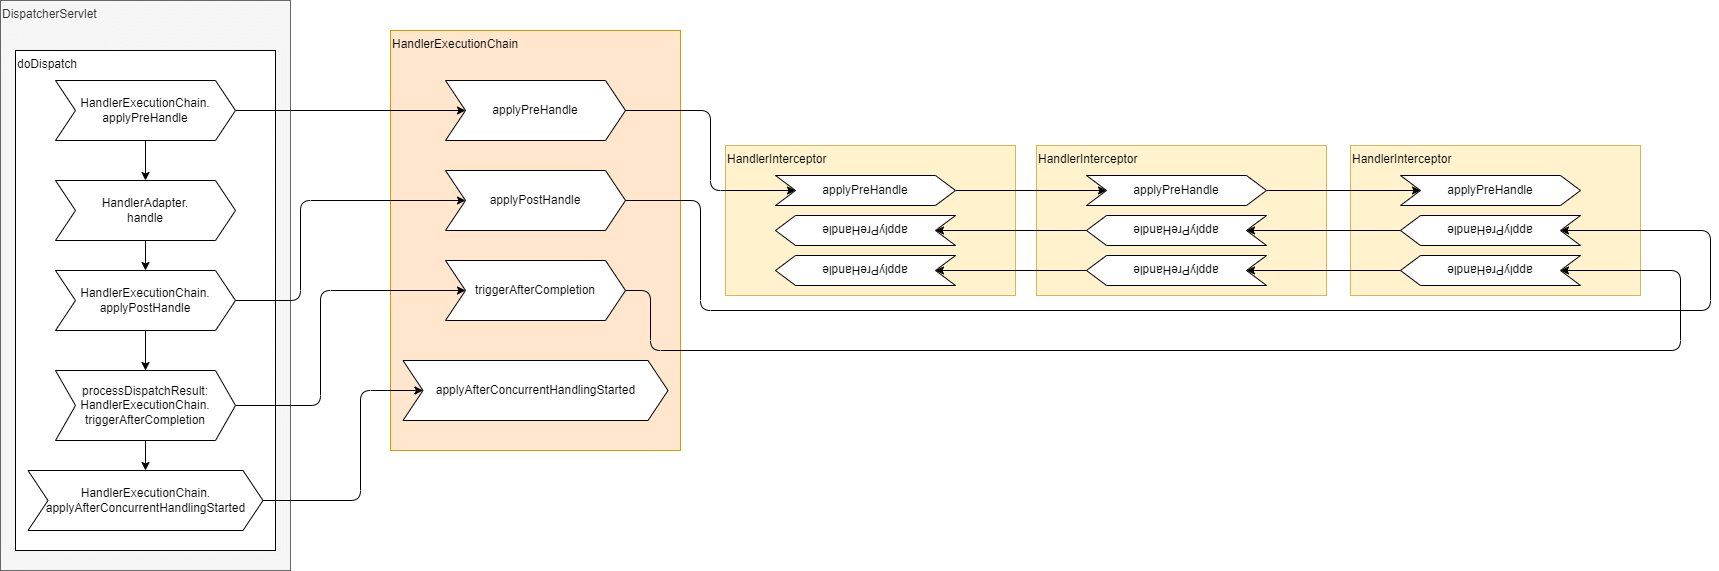
流程图:
所有的 HandlerInterceptor 的 preHandle 均通过
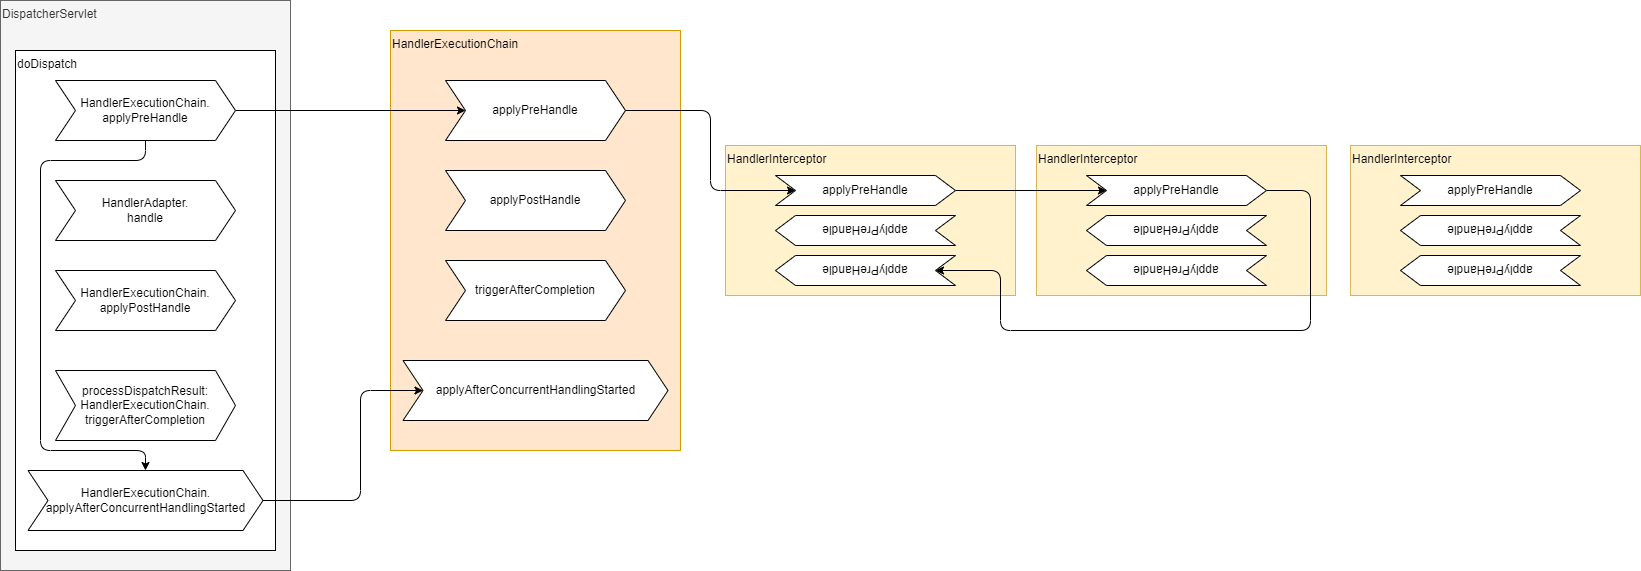
有的 HandlerInterceptor 的 preHandle 未通过
这一块的代码是非完美的调用链模板代码,非常值得参考
实践
SpringMVC 配置文件中,添加拦截器,注意,拦截器声明地顺序,决定了生效的顺序。
<!-- 拦截器声明地顺序,决定了生效的顺序-->
<mvc:interceptors>
    <mvc:interceptor>
        <!--通过ref或bean标签设置拦截器,通过mvc:mapping设置需要拦截的请求,通过mvc:exclude-mapping设置需要排除的请求,即不需要拦截的请求 -->
        <mvc:mapping path="/testInterceptor/handler"/>
        <mvc:exclude-mapping path="/"/>
        <ref bean="myInterceptor0"/>
    </mvc:interceptor>
    <mvc:interceptor>
        <mvc:mapping path="/testInterceptor/handler"/>
        <mvc:exclude-mapping path="/"/>
        <ref bean="myInterceptor1"/>
    </mvc:interceptor>
    <mvc:interceptor>
        <mvc:mapping path="/testInterceptor/handler"/>
        <mvc:exclude-mapping path="/"/>
        <ref bean="myInterceptor2"/>
    </mvc:interceptor>
</mvc:interceptors>
注意,下面写法表示所有的控制器方法都会被拦截 ,不推荐
<!-- 这种写法表示所有的控制器方法都会被拦截 ,不推荐   -->
<mvc:interceptors>
    <ref bean="myInterceptor0"/>
    <ref bean="myInterceptor1"/>
    <ref bean="myInterceptor2"/>
</mvc:interceptors>
被拦截的控制器
@Controller
@RequestMapping("/testInterceptor")
public class TestInterceptorController {

    @RequestMapping("/handler")
    public String testequest() {
        System.out.println("--------- "+ this.getClass().getName()+ " handler 执行 ----------");
        return "success";
    }

}
拦截器,总共三个拦截器,除了类名不一样(从 0 到 2 依次递增),其他完全一样。这里只贴第一个。
@Component
public class MyInterceptor0 implements HandlerInterceptor {
    @Override
    public boolean preHandle(HttpServletRequest request, HttpServletResponse response, Object handler) throws Exception {
        System.out.println("--------- "+ this.getClass().getName()+ " preHandle 执行 ----------");
        return HandlerInterceptor.super.preHandle(request, response, handler);
    }

    @Override
    public void postHandle(HttpServletRequest request, HttpServletResponse response, Object handler, ModelAndView modelAndView) throws Exception {
        System.out.println("--------- "+ this.getClass().getName()+ " postHandle 执行 ----------");
        HandlerInterceptor.super.postHandle(request, response, handler, modelAndView);
    }

    @Override
    public void afterCompletion(HttpServletRequest request, HttpServletResponse response, Object handler, Exception ex) throws Exception {
        System.out.println("--------- "+ this.getClass().getName()+ " afterCompletion 执行 ----------");
        HandlerInterceptor.super.afterCompletion(request, response, handler, ex);
    }
}
测试类
@SpringJUnitWebConfig(locations = "classpath:springMVC.xml")
class TestInterceptorControllerTest {

    MockMvc mockMvc;

    @BeforeEach
    void setup(WebApplicationContext wac) {
        this.mockMvc = MockMvcBuilders.webAppContextSetup(wac).build();
    }

    @Test
    void testequest() throws Exception {
        mockMvc.perform(get("/testInterceptor/handler")).andDo(print());
    }
}
执行日志:
--------- xyz.xiashuo.springmvcrequestmapping.interceptor.MyInterceptor0 preHandle 执行 ----------
--------- xyz.xiashuo.springmvcrequestmapping.interceptor.MyInterceptor1 preHandle 执行 ----------
--------- xyz.xiashuo.springmvcrequestmapping.interceptor.MyInterceptor2 preHandle 执行 ----------
--------- xyz.xiashuo.springmvcrequestmapping.TestInterceptorController handler 执行 ----------
--------- xyz.xiashuo.springmvcrequestmapping.interceptor.MyInterceptor2 postHandle 执行 ----------
--------- xyz.xiashuo.springmvcrequestmapping.interceptor.MyInterceptor1 postHandle 执行 ----------
--------- xyz.xiashuo.springmvcrequestmapping.interceptor.MyInterceptor0 postHandle 执行 ----------
........ Thymeleaf的渲染日志 ......
--------- xyz.xiashuo.springmvcrequestmapping.interceptor.MyInterceptor2 afterCompletion 执行 ----------
--------- xyz.xiashuo.springmvcrequestmapping.interceptor.MyInterceptor1 afterCompletion 执行 ----------
--------- xyz.xiashuo.springmvcrequestmapping.interceptor.MyInterceptor0 afterCompletion 执行 ----------
可以很清楚的看到
preHandle 是顺序执行,postHandle 和 afterCompletion 都是倒叙执行,同时 postHandle 在视图渲染之前执行,afterCompletion 在视图渲染之后执行。
修改 MyInterceptor1 模拟 preHandle 不通过
@Component
public class MyInterceptor1 implements HandlerInterceptor {
    @Override
    public boolean preHandle(HttpServletRequest request, HttpServletResponse response, Object handler) throws Exception {
        System.out.println("--------- "+ this.getClass().getName()+ " preHandle 执行 ----------");
        return HandlerInterceptor.super.preHandle(request, response, handler);
        //return false;
    }

    @Override
    public void postHandle(HttpServletRequest request, HttpServletResponse response, Object handler, ModelAndView modelAndView) throws Exception {
        System.out.println("--------- "+ this.getClass().getName()+ " postHandle 执行 ----------");
        HandlerInterceptor.super.postHandle(request, response, handler, modelAndView);
    }

    @Override
    public void afterCompletion(HttpServletRequest request, HttpServletResponse response, Object handler, Exception ex) throws Exception {
        System.out.println("--------- "+ this.getClass().getName()+ " afterCompletion 执行 ----------");
        HandlerInterceptor.super.afterCompletion(request, response, handler, ex);
    }
}
执行日志
--------- xyz.xiashuo.springmvcrequestmapping.interceptor.MyInterceptor0 preHandle 执行 ----------
--------- xyz.xiashuo.springmvcrequestmapping.interceptor.MyInterceptor1 preHandle 执行 ----------
--------- xyz.xiashuo.springmvcrequestmapping.interceptor.MyInterceptor0 afterCompletion 执行 ----------
直接返回,跟前面画的流程图一模一样。
PS:SpringMVC 会自动加上一些全局的控制器方法拦截器,最常见的就是被包装成 MappedInterceptor 的 ConversionServiceExposingInterceptor,虽然是 MappedInterceptor,但是因为 includePatterns 和 excludePatterns 皆为空,所以默认匹配所有控制器方法。
拦截器跟适配器的执行顺序
顺序很简单,在 DispatcherServlet#doDispatch 方法中写的非常清楚:
-
经过
HandlerMapping进行处理器映射,获取 handler,实际上获取的是包含拦截器的处理器执行链HandlerExecutionChain -
通过
HandlerExecutionChain中最终的 handler,获取适配器HandlerAdapter -
调用拦截器的处理器执行链的前置方法
HandlerExecutionChain#applyeHandle -
执行
HandlerAdapter#handle方法执行处理器,获得ModelAndView -
调用拦截器的处理器执行链的后置方法
HandlerExecutionChain#applyPostHandle -
调用
DispatcherServlet#processDispatchResult处理ModelAndView,如果有错误,就已经异常处理,渲染异常解析HandlerExceptionResolver返回的ModelAndView,如果没有错误,正常解析ModelAndView,并在最后调用拦截器的处理器执行链的完成时方法HandlerExecutionChain#afterCompletion。
也就是说适配器的执行是在拦截器的执行之中的,
其他
拦截器在实际生产环境的用处很多,一个比较实用的场景是,在拦截器中校验控制器方法的参数,详见《SpringMVC 整合 JavaBeanValidation 及拓展》中的 Controller方法非JavaBean类型的参数的校验 中的 方案二 自定义 HandlerInterceptor。