
Select a result to preview
DispatcherServlet 会根据控制器方法声明的参数,将封装好的数据,注入到控制器方法的参数中(通过WebDataBinder)
从控制器方法的角度看,请求都是带着参数的,但是从 HTTP 协议的角度看,不是,参数只是一种信息,而 HTTP 协议的请求数据包中的任何一个部分,都可以包含信息,所以我们可以看到,HTTP 请求的 URL 可以提取信息(GET 请求的参数追加在 URL 的后面),HTTP 的请求方法可以提取信息(@RequestMapping 注解的 method)HTTP 请求的消息头可以提取信息(@RequestHeader 注解),HTTP 请求头中的 cookie,还可以通过专门的@CookieValue 来获取,HTTP 请求的消息体也可以提取信息(POST 请求的参数存放在消息体中,可以通过@RequestBody 获取 json 格式的信息,或者不适用任何注解,直接获取 form 格式的信息)。所以基本上,通过下面提到的几个 Spring 注解的搭配,我们可以很轻松地获取一个 HTTP 请求的各个部分的数据。
其实,学习了《SpringMVC-RequestMappingHandlerAdapter 源码解析.md》的参数解析器之后,我们知道此章节中的所有的支持的参数,实际上都对应一个参数解析器。而且是因为存在相应的参数解析器,控制器方法才可以编写特定类型的参数。
原生的控制器参数,就是 HttpServletRequest,
这是原生的 servlet 方法中 doGet 方法和 doPost 方法的代表当前请求的对象
@WebServlet(name = "Servlet", value = "/Servlet")
public class Servlet extends HttpServlet {
    @Override
    protected void doGet(HttpServletRequest request, HttpServletResponse response) throws ServletException, IOException {

    }

    @Override
    protected void doPost(HttpServletRequest request, HttpServletResponse response) throws ServletException, IOException {

    }
}
在控制器方法中,我们可以使用 HttpServletRequest 获取参数
@Controller
@RequestMapping("/testParams")
public class TestParamsController {


    @RequestMapping("/testServletAPI")
    public String testServletAPI(HttpServletRequest request) {
        String username = request.getParameter("username");
        String password = request.getParameter("password");
        System.out.println(username + ";" + password);
        return "target";
    }

 }
测试
<a th:href="@{/testParams/testServletAPI(username='xiashuo',password='123456')}">测试servletAPI</a>
不过,一般不推荐使用 HttpServletRequest,因为 SpringMVC 在处理请求的时候已经提取了一遍参数,然后在此基础上提供了更方便更好用的 API,我们没有必要再从头再来一次。
控制器方法
@RequestMapping("/servletAPI")
public void servletAPI(HttpServletResponse response) throws IOException {
    response.getWriter().println("hello world!");
}
测试类
@Test
void servletAPI() throws Exception {
    mockMvc.perform(get("/testResponse/servletAPI")).andDo(print());
}
注意:只能匹配 url 中的参数和消息类型为
application/x-www-form-urlencoded的消息体中的参数
保证控制器方法的参数名和请求中的参数名一致即可,连注解都不用加,即可在控制器处理请求的时候,获取请求中的参数,实在是太方便了
@RequestMapping("/testSpringMVCAPI")
public String testSpringMVCAPI(String username, String password) {
    System.out.println(username + password);
    return "target";
}
测试
<a th:href="@{/testParams/testSpringMVCAPI(username='xiashuo789',password='aaaaaa')}">测试SpringMVCAPI</a>
处理多个同名参数:
@RequestMapping("/testSpringMVCAPIMultiParamSameName")
public String testSpringMVCAPIMultiParamSameName(String username, String password, String tag) {
    System.out.println(username + ";" + password + ";" + tag);
    return "target";
}
前端中,表单中有复选款的时候,
<form method="get" th:action="@{/testParams/testSpringMVCAPIMultiParamSameName}">
    <span>用户名:</span><input type="text" name="username" placeholder="username"/><br/>
    <span>密码:</span><input type="password" name="password" placeholder="password"/><br/>
    <span>标签:</span><input type="checkbox" name="tag" value="worker"/><input type="checkbox" name="tag" value="student"/><input type="checkbox" name="tag" value="father"/><br/>
    <input type="submit" value="测试SpringMVCAPI处理多个同名参数"/>
</form>
当有复选款的时候,请求连接是这样的,tag 是复选款,它的值有多个。
http://localhost:8080/SpringMVC_HTTPParams/testParams/testSpringMVCAPIMultiParamSameName?username=HBZFW&password=888888&tag=worker&tag=student&tag=father
控制台输出:
当请求参数中出现多个同名的请求参数时,比如使用复选款的时候,那么SpringMVC 的 API 会自动将这多个值用逗号拼起来,放入名称为此参数名的控制器的参数中,一般类型为字符串,当然,你可以用字符串数组来接受此类请求参数。不过使用字符串接收代码看起来更优雅。
用数组接收:
@RequestMapping("/testSpringMVCAPIMultiParamSameName/v2")
public String testSpringMVCAPIMultiParamSameName(String username, String password, String... tag) {
    // String... 本质上,就是 String[]
    System.out.println(username + ";" + password + ";" + Arrays.toString(tag));
    return "target";
}
<form method="get" th:action="@{/testParams/testSpringMVCAPIMultiParamSameName/v2}">
    <span>用户名:</span><input type="text" name="username" placeholder="username"/><br/>
    <span>密码:</span><input type="password" name="password" placeholder="password"/><br/>
    <span>标签:</span><input type="checkbox" name="tag" value="worker"/><input type="checkbox" name="tag" value="student"/><input type="checkbox" name="tag" value="father"/><br/>
    <input type="submit" value="测试SpringMVCAPI处理多个同名参数"/>
</form>
控制台输出:

注意:只能匹配 url 中的参数和消息类型为
application/x-www-form-urlencoded的消息体中的参数
通过参数名相同来匹配 时,控制器方法的形参必须跟 HTTP 请求参数名保持一直,才能获取到参数值,否则就获取不到,这个耦合度太高了,前端页面改了表单的 input 的 name,获取这个参数的控制器方法就也要改,这个时候,我们就需要一个注解实现 HTTP 请求参数和控制器方法的映射,这个注解就是 @RequestParam
@RequestParam 注解一共有三个属性:
value:指定为形参赋值的请求参数的参数名
required:设置是否必须传输此请求参数,默认值为 true,若设置为 true 时,则当前请求必须传输 value 所指定的请求参数,若没有传输该请求参数,且没有设置 defaultValue 属性,则页面报错 400:Required String parameter 'xxx' is not present,注意,此时,这个参数可以为空字符串,相当于表单中的输入框啥都没有输入;若设置为 false,则当前请求不是必须传输 value 所指定的请求参数,若没有传输,则注解所标识的形参的值为 null
defaultValue:不管 required 属性值为 true 或 false,当 value 所指定的请求参数没有传输或传输的值为 "" 时,则使用默认值为形参赋值,defaultValue 其实要比 require 和 values 属性用得更多,也更重要,
所以基本上,你设置了 defaultValue,就不用设置 required 了。required 只是用来发出报错信息的而已。
例子如下:
userId 设置了 required = true ,且未设置 defaultValue ,HTTP 请求参数中如果不包含 userId,就会报错。
@RequestMapping("/testSpringMVCAPIRequestParam/v1")
public String testSpringMVCAPIRequestParam1(@RequestParam(value = "userId", required = true) String userId, String username, String password) {
    // userId 设置了  required = true ,且未设置 defaultValue ,HTTP请求参数中如果不包含 userId,就会报错。
    System.out.println(userId + ";" + username + ";" + password);
    return "target";
}
<form method="get" th:action="@{/testParams/testSpringMVCAPIRequestParam/v1}">
    <!--    <span>用户ID:</span><input type="text" name="userId" placeholder="userId"/><br/>-->
    <span>用户名:</span><input type="text" name="username" placeholder="username"/><br/>
    <span>密码:</span><input type="password" name="password" placeholder="password"/><br/>
    <input type="submit" value="测试SpringMVCAPI@RequestParamv1"/>
</form>
userId 设置了 defaultValue ,即使 required = true ,HTTP 请求参数中即使不包含,也不会报错
@RequestMapping("/testSpringMVCAPIRequestParam/v2")
public String testSpringMVCAPIRequestParam2(@RequestParam(value = "userId", required = true, defaultValue = "0000000") String userId, @RequestParam(value = "userName", required = false, defaultValue = "xiashuo") String username, String password) {
    // userId 设置了 defaultValue ,即使 required = true ,HTTP请求参数中即使不包含,也不会报错。
    System.out.println(userId + ";" + username + ";" + password);
    return "target";
}
<form method="get" th:action="@{/testParams/testSpringMVCAPIRequestParam/v2}">
<!--    <span>用户ID:</span><input type="text" name="userId" placeholder="userId"/><br/>-->
    <span>用户名:</span><input type="text" name="userName" placeholder="username"/><br/>
    <span>密码:</span><input type="password" name="password" placeholder="password"/><br/>
    <input type="submit" value="测试SpringMVCAPI@RequestParamv2-1"/>
</form>
其中,userName 设置 require 为 false。参数可以不传,@RequestParam 不管有没有配置 defaultvalue,都不会报错
<form method="get" th:action="@{/testParams/testSpringMVCAPIRequestParam/v2}">
    <span>用户ID:</span><input type="text" name="userId" placeholder="userId"/><br/>
<!--    <span>用户名:</span><input type="text" name="userName" placeholder="username"/><br/>-->
    <span>密码:</span><input type="password" name="password" placeholder="password"/><br/>
    <input type="submit" value="测试SpringMVCAPI@RequestParamv2-2"/>
</form>
获取多个同名参数时,如果方法参数类型是 List,并且指定了请求参数名称,那么假设有适当的转换策略,则将请求参数值转换为 List。
如果方法参数是 Map<String, String> 或 MultiValueMap<String, String> 且没有指定参数名称,则此方法参数将获取所有请求参数名称和值。当每一个参数只有一个值的时候,使用 Map<String, String> 即可,但是当一个参数可能有多个值的时候,比如 form 表单中的复选框,一个参数名会对应多个值,此时,则应该使用 MultiValueMap<String, String>,一个 key 保留了多个 value。
@RequestMapping("/testSpringMVCAPIRequestParam/v3")
public String testSpringMVCAPIRequestParam3(@RequestParam("interest") List<String> interestList, @RequestParam Map<String, String> allParamsMap, @RequestParam  MultiValueMap<String, String> allParamsMultiValueMap ) {
    System.out.println(interestList);
    // 当每一个参数只有一个值的时候,使用map即可,但是当一个参数可能有多个值的时候,比如form表单中的复选框,一个参数名会对应多个值,此时,则应该使用MultiValueMap,一个key保留了多个value
    System.out.println(allParamsMap);
    System.out.println(allParamsMultiValueMap);
    return "target";
}
前端页面
<form method="get" th:action="@{/testParams/testSpringMVCAPIRequestParam/v3}">
    <span>用户ID:</span><input type="text" name="userId" placeholder="userId"/><br/>
    <span>用户名:</span><input type="text" name="userName" placeholder="username"/><br/>
    <span>密码:</span><input type="password" name="password" placeholder="password"/><br/>
    <input type="checkbox" name="interest" value="上班"/>
    <input type="checkbox" name="interest" value="睡觉"/><br/>
    <input type="checkbox" name="interest" value="写代码"/><br/>
    <input type="submit" value="测试SpringMVCAPI@RequestParamv3"/>
</form>
查看《SpringMVC- 第二篇:控制器方法(handler)映射》中的 使用路径中的占位符来获取路径作为参数 小节
一般在路径中带参数有两种方式
查询参数(QueryString),比如 http://ip:port/pathToRequest?name=1&age=2
矩阵变量(MatrixVariable),比如 [http://ip:port/pathToRequest;name=1;age=2;interest=a,b,c
矩阵变量的规则是,与请求路径通过
;分隔,如果有多个参数,则多个参数之间也用;分割,如果一个参数有多个值,则多个值用,号分割。也可以每个值都写一个键值对,用;分隔矩阵变量在禁用 cookie 之后,浏览器进行 URL 重写的时候会出现。
常规是 REST 风格的传参一层路径只能通过请求路径传一个参数,有了矩阵变量,我们可以在一层路径中传多个参数,非常有用。
@MatrixVariable 注解用于访问 URI 路径段中的键值对。矩阵变量必须用 URI 路径变量表示。例如 /market/{cars},其中传入 URL 可能是 /market/cars;color=red;year=2012。
想要使用矩阵变量,需要设置不丢弃分号后面的内容,因为默认情况下 URI 中分号后面的内容会被丢弃,比如 http://localhost:8088/TestMVCModule/1/2/3;p=1245/55 在 DispatcerServlet 看来就是 http://localhost:8088/TestMVCModule/1/2/3,配置分号后面的内容不丢弃之后,URI 中的矩阵变量才会被识别,因为矩阵变量使用分号分隔的。
基于 Java 配置 SpringMVC 的时候,在 WebConfig 中进行配置,重写 configurePathMatch 方法即可。
@Configuration(proxyBeanMethods = false)
public class MyWebonfig implements WebMvcConfigurer {

    @Override
    public void configurePathMatch(PathMatchConfigurer configurer) {
        UrlPathHelper pathHelper = new UrlPathHelper();
        pathHelper.setRemoveSemicolonContent(false);
        configurer.setUrlPathHelper(pathHelper);
    }

}
XML 配置方式下开启
<!--默认装配方案,开启@MatrixVariable注解功能,默认在SpringMVC中是不启动的-->
<mvc:annotation-driven enable-matrix-variables="true"></mvc:annotation-driven>
如果矩阵变量的值有多个,且方法参数类型是 List,则将矩阵变量的多个值会填充到 List 中。
如果方法参数是 Map<String, String> 或 MultiValueMap<String, String> 并且没有指定变量名,那么将用所有矩阵变量名和值填充此参数,我们建议使用 MultiValueMap<String, String>,因为一个参数可能有多个值,需要使用 MultiValueMap<String, String> 保存。
@RequestMapping("/testSpringMVCAPIMatrixVariable/v1/{cars}")
public String testSpringMVCAPIMatrixVariable(@PathVariable("cars") String path, @MatrixVariable(value = "color", required = false) String color, @MatrixVariable(value = "year", required = false) String year, @MatrixVariable(value = "tag", required = false) List<String> tags, @MatrixVariable() MultiValueMap<String, String> allMatrixParams) {
    // 注意,通过 @PathVariable 获取的路径参数,是不包含 矩阵变量的
    System.out.println(path);
    System.out.println(color + "-" + year);
    System.out.println(tags);
    System.out.println(allMatrixParams);
    return "target";
}
此时通过 @PathVariable 获取的路径参数,是不包含矩阵变量的。
cars
red-2012
[new, expensive, popular]
{color=[red], year=[2012], tag=[new, expensive, popular]}
在两层路径中绑定了同一个矩阵变量名,组需要使用 pathVar 来指定你想要获取哪个路径变量下的矩阵变量值
@RequestMapping("/testSpringMVCAPIMatrixVariable/v2/{boss}/{employee}")
public String testSpringMVCAPIMatrixVariable(@PathVariable("boss") String bossPath, @PathVariable("employee") String employeesPath, @MatrixVariable(value = "age", pathVar = "boss", required = false) String bossAge, @MatrixVariable(value = "age", pathVar = "employee", required = false) String employeesAge) {
    System.out.println(bossPath);
    System.out.println(employeesPath);
    System.out.println(bossAge);
    System.out.println(employeesAge);
    return "target";
}
boss
employee
100
20
@RequestHeader 是将请求头信息和控制器方法的形参创建映射关系
@RequestHeader 注解一共有三个属性:value、required、defaultValue,用法同 @RequestParam
require 也可以设置为 true,也可以设置 defaultValue。
如果方法参数是
Map<String, String>,MultiValueMap<String, String>,或HttpHeaders,那么这个方法参数将用所有的请求头名和值填充。
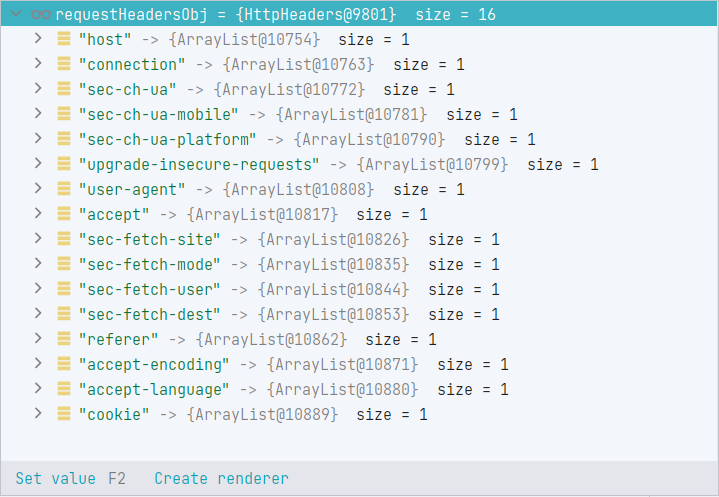
@RequestMapping("/testSpringMVCAPIRequestHeader")
public String testSpringMVCAPIRequestHeader(@RequestHeader(value = "Accept", defaultValue = "local") String header_accept, @RequestHeader Map<String, String> requestHeaderMap, @RequestHeader MultiValueMap<String, String> requestHeaderMultiValueMap, @RequestHeader HttpHeaders requestHeadersObj) {
    System.out.println(requestHeaderMap);
    System.out.println(requestHeaderMultiValueMap);
    System.out.println(requestHeadersObj);
    System.out.println("Accept:" + header_accept);
    return "target";
}
测试链接
<a th:href="@{/testParams/testSpringMVCAPIRequestHeader}">测试SpringMVCAPI@RequestHeader</a>
查看 requestHeadersObj 的内容可知所有的请求头。
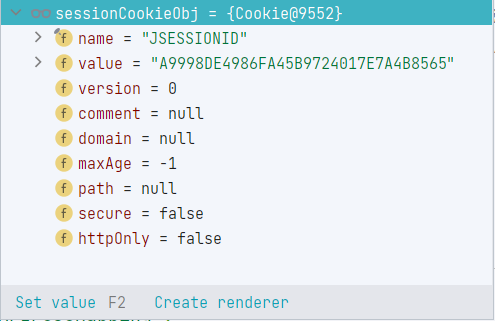
@CookieValue 是将 cookie 数据和控制器方法的形参创建映射关系
@CookieValue 注解一共有三个属性:value、required、defaultValue,用法同@RequestParam
在接受单个 cookie 的值的时候,方法参数可以声明为
javax.servlet.http.Cookie类型(获取详细的 cookie 的信息,比如超时时间,cookie 的值等等),也可以声明为 cookie 值类型比如 (String、int 等),只获取 cookie 的值
/**
* 第一次没有cookie 创建session,然后第二次就有cookie了。
*
* @param sessionID
* @param request
* @return
*/
@RequestMapping("/testSpringMVCAPICookieValue")
public String testSpringMVCAPICookieValue(@CookieValue(value = "JSESSIONID", required = false, defaultValue = "&&") String sessionID, HttpServletRequest request, @CookieValue(value = "JSESSIONID", required = false, defaultValue = "&&") Cookie sessionCookieObj) {
System.out.println(sessionCookieObj);
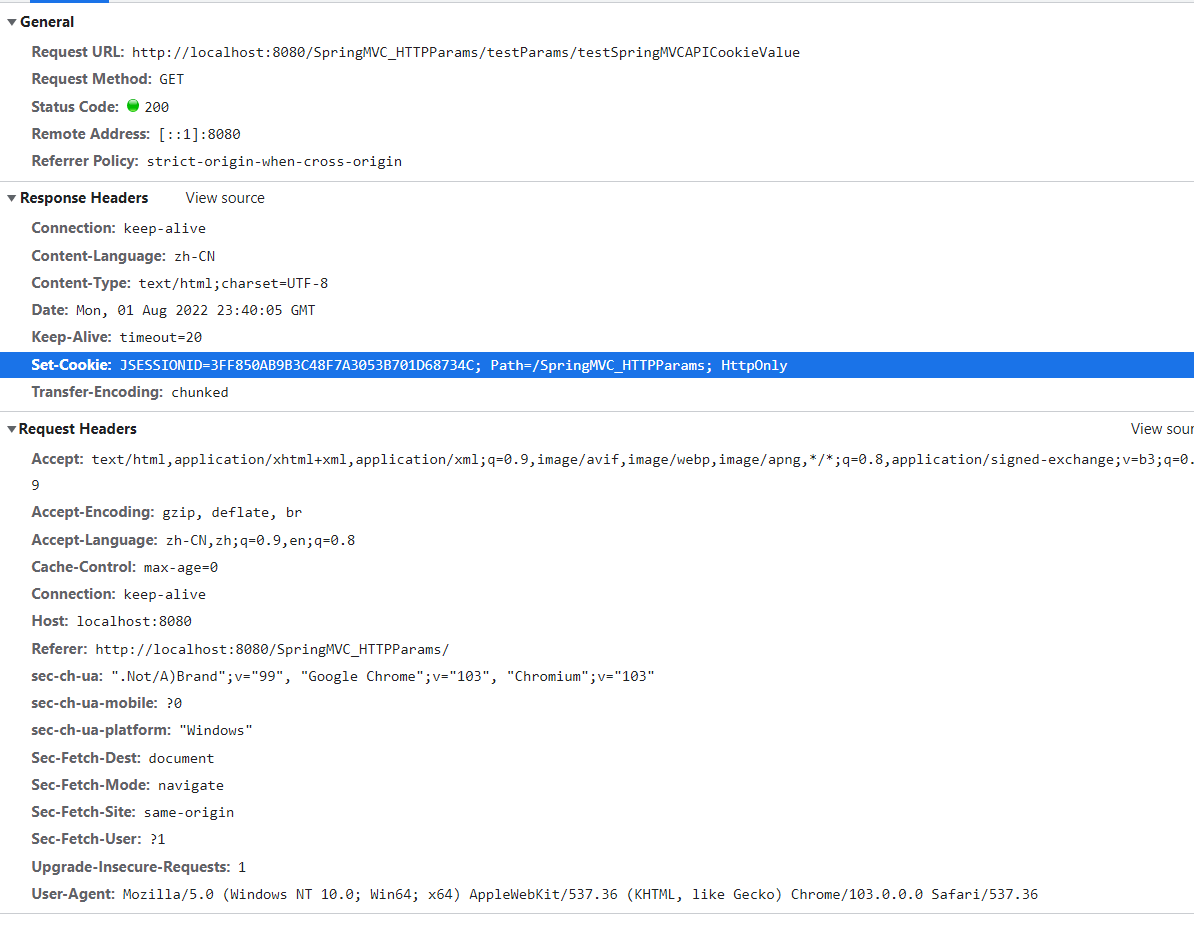
// 如果当前请求中没有携带JSESSIONID,表示当前请求不存在与会话中,调用getSession方法,就会创建一个Session,即HttpSession对象
// 服务器会存储这个HttpSession对象,同时创建一个key为JSESSIONID的cookie,这样,此请求对应的响应的消息头中就会带上一个 Set-Cookie 的header,其中存放了key JSESSIONID,值为 sessionID的键值对,用于在客户端即浏览器中创建cookie,
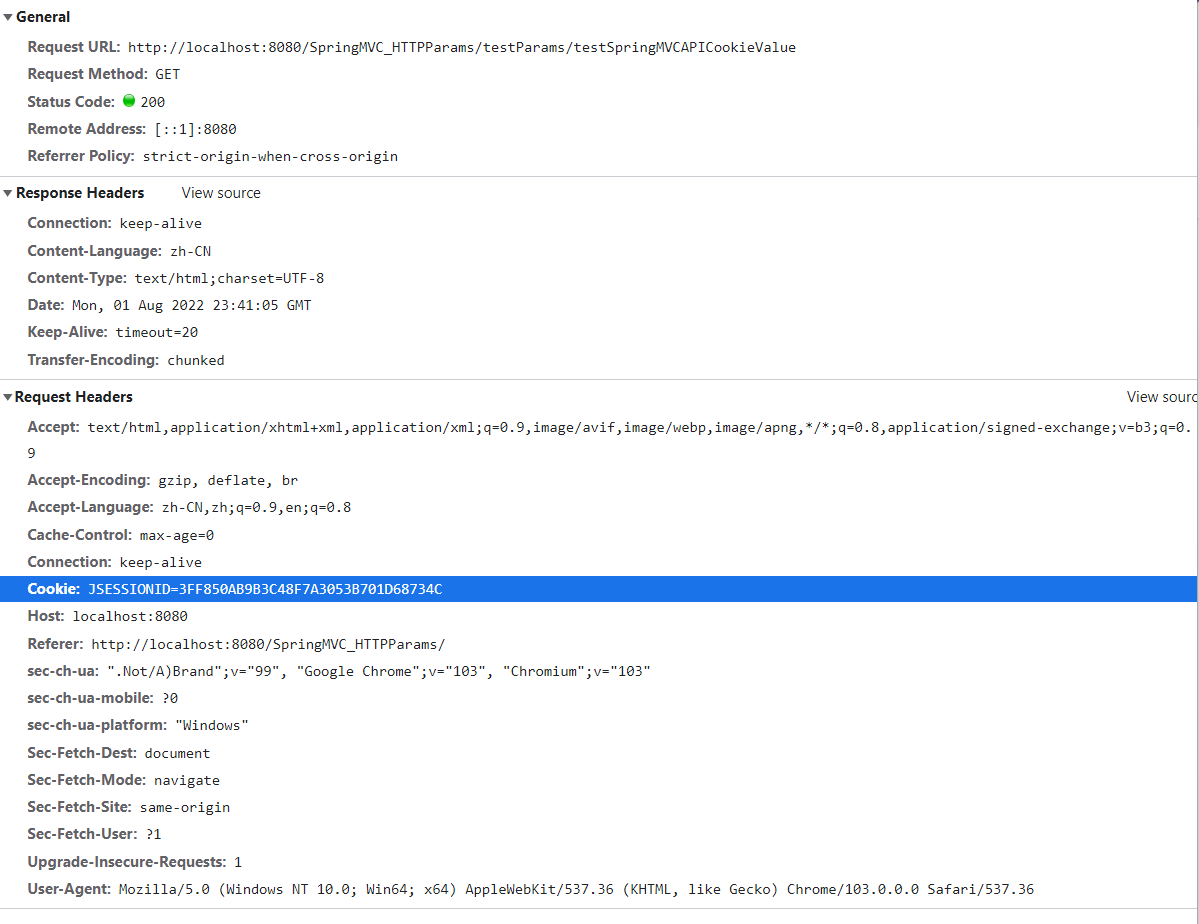
// 然后第二次再调用此方法或者此站点下的每一个方法的时候,消息头中都会带上 Cookie 的 这个header,里面有一个key为 JSESSIONID,值为sessionID的cookie,用于标识此请求属于此sessionID对应的会话。此时再在控制器方法中调用 getSession() 方法,就会获取此请求所在的会话对象,即HttpSession对象。
// 以后,此同源站点的每一个请求,消息头中都会带上 Cookie 这个header,里面有 JSESSIONID= session的id 这个cookie ,用于标识此请求所属的会话。直到会话过期,分配新的JSESSIONID,或者浏览器cookie过期或者被清除
HttpSession session = request.getSession();
System.out.println("JSESSIONID:" + sessionID);
return "target";
}
测试链接
<a th:href="@{/testParams/testSpringMVCAPICookieValue}">测试SpringMVCAPI@CookieValue</a>
第一次访问的时候,没有 JSESSIONID,输出默认值 &&
JSESSIONID:&&
后面的每一次,都有 JSESSIONID,而且 JSESSIONID 的 id 都是一样的,因为这些请求都属于一个会话。
JSESSIONID:A9998DE4986FA45B9724017E7A4B8565
同时 Cookie 对象为:
如果当前请求中没有携带 JSESSIONID,表示当前请求不存在与会话中,调用 getSession()方法,就会创建一个 Session,即 HttpSession 对象
服务器会存储这个 HttpSession 对象,同时创建一个 key 为 JSESSIONID 的 cookie,这样,此请求对应的响应的消息头中就会带上一个 Set-Cookie 的 header,其中存放了 key JSESSIONID,值为 sessionID 的键值对,用于在客户端即浏览器中创建 cookie,
然后第二次再调用此控制器方法或者此站点下的每一个控制器方法的时候,消息头中都会带上 Cookie 的 这个 header,里面有一个 key 为 JSESSIONID,值为 sessionID 的 cookie,用于标识此请求属于此 sessionID 对应的会话。此时再在控制器方法中调用 getSession() 方法,就会获取此请求所在的会话对象,即 HttpSession 对象。
以后,此同源站点的每一个请求,消息头中都会带上 Cookie 这个 header,里面有 JSESSIONID= session 的 id 这个 cookie ,用于标识此请求所属的会话。直到会话过期,分配新的 JSESSIONID,或者浏览器 cookie 过期或者被清除
cookie 是存储在浏览器的,所以其生命周期跟浏览器是同步的,想要清楚 cookie 的缓存,除了直接 Alt+Shift+Delete 清除浏览器缓存外,,在没有设置 cookie 的超时时间的情况下,可以通过重启浏览器来清除 cookie,如果设置了 cookie 的超时时间,在超时时间之内,重启浏览器,cookie 依然会保留,只有在过了超时时间的情况下,cookie 才会清除。
注意:只能匹配 url 中的参数和消息类型为
application/x-www-form-urlencoded的消息体中的参数
只需要请求参数的参数名和类中的属性名一致,那么请求参数就会为此属性赋值,
跟 通过参数名相同来匹配 一样,不要任何注解。Spring 之所以好用,就是因为这些自动化的操作。
注意,不是通过反射,private 属性需要通过 getter、setter 方法设置,所以必须为 private 属性设置 getter 和 setter,同时,如果参数无法转化成指定的类型,比如年龄在参数类中是 int 类型,但是实际参数值为中文字符串,那么就会报错。
根据面向对象的思想,实用类来管理数据结构,可以让代码的结构更情绪,更易于维护。
参数可以有多个类,只要请求参数名与这些类中的属性名相同,就都会赋值。同时,如果 JavaBean 的属性也是一个 JavaBean(这种情况下叫嵌套对象),那我们也可以通过数据绑定来设置这个嵌套对象的属性。
比如 JavaBean 类型为 A,其有一个 B 类型的属性,属性名为 b,同时 B 中也有一个 String 类型的属性为 c,那么我们可以通过指定消息类型为
application/x-www-form-urlencoded的消息体中的参数名b.c来设置 A 的值。具体请查看后文的@InitBinder 注解相关的章节。
JavaBean
public class User {

    private String username;
    private String gender;
    private int age;

    @Override
    public String toString() {
        return "User{" +
                "username='" + username + '\'' +
                ", gender='" + gender + '\'' +
                ", age=" + age +
                '}';
    }

    public String getUsername() {
        return username;
    }

    public void setUsername(String username) {
        System.out.println("-------------- setUsername --------");
        this.username = username;
    }

    public String getGender() {
        return gender;
    }

    public void setGender(String gender) {
        this.gender = gender;
    }

    public int getAge() {
        return age;
    }

    public void setAge(int age) {
        this.age = age;
    }
}
public class UserCopy {

    private String oid;

    private String profession;

    private String username;
    private String gender;
    private int age;

    @Override
    public String toString() {
        return "UserCopy{" +
                "oid='" + oid + '\'' +
                ", profession='" + profession + '\'' +
                ", username='" + username + '\'' +
                ", gender='" + gender + '\'' +
                ", age=" + age +
                '}';
    }

    public String getOid() {
        return oid;
    }

    public void setOid(String oid) {
        this.oid = oid;
    }

    public String getProfession() {
        return profession;
    }

    public void setProfession(String profession) {
        this.profession = profession;
    }

    public String getUsername() {
        return username;
    }

    public void setUsername(String username) {
        this.username = username;
    }

    public String getGender() {
        return gender;
    }

    public void setGender(String gender) {
        this.gender = gender;
    }

    public int getAge() {
        return age;
    }

    public void setAge(int age) {
        this.age = age;
    }
}
控制器方法
@RequestMapping("/testSpringMVCAPIPOJOMapping")
public String testSpringMVCAPIPOJOMapping(User user, UserCopy userCopy) {
    System.out.println(user.toString());
    System.out.println(userCopy.toString());
    return "target";
}
测试页面
<form method="get" th:action="@{/testParams/testSpringMVCAPIPOJOMapping}">
    <span>用户名:</span><input type="text" name="username" placeholder="username"/><br/>
    <span>性别:</span><input type="text" name="gender" placeholder="gender"/><br/>
    <span>年龄:</span><input type="text" name="age" placeholder="age"/><br/>
    <input type="submit" value="测试SpringMVCAPIPOJO映射"/>
</form>
输出日志

@RequestBody 可以读取任意格式(包括 application/x-www-form-urlencoded 和 application/json)的请求体,将其绑定到字符串类(String)的的控制器参数中,但是如果想将请求体映射为 Java Bean,对于 application/x-www-form-urlencoded 格式的消息体,那就没有必要强行用 @RequestBody 注解了,直接用 JavaBean 来接受参数就可以了,参考 直接用JavaBean来接受参数 小节,而对于 application/json 格式的请求体,@RequestBody 需要配合第三方 jar 包 jackson-databind 才能处理。
@RequestBody 获取任意格式的请求体并绑定到控制器的字符串类型的参数
控制器
/**
 * 只能以字符串的格式接受body参数
 */
@RequestMapping("/testSpringMVCAPIRequestBodyV1")
public String testSpringMVCAPIPOJOMappingV0(@RequestBody String body2userStr) {
    System.out.println(body2userStr);
    return "target";
}
前端 form
<form method="post" th:action="@{/testParams/testSpringMVCAPIRequestBodyV1}">
    <span>用户名:</span><input type="text" name="username" placeholder="username"/><br/>
    <span>性别:</span><input type="text" name="gender" placeholder="gender"/><br/>
    <span>年龄:</span><input type="text" name="age" placeholder="age"/><br/>
    <input type="submit" value="测试SpringMVCAPI@RequestBodyV1"/>
</form>
日志,可以注意到,gender 字段的值 男 被编码成了 %E7%94%B7
username=xiashuo&gender=%E7%94%B7&age=123
application/json 格式的请求体需要在 pom 中引入
<!-- https://mvnrepository.com/artifact/com.fasterxml.jackson.core/jackson-databind -->
<dependency>
    <groupId>com.fasterxml.jackson.core</groupId>
    <artifactId>jackson-databind</artifactId>
    <version>2.13.3</version>
</dependency>
@RequestBody 注解主要使用 HttpMessageConverter,完成 HTTP 消息体到 JavaBean 的转化,在后续学习@ResponseBody 注解的时候,会了解内容协商,也会注意到 HttpMessageConverter 的存在,也就是说HttpMessageConverter 在请求参数的解析和响应消息的解析中都会发生作用。
控制器:
// 注意:此时Form表单的post请求无效,会报格式不支持,因为form表单提交的请求的请求体格式是application/x-www-form-urlencoded,HttpMessageConverter不知道如何将请求体中的String转换成User类型,
// 需要发起消息体格式为application/json的post请求
@RequestMapping("/testSpringMVCAPIRequestBody")
public String testSpringMVCAPIPOJOMapping(@RequestBody User body2user, User user) {
    System.out.println(body2user.toString());
    System.out.println(user.toString());
    return "target";
}
这个时候通过 html 中的表单提交,会报错:
<form method="post" th:action="@{/testParams/testSpringMVCAPIRequestBody}">
    <span>用户名:</span><input type="text" name="username" placeholder="username"/><br/>
    <span>性别:</span><input type="text" name="gender" placeholder="gender"/><br/>
    <span>年龄:</span><input type="text" name="age" placeholder="age"/><br/>
    <input type="submit" value="测试SpringMVCAPI@RequestBody"/>
</form>
报错 415:不支持的媒体类型

控制台报错

为什么呢?因为用表单提交,Content-Type 是 application/x-www-form-urlencoded,系统内所有的 HttpMessageConverter 都无法将请求体解析成 JavaBean 的类型,所以报了一个 HttpMediaTypeNotSupportedException 类型的错,意思就是消息类型是不支持的类型。

这个时候我们可以通过 ApiPost 发起请求
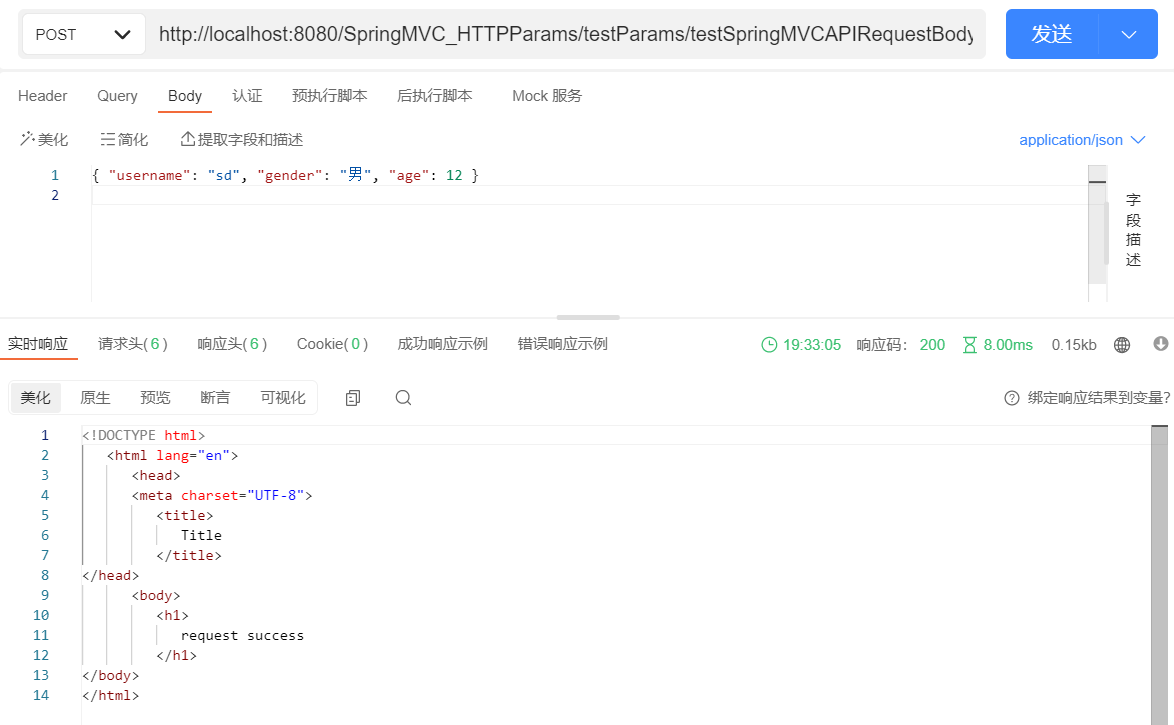
可以看到服务器正常响应,打出日志

可以看到,这个时候,只有@RequestBody 注解修饰的参数才有数据,未被@RequestBody 修饰的参数没有数据,这个主要消息体的格式决定的,控制器方法通过参数名称匹配请求参数,或者通过参数对象的属性匹配请求参数,只能在通过 URL 传递参数或者消息体消息类型为 application/x-www-form-urlencoded 的时候才可以
如果一个接口需要同时处理这两种情况,可以用 @RequestMapping 的 consumes 参数进行区分
@PostMapping(path = "/test", consumes = "application/json")
public String test(@RequestBody User user) {
  return user.toString();
}

@PostMapping(path = "/test", consumes = "application/x-www-form-urlencoded")
public String test(User user) {
  return user.toString();
}
具体看 参数校验 小节
@SessionAttributes 注解请看《SpringMVC- 第四篇:域对象共享数据》小节章的
@SessionAttributes的相关内容
如果您需要访问全局管理的 (即在控制器外部,例如通过过滤器) 已存在的会话属性(session attribute),并且可能存在也可能不存在,您可以在控制器方法参数上使用@SessionAttribute。
但是对于需要添加或删除会话属性的情况,考虑在控制器方法中使用 org.springframework.web.context.request.WebRequest 或 javax.servlet.http.HttpSession 类型的参数(SpringMVC 会自动注入相应类型的对象)。
对于需要在会话中临时存储 Model 属性作为多个控制器方法工作流的一部分,考虑使用 @SessionAttributes 注解。
@SessionAttribute 注解的 require 默认配置为 true,如果属性不存在,控制器方法调用会报错,所以有可能不存在的时候,设置 require 为 false。
@RequestMapping("/testSpringMVCAPISessionAttribute")
public String testSpringMVCAPISessionAttribute(@SessionAttribute(required = false) String ussername) {
    System.out.println(ussername.toString());
    return "target";
}
直接用 SpringTest 发起测试
@SpringJUnitWebConfig(locations = "classpath:springMVC.xml")
public class SpringMVCAPITest {
    MockMvc mockMvc;

    @BeforeEach
    void setup(WebApplicationContext wac) {
        this.mockMvc = MockMvcBuilders.webAppContextSetup(wac).build();
    }

    @Test
    void testSpringMVCAPISessionAttribute() throws Exception {
        // json格式的消息体,可以到达控制器方法
        MvcResult target = this.mockMvc.perform(
                        post("/testParams/testSpringMVCAPISessionAttribute")
                                .sessionAttr("ussername", "xiashuo123")
                )
                .andExpect(status().isOk())
                .andExpect(view().name("target")).andReturn();
    }

}
跟@SessionAttribute 类似,也很简单
@RequestMapping("/testSpringMVCAPIRequestAttribute")
public String testSpringMVCAPIRequestAttribute(@RequestAttribute(required = false) String requestAttr) {
    System.out.println(String.valueOf(requestAttr));
    return "target";
}
直接用 SpringTest 发起测试
@Test
void testSpringMVCAPIRequestAttribute() throws Exception {
    // json格式的消息体,可以到达控制器方法
    MvcResult target = this.mockMvc.perform(
                    post("/testParams/testSpringMVCAPIRequestAttribute")
                            .requestAttr("requestAttr", "xiashuo456")
            )
            .andExpect(status().isOk())
            .andExpect(view().name("target")).andReturn();
}
官方文档:HttpEntity
HttpEntity表示 HTTP 请求或响应实体,由消息头 headers 和消息体 body 组成,其中 body 的类型为泛型类型 T,通常用于 org.springframework.web.client.RestTemplate
HttpEntity(RequestEntity、ResponseEntity) 在 RestTemplate 中用的比较多
HttpHeaders headers = new HttpHeaders();
headers.setContentType(MediaType.TEXT_PLAIN);
HttpEntity<String> entity = new HttpEntity<String>(helloWorld, headers);
URI location = template.postForLocation("https://example.com", entity);
HttpEntity<String> entity = template.getForEntity("https://example.com", String.class);
String body = entity.getBody();
MediaType contentType = entity.getHeaders().getContentType();
或者在 Spring MVC 中用作一个控制器方法的返回值
@RequestMapping("/handle")
public HttpEntity<String> handle() {
    HttpHeaders responseHeaders = new HttpHeaders();
    responseHeaders.set("MyResponseHeader", "MyValue");
    return new HttpEntity<String>("Hello World", responseHeaders);
}
HttpEntity 的扩展,主要功能是公开 HTTP 方法和要访问的 URL。用于在 RestTemplate 表示要发起的请求和@Controller 方法中表示请求输入。
RequestEntity<MyRequest> request = RequestEntity
    .post("https://example.com/{foo}", "bar")
    .accept(MediaType.APPLICATION_JSON)
    .body(body);
ResponseEntity<MyResponse> response = template.exchange(request, MyResponse.class);
@RequestMapping("/handle")
public void handle(RequestEntity<String> request) {
    HttpMethod method = request.getMethod();
    URI url = request.getUrl();
    String body = request.getBody();
}
HttpEntity 的扩展,添加一个 HttpStatus 状态代码。在 RestTemplate 和@Controller 方法中使用。
在 RestTemplate 中,这个类由 getForEntity() 和 exchange() 返回。
ResponseEntity<String> entity = template.getForEntity("https://example.com", String.class);
String body = entity.getBody();
MediaType contentType = entity.getHeaders().getContentType();
HttpStatus statusCode = entity.getStatusCode();
在 Spring MVC 中用作一个控制器方法的返回值
@RequestMapping("/handle")
public ResponseEntity<String> handle() {
    URI location = ...;
    HttpHeaders responseHeaders = new HttpHeaders();
    responseHeaders.setLocation(location);
    responseHeaders.set("MyResponseHeader", "MyValue");
    return new ResponseEntity<String>("Hello World", responseHeaders, HttpStatus.CREATED);
}
或者通过静态方法使用构建器
@RequestMapping("/handle")
public ResponseEntity<String> handle() {
    URI location = ...;
    return ResponseEntity.created(location).header("MyResponseHeader", "MyValue").body("Hello World");
}
使用
ResponseEntity,我们可以手动定制,我们返回的**整个 HTTP 响应的方方面面**,包括消息体的 MediaType,虽然最终依然会经过内容协商的处理。
控制器方法,这里没有使用类型参数,当然,RequestEntity 也可以带类型参数,表示将请求消息体转化为何种类型的 JavaBean,效果基本上就跟@RequestBody 一模一样了,能使用参数 @RequestBody T t 的控制器方法,也可以使用参数 RequestEntity<T> requestEntity。
@RequestMapping("/testSpringMVCHttpEntity")
public ResponseEntity<User> testSpringMVCHttpEntity(RequestEntity requestEntity) {
    System.out.println(requestEntity.toString());
    User user = new User("xiashuo", "男", 18);
    // 容器中肯定要有可以将 User 转化为 MediaType.APPLICATION_JSON_VALUE 的工具,否则就会报错
    ResponseEntity<User> response = ResponseEntity.created(URI.create("www.baidu.com")).header("Content-Type", MediaType.APPLICATION_JSON_VALUE).body(user);
    return response;
}
测试
@Test
void testSpringMVCHttpEntity() throws Exception {
    mockMvc.perform(get("/testParams/testSpringMVCHttpEntity")).andDo(print());
}
日志
<GET http://localhost/testParams/testSpringMVCHttpEntity,[]>
MockHttpServletRequest:
HTTP Method = GET
Request URI = /testParams/testSpringMVCHttpEntity
Parameters = {}
Headers = []
Body = <no character encoding set>
Session Attrs = {}
Handler:
Type = xyz.xiashuo.springmvchttpparams.controller.TestParamsController
Method = xyz.xiashuo.springmvchttpparams.controller.TestParamsController#testSpringMVCHttpEntity(RequestEntity)
Async:
Async started = false
Async result = null
Resolved Exception:
Type = null
ModelAndView:
View name = null
View = null
Model = null
FlashMap:
Attributes = null
MockHttpServletResponse:
Status = 201
Error message = null
Headers = [Location:"www.baidu.com", Content-Type:"application/json"]
Content type = application/json
Body = {"username":"xiashuo","gender":"ç·","age":18}
Forwarded URL = null
Redirected URL = www.baidu.com
Cookies = []
容器中肯定要有可以将 User 转化为 MediaType.APPLICATION_JSON_VALUE 的工具,否则就会报错,比如返回 MediaType.APPLICATION_XML_VALUE
19:30:31.553 [main] WARN org.springframework.web.servlet.mvc.support.DefaultHandlerExceptionResolver - Resolved [org.springframework.http.converter.HttpMessageNotWritableException: No converter for [class xyz.xiashuo.springmvchttpparams.domain.User] with preset Content-Type 'application/xml']
分两种情况,get 请求的请求参数乱码和 post 请求的请求参数乱码
get 请求的请求参数是添加在 URL 后面的,请求参数的乱码是由 URL 的解码/编码格式不对造成的,我们需要设置 tomcat 服务器的 URL 解码/编码格式,路径是 Tomcat安装路径\conf\server.xml,加上 URIEncoding="UTF-8"

post 请求的请求参数是放在请求体中的,请求参数的乱码是由请求体的解码格式不对造成的,需要设置 HttpServletRequest 的 setCharacterEncoding,这个时候,我们需要借助 SpringMVC 默认提供的 filter,CharacterEncodingFilter,在 Servlet 获取参数之前,就设置请求的请求体的编码格式,同时,顺带,把相应的消息体的编码格式,也设置了,即,设置 forceRequestEncoding 和 forceResponseEncoding 这两个初始化参数为 true。
<!--配置springMVC的编码过滤器-->
<filter>
    <filter-name>CharacterEncodingFilter</filter-name>
    <filter-class>org.springframework.web.filter.CharacterEncodingFilter</filter-class>
    <init-param>
        <param-name>encoding</param-name>
        <param-value>UTF-8</param-value>
    </init-param>
    <init-param>
        <param-name>forceRequestEncoding</param-name>
        <param-value>true</param-value>
    </init-param>
    <init-param>
        <param-name>forceResponseEncoding</param-name>
        <param-value>true</param-value>
    </init-param>
</filter>
<filter-mapping>
    <filter-name>CharacterEncodingFilter</filter-name>
    <url-pattern>/*</url-pattern>
</filter-mapping>
之前,在学习 Servlet 的时候,常用做法也是在 filter 中进行编码格式设置和登录验证等等。
SpringMVC 中处理编码的过滤器一定要配置到其他过滤器之前,否则无效。
在 web.xml 中指定过滤器的调用顺序,是由<filter-mapping> 标签决定的,哪个 <filter> 的 <filter-mapping> 元素在前面则哪个 <filter> 首先被调用。但是,如果仅使用@WebFilter 注解,是无法指定过滤器的顺序的,作为变通,我们可以结合@WebFilter 和 web.xml 中的标签一起使用。
因为在 CharacterEncodingFilter 中通过 request.setCharacterEncoding(encoding) 方法设置字符集的,request.setCharacterEncoding(encoding) 方法要求前面不能有任何获取请求参数的操作
除了 CharacterEncodingFilter,SpringMVC 还提供了 CorsFilter 处理跨域请求的 filter,CommonsRequestLoggingFilter,记录请求日志的 filter,HiddenHttpMethodFilter 用于将 Post 请求转化为其他请求方法的请求,等 filter
还有 MultipartFilter ,作为与 org.springframework.web.servlet 一起使用 MultipartResolver 的替代方案。DispatcherServlet,可以在 web.xml 中注册 org.springframework.web.multipart.support.MultipartFilter。它将委托给根应用程序上下文中对应的 MultipartResolver。这主要针对那些没有使用 Spring web MVC 框架的应用程序。
关于参数校验,可以看
《JavaBeanValidation+HibernateValidator》
《SpringMVC 整合 JavaBeanValidation 及拓展》
这两篇博客,基本上 Bean Validation 的应用知识都涉及到了
其实参数校验,主要涉及到的是数据绑定(DataBinder),SpringMVC 的 WebDataBinder 非常重要,有需要的话可以@InitBinder 配置,
这个等到以后深入学习 DataBinder 的时候,再去写一篇文章
一般都是直接返回视图名,直接返回视图名表示直接返回网页,响应的消息体的格式就是确定的,就是 text/html。那当我们开始想返回别的类型的响应(比如 JSON、XML)的时候,只有配合@ResponseBody 注解才可以实现。
@ResponseBody 用于标识一个控制器方法,可以将该方法的返回值直接作为响应报文的响应体响应到浏览器。用在类上表示此控制器中的所有的方法都使用@ResponseBody
默认的 HttpMessageConverter 的配置
<mvc:annotation-driven>
    <mvc:message-converters>
        <!-- 处理响应中文内容乱码 -->
        <bean class="org.springframework.http.converter.StringHttpMessageConverter">
            <property name="defaultCharset" value="UTF-8"/>
            <property name="supportedMediaTypes">
                <list>
                    <value>text/html</value>
                    <value>application/json</value>
                </list>
            </property>
        </bean>
    </mvc:message-converters>
</mvc:annotation-driven>
引入相关依赖,
<!-- https://mvnrepository.com/artifact/com.fasterxml.jackson.core/jackson-databind -->
<dependency>
    <groupId>com.fasterxml.jackson.core</groupId>
    <artifactId>jackson-databind</artifactId>
    <version>2.13.3</version>
</dependency>
然后在 SpringMVC 的核心配置文件中开启 mvc 的注解驱动,此时在 HandlerAdaptor 中会自动装配一个消息转换器:MappingJackson2HttpMessageConverter,可以将响应到浏览器的 Java 对象转换为 Json 格式的字符串
<mvc:annotation-driven />
在处理器方法上使用@ResponseBody 注解进行标识,将 Java 对象直接作为控制器方法的返回值返回,就会自动转换为 Json 格式的字符串
@ResponseBody
@RequestMapping("/responseList")
public List<String> responseList() {
    List<String> list = new ArrayList<>();
    list.add("xiashuo");
    list.add("kkkkkkkk");
    list.add("zzzz");
    return list;
}
启动 tomcat,然后访问控制器,直接得到 json 格式的数据的返回。返回格式中的中文需要配置 CharacterEncodingFilter 才可以正常编码。回看 处理请求参数、响应乱码
// 20220824074136
// http://localhost:8080/SpringMVC_HTTPParams/testResponse/responseJavaBean

{
  "username": "xiashuo",
  "gender": "男",
  "age": 18
}
注意,使用的 SpringMVC Test 测试控制器的话,依然有会乱码,因为 SpringMVC Test 无法使用
web.xml中配置的CharacterEncodingFilter过滤器。回看SpringMVC-SpringMVCTest文档
经过测试可以得出结论
@ResponseBody + String 类型的返回值 : 响应消息头 Content-Type:"text/html;charset=UTF-8",原因主要是因为配置的第一个 HttpMessageConverter 是 StringHttpMessageConverter,其 supportedMediaTypes 配置的第一个是 text/html,看《SpringMVC-ContentNegotiation 内容协商》了解详情。
这里有一点需要注意,当@ResponseBody 修饰的方法的返回值类型为 String 类型的时候,不引入 jackson-databind 依赖也不会报错,这是因为 SpringMVC 初始化的时候默认注入一个 StringHttpMessageConverter,支持 String 类型,所以默认情况下 String 类型的返回值就可以解析,而且 StringHttpMessageConverter 也支持将字符串转化为 json 类型的 MediaType。这跟@RequestBody 注解可以将 application/json 格式的请求体放到 String 类型的控制器方法参数中,原因是一样。
看《SpringMVC-ContentNegotiation 内容协商》。
@ResponseBody + JavaBean 类型的返回值 : 响应消息头 Content-Type:"application/json"
@ResponseBody + List 类型的返回值 : 响应消息头 Content-Type:"application/json"
@ResponseBody + Map 类型的返回值 : 响应消息头 Content-Type:"application/json"
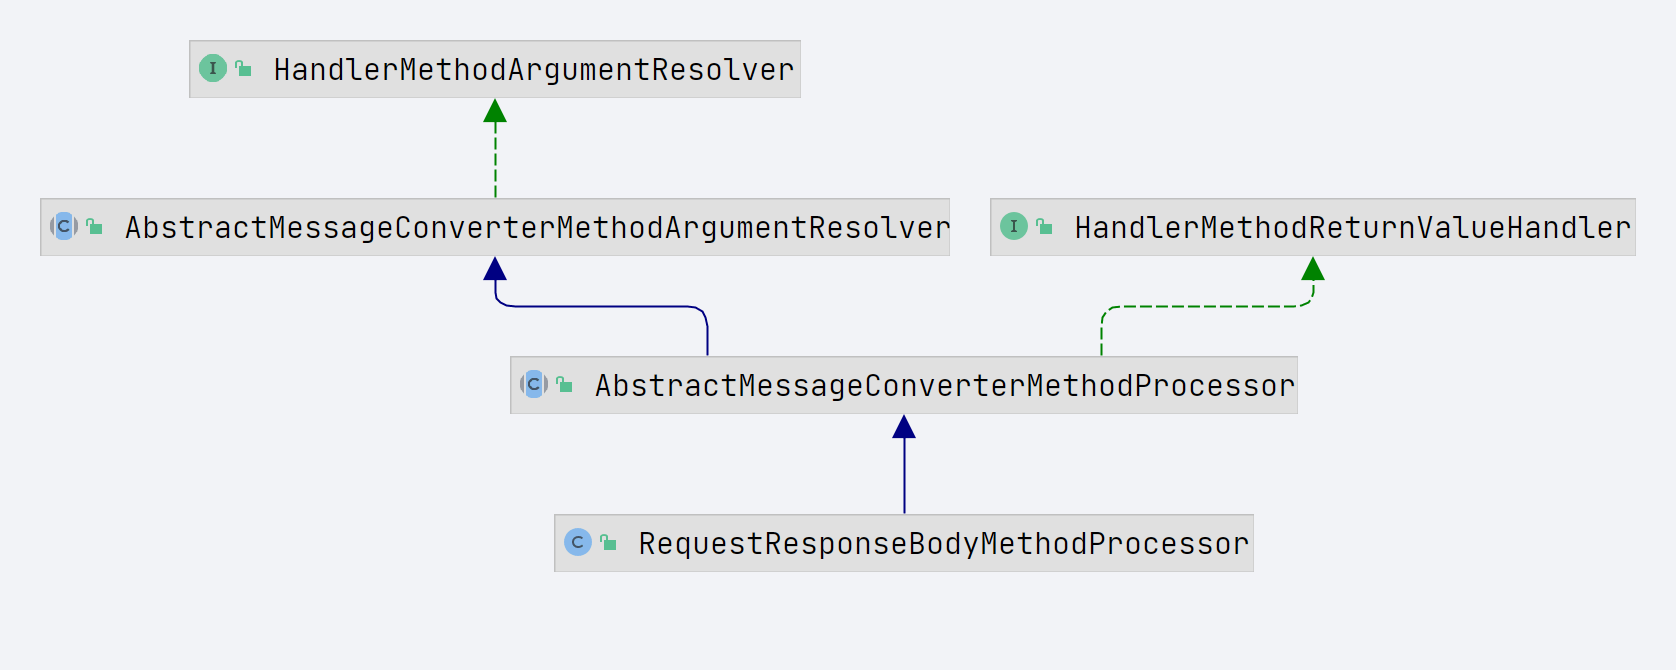
处理 @ResponseBody 的类是 RequestResponseBodyMethodProcessor
这里涉及到内容协商的内容,去看《SpringMVC-ContentNegotiation 内容协商》
和《SpringMVC- 第二篇:控制器方法与请求映射》中@RequestMapping 基本属性的 produces 属性
看《SpringMVC-ContentNegotiation 内容协商》。
HttpMessageConverter,报文信息转换器,将请求报文转换为 Java 对象,或将 Java 对象转换为响应报文
HttpMessageConverter 提供了两个注解和两个类型:@RequestBody,@ResponseBody,RequestEntity,ResponseEntity
看《SpringMVC-ContentNegotiation 内容协商》中关于 HttpMessageConverter 的内容。
Spring 默认没有自带处理 JSON 格式的 HttpMessageConverter,所以需要我们从外部引入
<dependency>
    <groupId>com.fasterxml.jackson.core</groupId>
    <artifactId>jackson-databind</artifactId>
    <version>2.13.3</version>
</dependency>
<!--        <!– jackson默认只会支持的json。若要xml的支持,需要额外导入如下包 –>-->
<dependency>
    <groupId>com.fasterxml.jackson.dataformat</groupId>
    <artifactId>jackson-dataformat-xml</artifactId>
    <version>2.9.8</version>
</dependency>
Spring 在加载默认的 HttpMessageConverter 的时候,会根据类路径中是否存在 com.fasterxml.jackson.databind.ObjectMapper 决定是否添加 MappingJackson2HttpMessageConverter;根据类路径中是否存在 com.fasterxml.jackson.dataformat.xml.XmlMapper 决定是否添加 MappingJackson2XmlHttpMessageConverter。而 jackson-databind 刚好引入了 com.fasterxml.jackson.databind.ObjectMapper,jackson-dataformat-xml 刚好引入了 com.fasterxml.jackson.dataformat.xml.XmlMapper。
看《SpringMVC- 第九篇:基于 XML 配置 SpringMVC》中 AnnotationDrivenBeanDefinitionParser 小节相关的内容
一些带注解的控制器方法的参数都是基于 String 类型的请求输入 (如@RequestParam, @RequestHeader, @PathVariable, @MatrixVariable 和@CookieValue),如果参数声明为 String 以外的其他类型,则需要进行类型转换。
对于这种情况,SpringMVC 根据配置的 converters 自动进行类型转换。默认情况下,支持简单类型 (int、long、Date 等)。你可以通过 WebDataBinder(参见 DataBinder) 或者通过在 FormattingConversionService 中注册 Formatters 来定制类型转换。
Converter 跟 HttpMessageConverter 可不是一个类,作用也不一样,HttpMessageConverter 主要用于解析 HTTP 协议中指定的 MediaType 格式的信息,Converter 主要用于 Java 类型中的转换,他们处理的类型不一样。
类型转换中的一个实际问题是对空 String 值的处理。如果这种值在类型转换后变为 null,则将其视为缺失值。目标类型可能是 Long、UUID 和其他类型。如果您希望允许注入 null,可以在参数注释中使用 required 参数,比如@RequestParam 就有 required 参数,或者将参数声明为@Nullable。
关于 SpringMVC 中的类型转换和数值绑定,这里不都介绍,需要去看专门的专题:
《SpringMVC 中的类型转换》
《SpringMVC 中的数据绑定》
现在我们来简单看看如何通过@InitBinder 注解自定义 WebDataBinder,进行简单的类型转换和参数绑定。
@InitBinder 注解标识的方法用于初始化 org.springframework.web.bind.WebDataBinder,WebDataBinder 则用于填充控制器方法的命令对象(command object)和表格对象(form object)参数。
控制器方法的 JavaBean 类型的参数,有时候也叫command object(命令对象),(form-backing object)表单支撑对象,或者 POJO (Plain Old Java Object)
form object(表格对象),指的是 MediaType 为
application/x-www-form-urlencoded的请求的请求体对应的对象
参数:
@InitBinder 注解标识的方法支持使用所有 @RequestMapping 支持的所有参数,除了命令/表单对象和相应的验证结果对象(BindingResult 类型)。@InitBinder 注解标识的方法的参数通常是 org.springframework.web.bind.WebDataBinder 或者,org.springframework.web.context.request.WebRequest 或者 java.util.Locale。
返回值:
@InitBinder 注解标识的方法不能有返回值; 它们的返回值通常为 void 类型的。
value 属性 - 重要
有一个参数 value,默认值是是空数组,表示此 @InitBinder 方法应用于其所在控制器类中的所有控制器方法的所有命令对象/表单对象参数的属性和请求参数。如果指定 value 值,则表示,此 @InitBinder 注解标识的方法仅用于与 value 值匹配的 Model 属性或请求参数的处理,实际上,我们一般用不同的 @InitBinder 方法处理不同的 Model 属性或请求参数。
如果指定了 value,则需要用@ModelAttribute 和@RequestParam 标识控制器方法参数,才能被
@InitBinder标识的方法处理。
在 web 应用程序上下文中,数据绑定包含两部分的功能,一是到将 HTTP 请求参数 (即表单数据或查询参数) 绑定到模型 (Model) 对象的属性中,同时也会尝试与模型对象的的嵌套对象中的属性。
注意这个 Model 就是字面上的模型的意思,跟视图中的 Model 类不是一个意思,控制器方法的参数中,模型对象或者说 JavaBean 类型的参数叫做 command object(命令对象)
什么是嵌套属性,A 是一个 Model,一个 Java 类,B 也是一个 Java 类,同时对象 B 是对象 A 的属性,那么 B 就是 A 的嵌套对象。
只有遵循 JavaBeans 命名约定的公共属性才被暴露用于数据绑定,例如,firstName 字段的的公共 String getFirstName() 和公共 void setFirstName(String) 方法表明了其是公共的字段/属性。
默认情况下,Spring 允许绑定到模型对象图中的所有公共属性,这意味着您需要仔细考虑模型有哪些公共属性,因为客户端可以针对任何嵌套路径下的公共属性进行绑定,因此,自动的数据绑定,可能会超出预期地修改深层嵌套对象的一些属性的值。
解决方案:
推荐的方法是使用专用的模型对象,只公开与表单提交相关的属性,即每一个或者每一类表单,都专门设计一个 POJO 与之对应。
限制数据绑定所允许的属性。理想情况下,您可以通过 WebDataBinder 上的 setAllowedFields() 方法注册允许的字段名模板来实现这一点。除了注册允许的字段名模式外,还可以通过 setDisallowedFields() 方法注册不允许的字段名模式。但是,请注意,“允许列表”比“拒绝列表”更安全。因此,setAllowedFields() 应该优先于 setDisallowedFields()。注意,匹配允许的字段名模式是区分大小写的; 然而,匹配不允许的字段名模式是不区分大小写的。此外,匹配不允许的模式的字段将不被接受,即使它碰巧也匹配允许列表中的模式。
字段名模板支持
*通配符,匹配实现是PatternMatchUtils.simpleMatch()
嵌套对象的属性绑定算是对
直接用JavaBean来接受参数小节的补充
简单的嵌套属性绑定:
模型对象 Company
public class Company {

    private User owner = new User();

    private String companyName;

    private int age;

    ......
    // 省略 get/set/toString方法
}
模型 User
public class User {

    private String username;

    private String gender;

    private int age;

    ......
    // 省略 get/set/toString方法

}
控制器
@RestController
@RequestMapping("/ModelAllowedField")
public class TestModelAllowedFieldController {

    @RequestMapping("/testSimpleDataBind")
    public String testSimpleDataBind(Company companyInfo) {
        System.out.println(companyInfo.toString());
        return "companyInfo accept success";
    }

}
测试方法
@SpringJUnitWebConfig(locations = "classpath:springMVC.xml")
class TestModelAllowedFieldControllerTest {
    MockMvc mockMvc;

    @BeforeEach
    void setup(WebApplicationContext wac) {
        this.mockMvc = MockMvcBuilders.webAppContextSetup(wac).build();
    }

    @Test
    void testSimpleDataBind() throws Exception {
        mockMvc.perform(get("/ModelAllowedField/testSimpleDataBind")
                .queryParam("owner.username", "xiashuo")
                .queryParam("owner.gender", "female")
                .queryParam("owner.age", "26")
                .queryParam("companyName", "Xiaomi")
                .queryParam("age", "14")
        ).andDo(print());
    }

}
测试日志
Company{owner=User{username='xiashuo', gender='female', age=26}, companyName='Xiaomi', age=14}
注意:嵌套对象的属性设置,需要加上此对象在所属模型中的属性名为前缀,比如 User 对象在 Company 对象中的属性名为 owner,因此通过请求参数设置其 User 属性的属性,请求参数名需要以 owner. 开头,比如 owner.gender 或则和 owner.username。
这种用嵌套对象的属性引出内部属性名的写法,跟《Spring5-IOC 容器》中通过 XML 配置 Spring 的时候提到的级联赋值很像
其实是因为,他们的本质上都是调用
AbstractNestablePropertyAccessor中实现的setPropertyValue方法进行属性设置
现在,我们来对嵌套对象的属性设置进行限制
在控制器中添加控制器方法和 @InitBinder 方法,同时 @InitBinder 方法指定 value 参数为特定的 Model 属性 compInfo,因此,控制器方法对应的参数也要指定 @ModelAttribute("compInfo"),如此,@InitBinder 方法中设置的不允许的字段方能生效。当然了,如果 @InitBinder 方法不设置 value 属性,则对所有控制器方法参数中的所有命令对象参数(模型对象)和表单对象属性和所有请求参数生效,此时控制器方法参数有没有配置 @ModelAttribute 都能生效。
@InitBinder({"compInfo"})
public void AllowedAndDisAllowedFields(WebDataBinder binder) {
    binder.setDisallowedFields("owner.*");
}

@RequestMapping("/testAllowedDataBind")
public String testAllowedDataBind(@ModelAttribute("compInfo") Company companyInfo) {
    System.out.println(companyInfo.toString());
    return "companyInfo accept success";
}
测试方法
@Test
void testAllowedDataBind() throws Exception {
    mockMvc.perform(get("/ModelAllowedField/testAllowedDataBind")
            .queryParam("owner.username", "xiashuo")
            .queryParam("owner.gender", "female")
            .queryParam("owner.age", "26")
            .queryParam("companyName", "Xiaomi")
            .queryParam("age", "14")
    ).andDo(print());
}
输出日志:
Company{owner=User{username='null', gender='null', age=0}, companyName='Xiaomi', age=14}
可以看到 Company 中的属性赋值不受影响,但是其嵌套对象的属性都没有赋值,这就是因为 binder.setDisallowedFields("owner.*"); 对这些属性进行了限制。
稍微查看了下源码,发现:
指定的允许字段和不允许字段在 DataBinder 的 doBind 方法中生效,先调用 checkAllowedFields 检查允许的字段名,再调用 checkRequiredFields 检查必要字段是否存在,不存在就报错,最后的属性应用在 applyPropertyValues 方法中执行,最终是调用 AbstractPropertyAccessor 中定义的 AbstractNestablePropertyAccessor 中实现的 setPropertyValue 方法。
这里就不深究了,以后有机会再细看。
直接看实践代码
@RestController
@RequestMapping("/InitBinder")
public class TestInitBinderController {

    @InitBinder({"userInfo", "carInfo"})
    public void addConverter4User(WebDataBinder binder) {
        binder.addCustomFormatter(new UserFormatter());
        binder.addCustomFormatter(new MyDateFormatter());
        // 当然也可以直接使用 org.springframework.format.datetime.DateFormatter
        //binder.addCustomFormatter(new DateFormatter("yyyy年MM月dd日"));
    }

    // 单个请求参数转化为模型对象
    // @RequestParam 注解必须带上,否则不生效
    @RequestMapping("/convertSingleParameter")
    public String convertSingleParameter(@RequestParam User userInfo, Model model) {
        System.out.println(userInfo);
        return "userInfo convert success";
    }

    // 多个请求参数转化为模型对象,同时单个请求参数转化为模型对象的一个嵌套对象
    // 这个时候,首先需要用 @ModelAttribute("carInfo") 标记参数为Model域属性同时设置名称,然后再在@InitBinder的value属性中指定这个名称,这样,此JavaBean参数的解析,才会用到@InitBinder方法中设置的formatter
    @RequestMapping("/convertBeanProperty")
    public String convertBeanProperty(@ModelAttribute("carInfo") Car carInfo, Model model) {
        System.out.println(carInfo);
        return "userInfo convert success";
    }

    static class UserFormatter implements Formatter<User> {
        @Override
        public User parse(String text, Locale locale) throws ParseException {
            User user = new User();
            String[] parts = text.split(";");
            for (String part : parts) {
                String[] values = part.split("=");
                String name = values[0].trim();
                Object value = values[1].trim();
                if (name.equals("age")) {
                    value = Integer.valueOf(String.valueOf(value));
                }
                try {
                    Field field = User.class.getDeclaredField(name);
                    field.setAccessible(true);
                    field.set(user, value);
                } catch (NoSuchFieldException e) {
                    throw new RuntimeException(e);
                } catch (IllegalAccessException e) {
                    throw new RuntimeException(e);
                }
            }
            return user;
        }

        @Override
        public String print(User object, Locale locale) {
            return object.toString();
        }
    }

    static class MyDateFormatter implements Formatter<Date> {
        private static final String DATE_FORMAT = "yyyy年MM月dd日";

        private static SimpleDateFormat formatter = new SimpleDateFormat(DATE_FORMAT);


        @Override
        public Date parse(String text, Locale locale) throws ParseException {
            return formatter.parse(text);
        }

        @Override
        public String print(Date object, Locale locale) {
            return formatter.format(object);
        }
    }

}
测试方法
@SpringJUnitWebConfig(locations = "classpath:springMVC.xml")
class TestInitBinderControllerTest {

    MockMvc mockMvc;

    @BeforeEach
    void setup(WebApplicationContext wac) {
        this.mockMvc = MockMvcBuilders.webAppContextSetup(wac).build();
    }


    @Test
    void testConvert() throws Exception {
        mockMvc.perform(get("/InitBinder/convertSingleParameter").queryParam("userInfo", "username=123;gender=female;age=20")).andDo(print());
    }

    @Test
    void testConvert2() throws Exception {
        mockMvc.perform(get("/InitBinder/convertBeanProperty")
                .queryParam("owner", "username=123;gender=female;age=20")
                .queryParam("manufacturerDate", "2022年9月5日")
                .queryParam("age", "14")
                .queryParam("brand", "Tesla")
        ).andDo(print());
    }

}
看 convertSingleParameter 方法,测试类执行结果
User{username='123', gender='female', age=20}
可以看到正常解析了,现在来分析一下
首先,我们必须用 @RequestParam 修饰这个控制器方法的参数,因为是将单个 HTTP 请求参数转化为一个 JavaBean 对象,所以需要加上 @RequestParam 指定,否则,会尝试将多个 HTTP 请求参数适配给 JavaBean 中的属性。@RequestParam 会默认使用控制器方法中此参数的参数名去匹配 HTTP 请求中的请求参数名(当然你也可以手动指定)。
然后为了让 @InitBinder 注解对其生效,我们需要将其添加到 @InitBinder 注解的 value 属性中,让 @InitBinder 注解修饰的方法,只对此请求参数生效。当然你也可以不适用 value 属性,让 @InitBinder 注解修饰的方法对所有控制器方法的所有命令对象/表单对象参数的属性和请求参数。
接下来,我们需要在 @InitBinder 注解修饰的方法中添加自定义的 Formatter 接口实现到 WebDataBinder 中,自定义实现也很简单,直接实现泛型接口 Formatter<T> 然后实现 parse 和 print 方法即可,在测试中,我们传入的是逗号分隔的键值对:username=123;gender=female;age=20,需要手动解析,简单思路就是通过英文逗号之后,然后通过反射设置值,这个例子很具有代表性,以后不管什么样格式的字符串,我们都可以通过这样的方式将其转化为一个 JavaBean,并绑定到一个控制器方法的参数上。
看 convertBeanProperty 方法,测试类执行结果
Car{owner=User{username='123', gender='female', age=20}, brand='Tesla', age=14, manufacturerDate=Mon Sep 05 00:00:00 CST 2022}
这个时候,首先需要用 @ModelAttribute("carInfo") 标记参数为 Model 域属性同时设置参数名称,如果不使用 @ModelAttribute 指定 Car 类型参数的名称,默认的参数名称就是 car,而不是实际的名称 carInfo,然后再在@InitBinder 的 value 属性中指定这个 Model 属性名称,这样,此 JavaBean 参数的解析,才会用到@InitBinder 方法中设置的 formatter,
当然你也可以不适用 value 属性,让 @InitBinder 注解修饰的方法对所有控制器方法的所有命令对象/表单对象参数的属性和请求参数,此时也不需要在 Car 类型参数前加 @ModelAttribute("carInfo") 来标记参数名称了,当然我们不建议这么做,能控制能够精细一些的时候,还是精细一些,不然会有很多意想不到的 bug。
接下来,我们需要在 @InitBinder 注解修饰的方法中添加自定义的 Formatter 实现,这次,我们除了添加自定义的 UserFormatter(上一小节提到了),还添加了自定义的 MyDateFormatter 用来处理非常规的时间字符串。当然,如果时间字符串的格式不是那么古怪,也可以直接使用 org.springframework.format.datetime.DateFormatter。
新建 Person 模型
public class Person {

    private String username;

    private String gender;

    private int age;

    ......
    // 省略 get/set/toString方法

}
新建 Converter 实现类 String2PersonConverter 用于将字符串转化为 Person 类
public class String2PersonConverter implements Converter<String, Person> {

    @Override
    public Person convert(String source) {
        Person person = new Person();
        String[] parts = source.split(";");
        for (String part : parts) {
            String[] values = part.split("=");
            String name = values[0].trim();
            Object value = values[1].trim();
            if (name.equals("age")) {
                value = Integer.valueOf(String.valueOf(value));
            }
            try {
                Field field = Person.class.getDeclaredField(name);
                field.setAccessible(true);
                field.set(person, value);
            } catch (NoSuchFieldException e) {
                throw new RuntimeException(e);
            } catch (IllegalAccessException e) {
                throw new RuntimeException(e);
            }
        }
        return person;
    }

}
在 SpringMVC 配置文件中注册此 Converter
<mvc:annotation-driven conversion-service="conversionService"/>

<bean id="conversionService" class="org.springframework.format.support.FormattingConversionServiceFactoryBean">
    <property name="converters">
        <set>
            <bean class="xyz.xiashuo.springmvchttpparams.converters.String2PersonConverter"/>
        </set>
    </property>
</bean>
如果是通过注解配置 SpringMVC 的话,则直接在 WebMvcConfigurer 的实现类中,重写 addFormatters 方法即可
@Override
public void addFormatters(FormatterRegistry registry) {
    registry.addConverter(new String2PersonConverter());
}
然后就可以在控制器方法中直接使用,不要再写 @InitBinder 注解,彻底解放双手。
@RestController
@RequestMapping("/Converter")
public class TestConverterController {

    @RequestMapping("/singleParameter")
    public String singleParameter(@RequestParam Person person, Model model) {
        System.out.println(person);
        return "userInfo convert success";
    }

}
测试类
@SpringJUnitWebConfig(locations = "classpath:springMVC.xml")
class TestConverterControllerTest {
    MockMvc mockMvc;

    @BeforeEach
    void setup(WebApplicationContext wac) {
        this.mockMvc = MockMvcBuilders.webAppContextSetup(wac).build();
    }


    @Test
    void singleParameter() throws Exception {
        mockMvc.perform(get("/Converter/singleParameter").queryParam("person", "username=123;gender=female;age=20")).andDo(print());
    }
}
执行日志
Person{username='123', gender='female', age=20}
因此,如果在业务系统中,需要经常处理字符串到特定类型的转换,我们都应该将其进行系统级的配置,方便在控制器中使用。
还有别的场景,这里就不一一研究了,有需要再去学习。
Using Custom Data Binders in Spring MVC | Baeldung
官方文档,从官方文档中得知 MultipartFile 还可以放到对象里面,然后用对象接收 form 表单参数,还挺好用的
class MyForm {

    private String name;

    private MultipartFile file;

    // ...
}

@Controller
public class FileUploadController {

    @PostMapping("/form")
    public String handleFormUpload(MyForm form, BindingResult errors) {
        if (!form.getFile().isEmpty()) {
            byte[] bytes = form.getFile().getBytes();
            // store the bytes somewhere
            return "redirect:uploadSuccess";
        }
        return "redirect:uploadFailure";
    }
}
开始实践
引入相关依赖,commons-io 中有非常多的 IO 相关的工具类,比如 FileUtils,非常好用
<!--        文件上传下载-->
<!-- https://mvnrepository.com/artifact/commons-io/commons-io -->
<dependency>
    <groupId>commons-io</groupId>
    <artifactId>commons-io</artifactId>
    <version>2.11.0</version>
</dependency>
<!-- https://mvnrepository.com/artifact/commons-fileupload/commons-fileupload -->
<dependency>
    <groupId>commons-fileupload</groupId>
    <artifactId>commons-fileupload</artifactId>
    <version>1.4</version>
</dependency>
在 SpringMVC 配置文件中,添加 MultipartResolver 解析器,注意必须设置 id 为 multipartResolver,否则无法生效,MultipartResolver 主要用于处理 multipart/* 这一类 MediaType(主要是 "multipart/form-data"),将上传的文件封装为 MultipartFile 对象。
<!--    上传文件解析器-->
<!-- 创建MultipartResolver解析器 -->
<bean id="multipartResolver" class="org.springframework.web.multipart.commons.CommonsMultipartResolver">
    <!-- 配置属性,可以省略不配置,设置上传的文件maxSize,单位为B(字节) -->
    <property name="maxUploadSize" value="1000000"></property>
    <property name="defaultEncoding" value="UTF-8"/>
</bean>
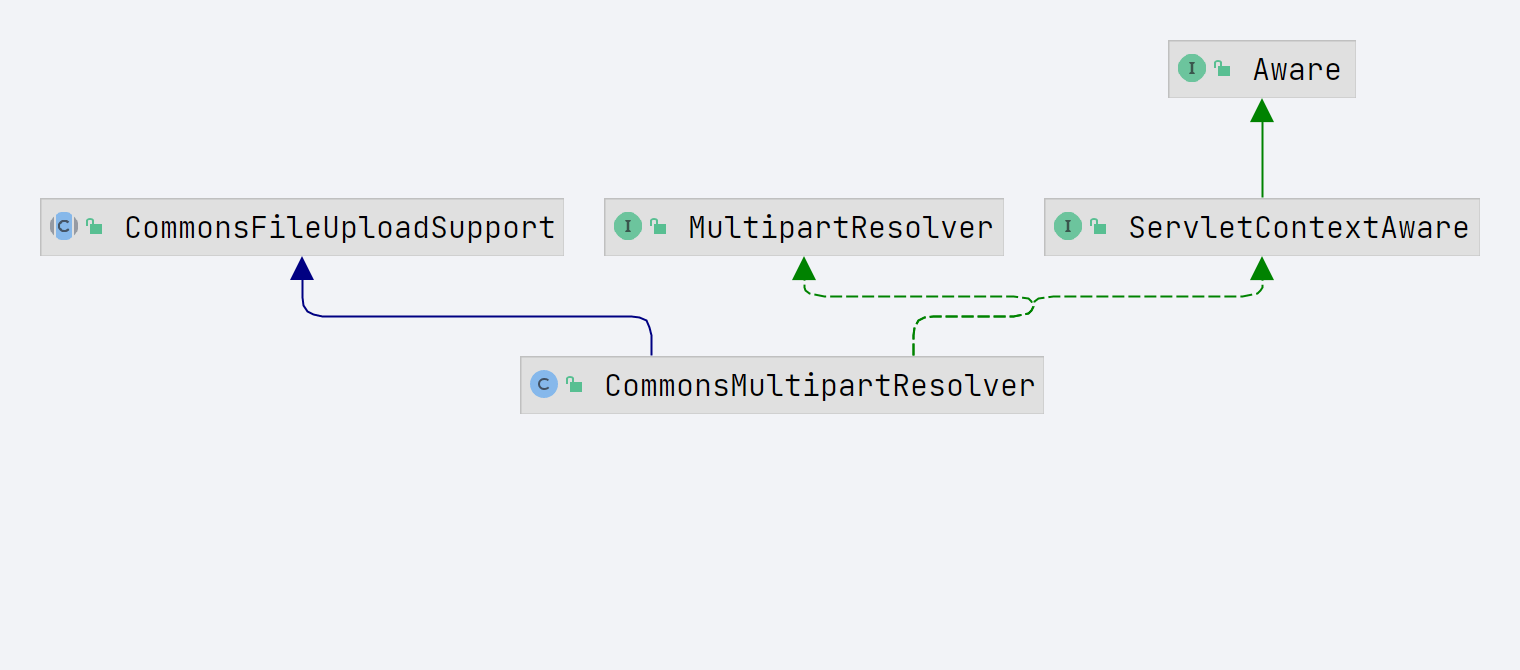
MultipartResolver 的类继承图
跟
HttpMessageConverter无关
准备测试文件
在 src/main/resources 下新建文件夹 sourceFile,放入一个测试文件 outline.png,然后在 webapp 文件夹下新建 uploadFile 文件夹,在其中放入 outline.png 文件。
控制器
网上很多博客,发现都是直接在原生的 servlet 响应对象 HttpServletResponse 中写入字节流,还不如使用 ResponseEntity
还可以上传多个文件。这个时候可以用
MultipartFile[] myfiles接收文件。
控制器方法中写了两种路径下的文件读取方法
编译输出路径,通过 ResourceUtils.getFile(ResourceUtils.CLASSPATH_URL_PREFIX + filePath); 获取,本质上还是调用 classloader 获取
当前项目在服务器的部署路径,通过 servletContext.getRealPath("filePath");
getRealPath
获取与给定虚拟路径对应的实路径。
例如,如果 path 等于/index.html,该方法将返回格式为http://<host>:<port>/<contextPath>/index.html的请求在服务器文件系统上的映射的文件的绝对文件路径,其中<contextpath>对应于这个 ServletContext 的上下文路径。
返回的实际路径将采用适合运行 servlet 容器的计算机和操作系统的形式,包括合适的路径分隔符。(在 Windows 操作系统和 Linux 操作系统下会有所区别)
只有当容器已将 JAR 文件从包含它们的 JAR 包解包时,才能考虑应用程序的/WEB-INF/lib 目录中绑定的 JAR 文件的/META-INF/Resources目录中的资源,在这种情况下,必须返回未解包的 jar 包的位置的路径。
如果 servlet 容器无法将给定的虚拟路径转换为真实路径,则此方法返回 null。
测试获取当前应用的 web 根路径
@SpringJUnitWebConfig(locations = "classpath:springMVC.xml")
class FileControllerTest {

    MockMvc mockMvc;

    ServletContext servletContext;

    @BeforeEach
    void setup(WebApplicationContext wac) {
        servletContext = wac.getServletContext();
        this.mockMvc = MockMvcBuilders.webAppContextSetup(wac).build();
    }

    @Test
    void getwebappPath(){
        String realPath = servletContext.getRealPath("/");
        System.out.println(realPath);
    }

}
输出
E:\IDEAProject\SpringMVC\SpringMVC-HTTPParams\src\main\webapp,这是因为我们在测试,并没有真的部署,真实部署到 Tomcat 之后,这个路径就是<tomcat-home>\webapps\<contextPath>
@Controller
@RequestMapping("/file")
public class FileController {

    @RequestMapping("/upload")
    // 注意表单中文件上传的input的name要和这里的参数名相同。这样才能对应上,这是因为SpringMVC可以直接通过控制器方法的参数名和请求参数进行匹配
    public String upload(MultipartFile file, HttpSession session) throws IOException {
        //获取上传的文件的文件名
        String fileName = file.getOriginalFilename();
        //处理文件重名问题
        String hzName = fileName.substring(fileName.lastIndexOf("."));
        fileName = UUID.randomUUID().toString() + hzName;
        //获取服务器中photo目录的路径
        ServletContext servletContext = session.getServletContext();
        String uploadFilePath = servletContext.getRealPath("uploadFile");
        File uploadFileFolder = new File(uploadFilePath);
        // 上传到 src/main/resources 文件夹下,一般不这么干
        //File uploadFileFolder = ResourceUtils.getFile(ResourceUtils.CLASSPATH_URL_PREFIX + File.separator + "uploadFile");

        if (!uploadFileFolder.exists()) {
            uploadFileFolder.mkdir();
        }
        String finalPath = uploadFileFolder.getCanonicalPath() + File.separator + fileName;
        //实现上传功能
        file.transferTo(new File(finalPath));

        return "success";
    }

    // 前端测试链接 http://localhost:8080/SpringMVC_HTTPParams/file/download?fileName=outline.png
    @RequestMapping("/download")
    public ResponseEntity<byte[]> download(HttpSession session, String fileName) throws IOException {
        //获取ServletContext对象
        ServletContext servletContext = session.getServletContext();
        String realPath = servletContext.getRealPath(File.separator + "uploadFile" + File.separator + fileName);

        //获取服务器中文件的真实路径
        // 从 src/main/resources 文件夹下下载,一般不这么干
        //File uploadFileFolder = ResourceUtils.getFile(ResourceUtils.CLASSPATH_URL_PREFIX + File.separator + "uploadFile" + File.separator + fileName);
        //String realPath = uploadFileFolder.getCanonicalPath() + "";

        byte[] fileContent = FileUtils.readFileToByteArray(new File(realPath));

        ////创建输入流
        //InputStream is = new FileInputStream(realPath);
        ////创建字节数组
        //byte[] bytes = new byte[is.available()];
        ////将流读到字节数组中
        //is.read(bytes);

        //创建HttpHeaders对象设置响应头信息
        MultiValueMap<String, String> headers = new HttpHeaders();
        //设置要下载方式以及下载文件的名字
        headers.add("Content-Disposition", "attachment;filename="+fileName);
        //设置响应状态码
        HttpStatus statusCode = HttpStatus.OK;
        //创建ResponseEntity对象
        ResponseEntity<byte[]> responseEntity = new ResponseEntity<>(fileContent, headers, statusCode);

        ////关闭输入流
        //is.close();
        return responseEntity;
    }


}
用 Spring-test 发起请求
@SpringJUnitWebConfig(locations = "classpath:springMVC.xml")
class FileControllerTest {

    MockMvc mockMvc;

    @BeforeEach
    void setup(WebApplicationContext wac) {
        this.mockMvc = MockMvcBuilders.webAppContextSetup(wac).build();
    }

    @Test
    void testUpload() throws Exception {
        File file = ResourceUtils.getFile(ResourceUtils.CLASSPATH_URL_PREFIX + File.separator+ "sourceFile"+ File.separator+"outline.png");
        byte[] fileContent = FileUtils.readFileToByteArray(file);
        MockMultipartFile multipartFile = new MockMultipartFile("file", "outline.png", MediaType.IMAGE_PNG_VALUE, fileContent);
        mockMvc.perform(MockMvcRequestBuilders.multipart("/file/upload").file(multipartFile)).andDo(print());
    }

    @Test
    void testDownload() throws Exception {
        mockMvc.perform(get("/file/download").queryParam("fileName","outline.png")).andDo(print());
    }
}
日志
testUpload,文件上传的格式请求的消息头 Content-Type:"multipart/form-data"
MockHttpServletRequest:
      HTTP Method = POST
      Request URI = /file/upload
       Parameters = {}
          Headers = [Content-Type:"multipart/form-data"]
             Body = <no character encoding set>
    Session Attrs = {}

Handler:
             Type = xyz.xiashuo.springmvchttpparams.controller.FileController
           Method = xyz.xiashuo.springmvchttpparams.controller.FileController#upload(MultipartFile, HttpSession)

Async:
    Async started = false
     Async result = null

Resolved Exception:
             Type = null

ModelAndView:
        View name = success
             View = null
            Model = null

FlashMap:
       Attributes = null

MockHttpServletResponse:
           Status = 200
    Error message = null
          Headers = [Content-Language:"en", Content-Type:"text/html;charset=UTF-8"]
     Content type = text/html;charset=UTF-8
             Body = <!DOCTYPE html>
<html lang="en">
<head>
    <meta charset="UTF-8">
    <title>Title</title>
</head>
<body>
<h1>file upload success</h1>
</body>
</html>
    Forwarded URL = null
   Redirected URL = null
          Cookies = []
testDownload,文件下载的消息头为 [Content-Disposition:"attachment;filename=outline.png", Content-Type:"application/octet-stream", Content-Length:"289439"],尤其要注意 Content-Type:"application/octet-stream"。
MockHttpServletRequest:
HTTP Method = GET
Request URI = /file/download
Parameters = {fileName=[outline.png]}
Headers = []
Body = <no character encoding set>
Session Attrs = {}
Handler:
Type = xyz.xiashuo.springmvchttpparams.controller.FileController
Method = xyz.xiashuo.springmvchttpparams.controller.FileController#download(HttpSession, String)
Async:
Async started = false
Async result = null
Resolved Exception:
Type = null
ModelAndView:
View name = null
View = null
Model = null
FlashMap:
Attributes = null
MockHttpServletResponse:
Status = 200
Error message = null
Headers = [Content-Disposition:"attachment;filename=outline.png", Content-Type:"application/octet-stream", Content-Length:"289439"]
Content type = application/octet-stream
Body = PNG
.....
Forwarded URL = null
Redirected URL = null
Cookies = []
文件的下载,其实还可以直接使用 ResourceHttpMessageConverter,具体请看《SpringMVC-ContentNegotiation 内容协商.md》中的 ResourceHttpMessageConverter 小节