配置文件加载过程
配置文件加载过程
参考文档
springboot读取配置顺序_qq_21159963的博客-CSDN博客_springboot 配置读取顺序
Springboot配置文件加载原理及流程【源码分析】_Mr_Liu946的博客-CSDN博客_springboot 加载配置文件原理
《Spring5-IOC 容器.docx》的 Environment变量 小节
Spring 中的资源获取以及 ResourceLoader 的相关实践,请查看《Spring 中的资源获取.md》
实践
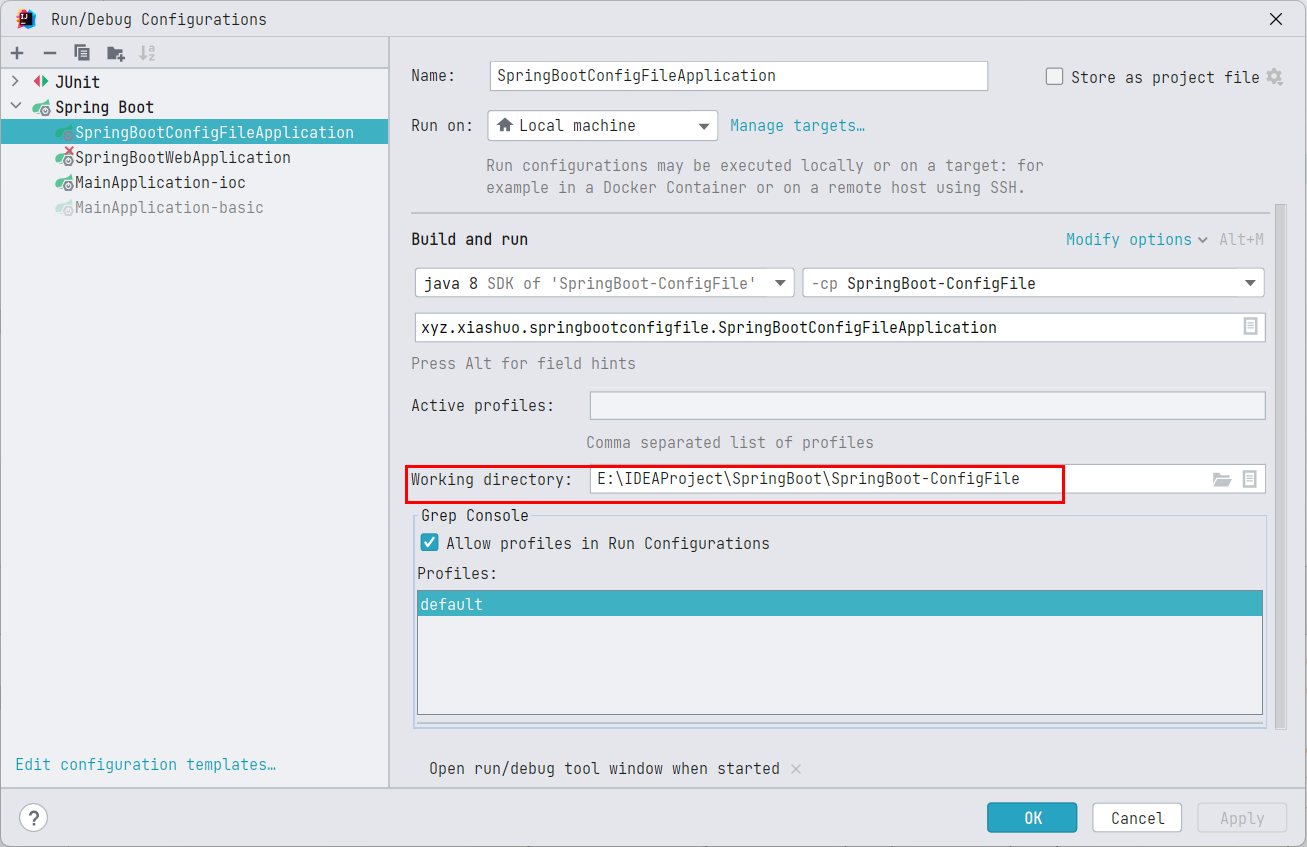
配置工作目录
实践之前先设置一下当前 main 方法的 working directory 为当前模块的根路径,这个配置的值默认是当前模块所在的项目得根路径,当前例子中是 E:\IDEAProject\SpringBoot
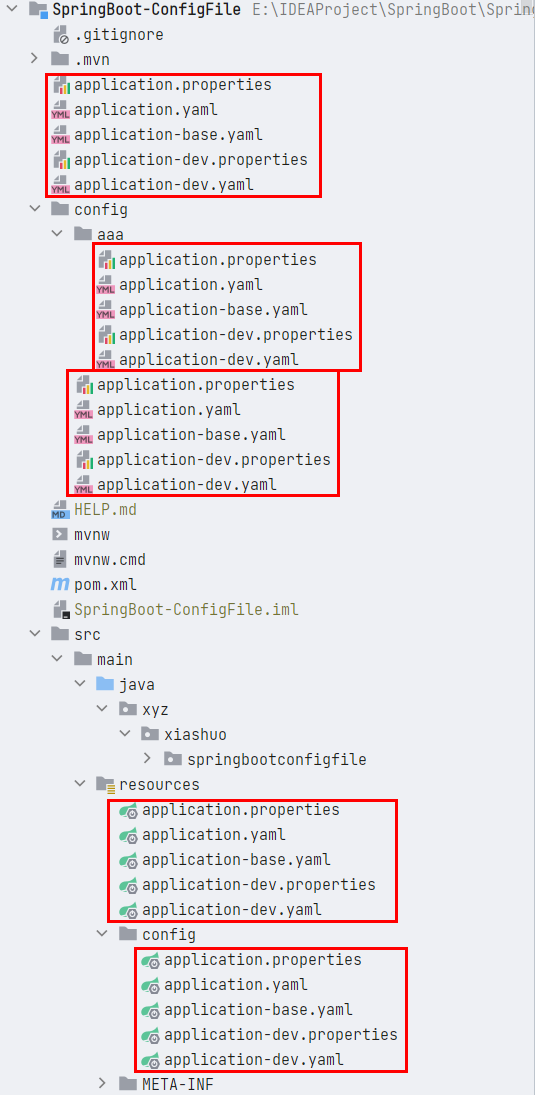
创建配置文件
在所有的默认目录下都创建默认名称的配置文件。
默认的配置文件位置:
classpath:/,classpath:/config/,file:./,file:./config/*/,file:./config/默认的配置文件名:
application
这些配置文件的内容都是配置 spring.application.name 属性的内容,而且,内容的值为 配置文件路径_profile_文件拓展名 的格式,这样,当我们最后获取这个属性的值的时候,直接根据值的内容即可确定是哪个配置文件的优先级最高(也可以理解为生效)。同时在 classpath:/application.yaml 中配置激活的 profile 为 dev
spring:
  profiles:
    active: dev
  application:
    name: classpath-null-yaml
测试
测试代码
@SpringBootApplication
public class SpringBootConfigFileApplication {

    public static void main(String[] args) {
        ConfigurableApplicationContext context = SpringApplication.run(SpringBootConfigFileApplication.class, args);
        String property = context.getEnvironment().getProperty("spring.application.name");
        System.out.println(property);
    }

}
执行测试代码,输出日志
  .   ____          _            __ _ _
 /\\ / ___'_ __ _ _(_)_ __  __ _ \ \ \ \
( ( )\___ | '_ | '_| | '_ \/ _` | \ \ \ \
 \\/  ___)| |_)| | | | | || (_| |  ) ) ) )
  '  |____| .__|_| |_|_| |_\__, | / / / /
 =========|_|==============|___/=/_/_/_/
 :: Spring Boot ::        (v2.3.4.RELEASE)

2022-11-02 07:24:22.762  INFO 27984 --- [           main] x.x.s.SpringBootConfigFileApplication    : Starting SpringBootConfigFileApplication on LAPTOP-LK with PID 27984 (E:\IDEAProject\SpringBoot\SpringBoot-ConfigFile\target\classes started by wwwli in E:\IDEAProject\SpringBoot\SpringBoot-ConfigFile)
2022-11-02 07:24:22.764  INFO 27984 --- [           main] x.x.s.SpringBootConfigFileApplication    : The following profiles are active: dev
2022-11-02 07:24:22.967  INFO 27984 --- [           main] x.x.s.SpringBootConfigFileApplication    : Started SpringBootConfigFileApplication in 0.378 seconds (JVM running for 0.919)
module&config-dev-properties
可见生效的配置所在的配置文件的目录为 file:./config/application-dev.properties。
源码分析
SpringApplication.run 这个静态方法实际上是层层委托,最终还是要创建一个 SpringApplication 实例,然后再调用其 run 方法
public static ConfigurableApplicationContext run(Class<?>[] primarySources, String[] args) {
    return new SpringApplication(primarySources).run(args);
}
初始化一个 SpringApplication 实例的过程分析
// primarySources 就是 SpringApplication.run 传入的类,就是 @SpringBootApplication 修饰的主启动类
// resourceLoader 为空,此时还啥都没有,因此resourceLoader为空
public SpringApplication(ResourceLoader resourceLoader, Class<?>... primarySources) {
this.resourceLoader = resourceLoader;
Assert.notNull(primarySources, "PrimarySources must not be null");
this.primarySources = new LinkedHashSet<>(Arrays.asList(primarySources));
// 如果是web应用,现在就根据类路径下是否有特定的类来确定web应用的类型,要么是 SERVLET 要么是 REACTIVE ,如果不是web应用,webApplicationType为 NONE
this.webApplicationType = WebApplicationType.deduceFromClasspath();
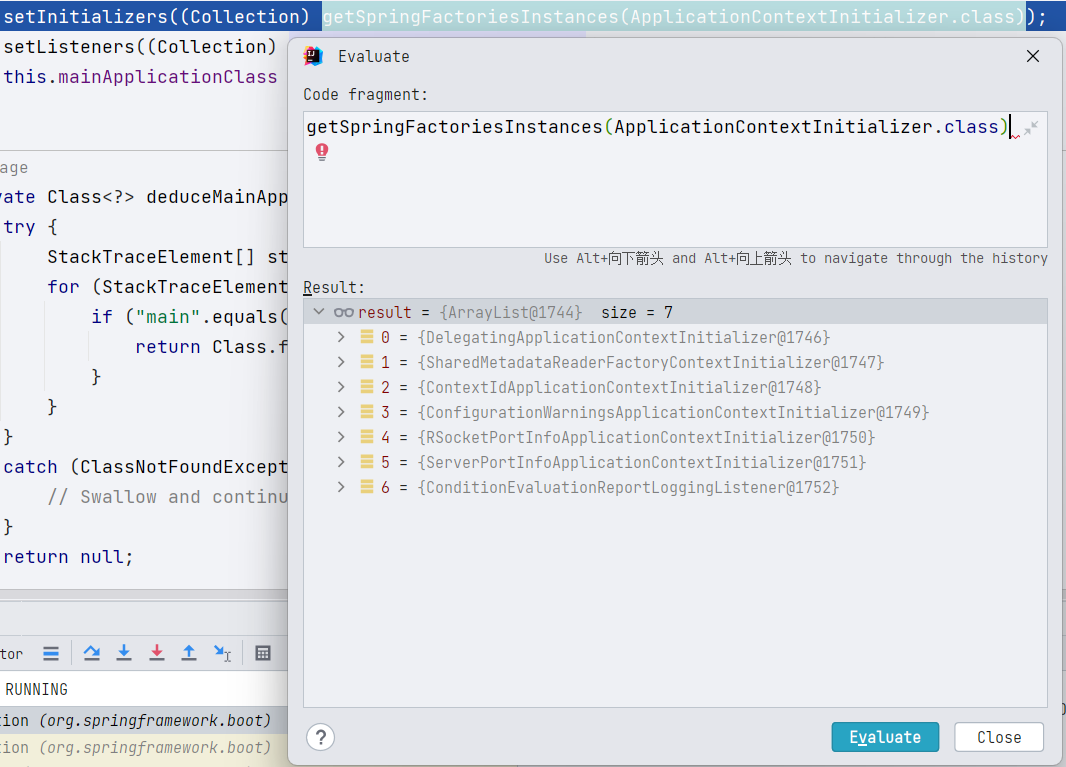
// getSpringFactoriesInstances中的具体细节,看《SpringBoot基础篇-2-自动配置.md》的 SpringFactoriesLoader - 工厂加载器 小节
// getSpringFactoriesInstances 的作用,是在类路径下的`META-INF/spring.factories`中查找ApplicationContextInitializer类对应的类,并将其实例化
// 然后交给 setInitializers方法,设置到 initializers 字段中,留待之后进行初始化
setInitializers((Collection) getSpringFactoriesInstances(ApplicationContextInitializer.class));
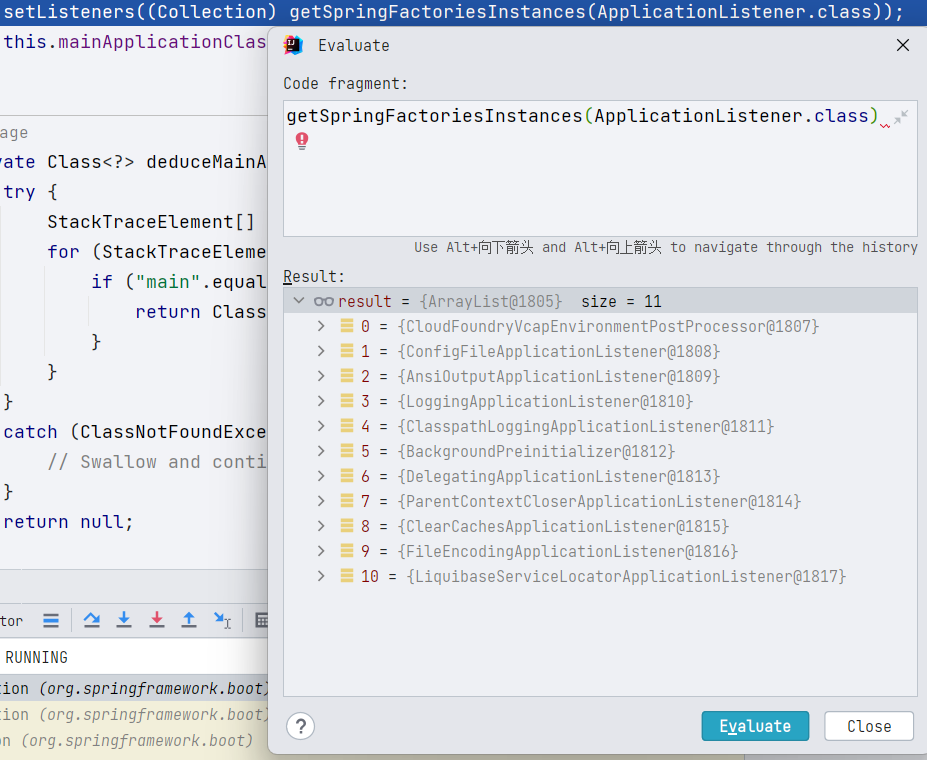
// getSpringFactoriesInstances 的作用,是在类路径下的`META-INF/spring.factories`中查找ApplicationListener类对应的类,并将其实例化
// 然后交给 setListeners 方法,设置到 listeners 字段中,留待之后进行创建监听器
setListeners((Collection) getSpringFactoriesInstances(ApplicationListener.class));
// 通过分析调用栈,获取SpringBoot应用的入口main方法所在的类实例,在常规情况下,应该就是 primarySources,但是在某些情况不是,所以这里需要从调用栈分析
this.mainApplicationClass = deduceMainApplicationClass();
}
其中,META-INF/spring.factories 中的初始化器示例如下:
META-INF/spring.factories 中的监听器示例如下:
而 spring-boot-2.3.4.RELEASE.jar 中的 /META-INF/spring.factories 中配置的初始化器和监听器如下:
# Application Context Initializers
org.springframework.context.ApplicationContextInitializer=\
org.springframework.boot.context.ConfigurationWarningsApplicationContextInitializer,\
org.springframework.boot.context.ContextIdApplicationContextInitializer,\
org.springframework.boot.context.config.DelegatingApplicationContextInitializer,\
org.springframework.boot.rsocket.context.RSocketPortInfoApplicationContextInitializer,\
org.springframework.boot.web.context.ServerPortInfoApplicationContextInitializer

# Application Listeners
org.springframework.context.ApplicationListener=\
org.springframework.boot.ClearCachesApplicationListener,\
org.springframework.boot.builder.ParentContextCloserApplicationListener,\
org.springframework.boot.cloud.CloudFoundryVcapEnvironmentPostProcessor,\
org.springframework.boot.context.FileEncodingApplicationListener,\
org.springframework.boot.context.config.AnsiOutputApplicationListener,\
org.springframework.boot.context.config.ConfigFileApplicationListener,\
org.springframework.boot.context.config.DelegatingApplicationListener,\
org.springframework.boot.context.logging.ClasspathLoggingApplicationListener,\
org.springframework.boot.context.logging.LoggingApplicationListener,\
org.springframework.boot.liquibase.LiquibaseServiceLocatorApplicationListener
SpringApplication 初始化完成之后,然后再调用其 run 方法,启动 SpringBoot 上下文:
public ConfigurableApplicationContext run(String... args) {
    // 用于监听启动时间
    StopWatch stopWatch = new StopWatch();
    stopWatch.start();
    // 准备应用上下文
    ConfigurableApplicationContext context = null;
    Collection<SpringBootExceptionReporter> exceptionReporters = new ArrayList<>();
    // 设置系统属性 java.awt.headless,通过System.setProperty方法设置
    configureHeadlessProperty();
    // 获取运行时监听器,实际上就只有一个,为 EventPublishingRunListener,配置在 `spring-boot-2.3.4.RELEASE.jar`中的`/META-INF/spring.factories`中
    // org.springframework.boot.SpringApplicationRunListener= org.springframework.boot.context.event.EventPublishingRunListener
    SpringApplicationRunListeners listeners = getRunListeners(args);
    // 实际上是向在初始化`SpringApplication`实例的时候注册的所有监听器广播了一个`ApplicationStartingEvent`事件,只有能够处理此事件的监听器才会被通知。
    listeners.starting();
    try {
        // args 一般为空数组
        ApplicationArguments applicationArguments = new DefaultApplicationArguments(args);
        // 配置 environment 对象,主要是处理用户的配置文件,例如 application.properties 、 application.yaml 等
        // 是我们后续分析的重点。
        ConfigurableEnvironment environment = prepareEnvironment(listeners, applicationArguments);
        // 将配置文件中配置的 spring.beaninfo.ignore 属性通过System.setProperty设置到 系统属性中
        configureIgnoreBeanInfo(environment);
        // 在控制台打印横幅
        Banner printedBanner = printBanner(environment);
        // 根据 webApplicationType 构建 应用上下文 实例,仅仅是创建一个空的实例
        // webApplicationType 在实例化 SpringApplication 的时候就确定了
        // 如果不是web应用,默认的上下文类型是 "org.springframework.context.annotation.AnnotationConfigApplicationContext"
        context = createApplicationContext();
        exceptionReporters = getSpringFactoriesInstances(SpringBootExceptionReporter.class,
                new Class[] { ConfigurableApplicationContext.class }, context);
        // 准备上下文,构建上下文
        prepareContext(context, environment, listeners, applicationArguments, printedBanner);
        refreshContext(context);
        afterRefresh(context, applicationArguments);
        stopWatch.stop();
        if (this.logStartupInfo) {
            new StartupInfoLogger(this.mainApplicationClass).logStarted(getApplicationLog(), stopWatch);
        }
        // 实际上是向在向应用上下文中的监听器广播了一个`ApplicationStartedEvent`事件
        listeners.started(context);
        // 钩子
        // 执行所有 ApplicationRunner 和 CommandLineRunner 类型的bean实例的 run 方法
        // 可用于在SpringBoot启动之后执行一些操作,
        callRunners(context, applicationArguments);
    }
    catch (Throwable ex) {
        handleRunFailure(context, ex, exceptionReporters, listeners);
        throw new IllegalStateException(ex);
    }

    try {
        // 实际上是向在向应用上下文中的监听器广播了一个`ApplicationReadyEvent`事件
        listeners.running(context);
    }
    catch (Throwable ex) {
        handleRunFailure(context, ex, exceptionReporters, null);
        throw new IllegalStateException(ex);
    }
    return context;
}
我们可以注意到:在 SpringBoot 的启动过程中,多次从 /META-INF/spring.factories 这个工厂中中获取特定类型的目标类,最后通过反射获取最终实例。好处是
-
解耦,方便修改和拓展
-
查找速度快
接下来有两个方面的初始化需要我们重点分析
-
prepareEnvironment -
prepareContext
这里我们重点研究 prepareEnvironment 方法,prepareContext 方法就先忽略。
环境变量 Environment
Environment 的相关知识,请看《Spring5-IOC 容器.docx》的
Environment变量小节
从 SpringApplication#prepareEnvironment 开始看
private ConfigurableEnvironment prepareEnvironment(SpringApplicationRunListeners listeners, ApplicationArguments applicationArguments) {
    // Create and configure the environment
    // 根据 当前web项目的具体类型(REACTIVE 或者 SERVLET)返回不同的 ConfigurableEnvironment 实现类,非web类型返回 StandardEnvironment
    ConfigurableEnvironment environment = getOrCreateEnvironment();
    // 配置 ConfigurableEnvironment
    configureEnvironment(environment, applicationArguments.getSourceArgs());
    // 将environment中的 PropertySource集合(MutablePropertySources)包装成一个 ConfigurationPropertySource,目前还不知道 ConfigurationPropertySource 的用处,TODO
    ConfigurationPropertySources.attach(environment);
    // 监听器开始工作,开始准备environment环境变量
    listeners.environmentPrepared(environment);
    // 将加载完成的环境变量信息绑定到Spring IOC容器中
    bindToSpringApplication(environment);
    if (!this.isCustomEnvironment) {
        // 如果是通过 SpringApplication#setEnvironment 方法手动设置的 environment字段,则需要进行转化
        environment = new EnvironmentConverter(getClassLoader()).convertEnvironmentIfNecessary(environment,
                deduceEnvironmentClass());
    }
    // 再次调用 ConfigurationPropertySources.attach(environment);
    ConfigurationPropertySources.attach(environment);
    return environment;
}
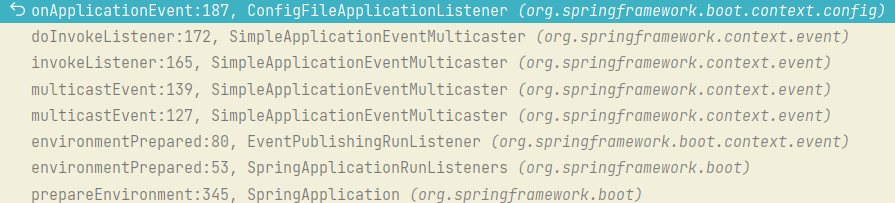
仔细看 listeners.environmentPrepared(environment); 实际上是向在初始化 SpringApplication 实例的时候注册的所有监听器广播了一个 ApplicationEnvironmentPreparedEvent 事件,只有能够处理此事件的监听器才会被通知。
实际上
SpringApplication#run中调用listeners.starting();以及发过一次广播了
调用栈如下

看 SimpleApplicationEventMulticaster#multicastEvent,
@Override
public void multicastEvent(final ApplicationEvent event, @Nullable ResolvableType eventType) {
    ResolvableType type = (eventType != null ? eventType : resolveDefaultEventType(event));
    // 是否配置了线程池
    Executor executor = getTaskExecutor();
    // getApplicationListeners(event, type)返回的,可以处理`ApplicationEnvironmentPreparedEvent`事件的监听器,只有8个
    for (ApplicationListener<?> listener : getApplicationListeners(event, type)) {
        if (executor != null) {
            // 如果配置了,交给线程池去处理
            executor.execute(() -> invokeListener(listener, event));
        }
        else {
            // 如果没有,调用 invokeListener
            invokeListener(listener, event);
        }
    }
}
此时能够处理 ApplicationEnvironmentPreparedEvent 事件的监听器,只有 7 个:
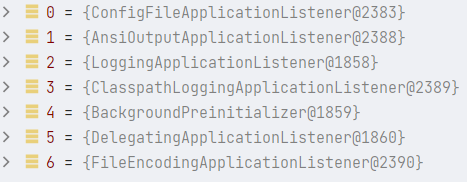
注意:此时没有引入 SpringCloud 相关包,否则 ConfigFileApplicationListener 前面还会有一个 BootstrapApplicationListener
BootstrapApplicationListener:来自 SpringCloud,优先级最高,用于启动/建立 SpringCloud 的应用上下文。须要注意的是,到此时 SpringBoot 的上下文还未创建完成,因为在创建 SpringBoot 上下文的时候通过BootstrapApplicationListener去开启了 Springcloud 上下文的创建流程。 这个流程嵌套特别像 Bean 初始化流程:初始化 Bean A 时,遇到了 Bean B,就须要先去完成 Bean B 的初始化,再回头来继续完成 Bean A 的步骤。在建立 SpringCloud 的应用的时候,使用的也是
SpringApplication#run完成的(非 web),所以也会走下一整套 SpringApplication 的生命周期逻辑,因此请你务必区分,特别是这种 case 会让“绝大多数”初始化器、监听器等执行多次,若你有那种只须要执行一次的需求(好比只想让 Springboot 容器生命周期内执行,Springcloud 生命周期不执行),请务必自行处理,不然会被执行多次而带来不可预知的结果。SpringCloud 和 SpringBoot 应用上下文都是使用
ConfigFileApplicationListener来完成加载和解析的。Springboot 应用上下文读取的外部化配置文件名默认是:
applicationSpringcloud 应用上下文读取的外部化配置文件名默认是:
bootstrap
调用 invokeListener 调用监听器,开始让监听器处理事件,最终执行的是监听器(ApplicationListener 接口的实现类)的 onApplicationEvet 方法。
ConfigFileApplicationListener 监听器
SpringBoot 2.4.0 之前使用
ConfigFileApplicationListener,2.4.0 之后,使用EnvironmentPostProcessorApplicationListener
从 ConfigFileApplicationListener#onApplicationEvent 开始看
@Override
public void onApplicationEvent(ApplicationEvent event) {
    if (event instanceof ApplicationEnvironmentPreparedEvent) {
        // 刚启动,进这里
        onApplicationEnvironmentPreparedEvent((ApplicationEnvironmentPreparedEvent) event);
    }
    if (event instanceof ApplicationPreparedEvent) {
        onApplicationPreparedEvent(event);
    }
}
onApplicationEnvironmentPreparedEvent 方法,实际上获取类路径下 /META-INF/spring.factories 中 EnvironmentPostProcessor 对应的类,然后把自己也加上,排序后依次调用
private void onApplicationEnvironmentPreparedEvent(ApplicationEnvironmentPreparedEvent event) {
    // 获取类路径下`/META-INF/spring.factories`中 EnvironmentPostProcessor对应的类
    // `spring-boot-2.3.4.RELEASE.jar`中的 `/META-INF/spring.factories`中 ,有四个
    List<EnvironmentPostProcessor> postProcessors = loadPostProcessors();
    // 把自己 ConfigFileApplicationListener 也加上
    postProcessors.add(this);
    // 按照 @Order注解或者对Order接口的实现进行排序
    AnnotationAwareOrderComparator.sort(postProcessors);
    for (EnvironmentPostProcessor postProcessor : postProcessors) {
        // 依次调用这些后置处理器的 EnvironmentPostProcessor 中的 postProcessEnvironment方法
        postProcessor.postProcessEnvironment(event.getEnvironment(), event.getSpringApplication());
    }
}
spring-boot-2.3.4.RELEASE.jar 中的 /META-INF/spring.factories 中 ,有四个
org.springframework.boot.env.EnvironmentPostProcessor=\
org.springframework.boot.cloud.CloudFoundryVcapEnvironmentPostProcessor,\
org.springframework.boot.env.SpringApplicationJsonEnvironmentPostProcessor,\
org.springframework.boot.env.SystemEnvironmentPropertySourceEnvironmentPostProcessor,\
org.springframework.boot.reactor.DebugAgentEnvironmentPostProcessor
加上 ConfigFileApplicationListener 自己,排序之后的结果是
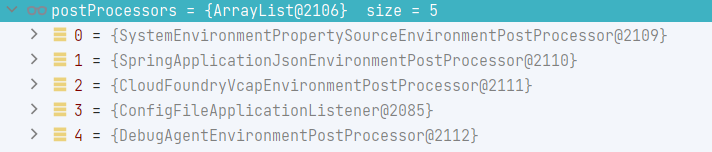
ConfigFileApplicationListener 对 EnvironmentPostProcessor 的实现也很简单,直接委托给 ConfigFileApplicationListener#addPropertySources 方法
@Override
public void postProcessEnvironment(ConfigurableEnvironment environment, SpringApplication application) {
    addPropertySources(environment, application.getResourceLoader());
}
而 ConfigFileApplicationListener#addPropertySources 方法则是把工作完全委托给内部类 Loader 的 load 方法
// 向指定的环境(environment)添加配置文件属性源(PropertySources)
protected void addPropertySources(ConfigurableEnvironment environment, ResourceLoader resourceLoader) {
    RandomValuePropertySource.addToEnvironment(environment);
    // 委托给 Loader 类的 load方法
    new Loader(environment, resourceLoader).load();
}
内部类 Loader
构造方法我们很熟悉
Loader(ConfigurableEnvironment environment, ResourceLoader resourceLoader) {
    this.environment = environment;
    this.placeholdersResolver = new PropertySourcesPlaceholdersResolver(this.environment);
    // 传入的参数 resourceLoader为空,因此此时使用的是 DefaultResourceLoader
    this.resourceLoader = (resourceLoader != null) ? resourceLoader : new DefaultResourceLoader(null);
    // SpringFactoriesLoader 的作用我们很熟悉
    this.propertySourceLoaders = SpringFactoriesLoader.loadFactories(PropertySourceLoader.class,
            getClass().getClassLoader());
}
其中 spring-boot-2.3.4.RELEASE.jar 中的 /META-INF/spring.factories 配置了两个我们常见的 PropertySourceLoader 属性元加载器:
# PropertySource Loaders
org.springframework.boot.env.PropertySourceLoader=\
org.springframework.boot.env.PropertiesPropertySourceLoader,\
org.springframework.boot.env.YamlPropertySourceLoader
-
YamlPropertySourceLoader用于将后缀为
.yml或者.yaml的文件加载为一个PropertySource,具体的加载方法为load方法,解析结果类型为List<PropertySource<?>> -
PropertiesPropertySourceLoader用于将后缀为
.properties或者.xml的文件加载为一个PropertySource,具体的加载方法为load方法,解析结果类型为List<PropertySource<?>>
在 Loader 中,并不会直接使用 PropertySourceLoader 的解析结果,而是将其封装为一个 ConfigFileApplicationListener 内部对象 Document,方便我们直接获取配置文件中配置的 profile 相关的信息。参考 Loader 的 asDocuments 方法。
private List<Document> asDocuments(List<PropertySource<?>> loaded) {
    if (loaded == null) {
        return Collections.emptyList();
    }
    return loaded.stream().map((propertySource) -> {
        Binder binder = new Binder(ConfigurationPropertySources.from(propertySource), this.placeholdersResolver);
        String[] profiles = binder.bind("spring.profiles", STRING_ARRAY).orElse(null);
        Set<Profile> activeProfiles = getProfiles(binder, ACTIVE_PROFILES_PROPERTY);
        Set<Profile> includeProfiles = getProfiles(binder, INCLUDE_PROFILES_PROPERTY);
        // 封装  PropertySourceLoader 解析配置文件的结果(类型为List<PropertySource<?>>)
        // 同时将配置文件中的 profiles,activeProfiles,includeProfiles提取出发,方便后续的直接调用,非常方便
        return new Document(propertySource, profiles, activeProfiles, includeProfiles);
    }).collect(Collectors.toList());
}
load() - 第一层 load 方法
然后我们开始看 Loader 的 load 方法,这个方法,是加载配置文件的核心方法
void load() {
    FilteredPropertySource.apply(this.environment, DEFAULT_PROPERTIES, LOAD_FILTERED_PROPERTY,
            // 函数式接口 Consumer 的 lambda 表达式
            //  defaultProperties 为 默认的属性源的名称(defaultProperties)对应的PropertySource数据源,一般为null
            (defaultProperties) -> {
                this.profiles = new LinkedList<>();
                this.processedProfiles = new LinkedList<>();
                this.activatedProfiles = false;
                // 配置文件读取的最终结果Map,类型为 Map<Profile, MutablePropertySources>。 一个profile对应一个PropertySource集合
                this.loaded = new LinkedHashMap<>();
                // 初始化 profiles
                // 注意,此时还未从properties或者yaml配置文件中读取配置信息,仅从当前environment变量中查找
                // 若环境变量environment中已存在spring.profiles.active变量则将其添加到profiles中
                // 若环境变量environment中不存在spring.profiles.active变量,则默认添加 null,用于加载默认的配置文件名+各种文件拓展名对应的配置文件,比如application.yml,
                //  还会添加一个一个defaultProfile,名称为"default"
                //  此时 profiles 中的元素是 null 和 "default"
                initializeProfiles();
                // 1、通过默认的null首先去加载application.yml配置文件
                // 2、读取application.yml是否有配置spring.profiles.active
                //    2.1、若没有找到spring.profiles.active配置项,则下一步循环default
                //    2.2、若在application.yml配置中找到了spring.profiles.active配置项,则会在profiles中添加这个profile,null循环完之后,开始循环这个profile
                while (!this.profiles.isEmpty()) {
                    Profile profile = this.profiles.poll();
                    // 虽然方法名叫 isDefaultProfile,但是实际执行的是 !profile.isDefaultProfile()
                    // PS: "default"的profile.isDefaultProfile()为true
                    if (isDefaultProfile(profile)) {
                        // 设置environment对象的ActiveProfile,调用的方法是 environment.addActiveProfile
                        addProfileToEnvironment(profile.getName());
                    }
                    load(profile, this::getPositiveProfileFilter, addToLoadedaddLast, false);
                    this.processedProfiles.add(profile);
                }
                load(null, this::getNegativeProfileFilter, addToLoadedaddFirst, true);
                // 将loaded 按照profile的加载顺序倒叙,然后将每一个MutablePropertySources中的PropertySource添加到environment环境变量中
                addLoadedPropertySources();
                applyActiveProfiles(defaultProperties);
            });
}
最外层的是 FilteredPropertySource.apply 方法
// DEFAULT_PROPERTIES 的值为 defaultProperties
static void apply(ConfigurableEnvironment environment, String propertySourceName, Set<String> filteredProperties,
        Consumer<PropertySource<?>> operation) {
    // 关于 environment.getPropertySources ,请查看 《Spring5-IOC容器.docx》 文档中的 1.3.2.5.1    Environment变量 小节
    MutablePropertySources propertySources = environment.getPropertySources();
    PropertySource<?> original = propertySources.get(propertySourceName);
    // 如果环境变量中,有DEFAULT_PROPERTIES
    if (original == null) {
        operation.accept(null);
        return;
    }
    // 环境变量中,有DEFAULT_PROPERTIES
    propertySources.replace(propertySourceName, new FilteredPropertySource(original, filteredProperties));
    try {
        operation.accept(original);
    }
    finally {
        propertySources.replace(propertySourceName, original);
    }
}
在 lambda 表达式内部进行初始化,其中调用了两次 load 方法
load(profile, this::getPositiveProfileFilter, addToLoadedaddLast, false);
其中 addToLoaded 方法非常巧妙。
private DocumentConsumer addToLoaded(BiConsumer<MutablePropertySources, PropertySource<?>> addMethod,
        boolean checkForExisting) {
    // 传入不同的profile,会将  document 添加到不同的 MutablePropertySources中
    return (profile, document) -> {
        // 是否进行去重检查
        if (checkForExisting) {
            // 根据 PropertySource 的名字,也就是 文件的路径判断 loaded 是否以及加载过此文件
            for (MutablePropertySources merged : this.loaded.values()) {
                if (merged.contains(document.getPropertySource().getName())) {
                    // 如果以及存在,则直接返回
                    return;
                }
            }
        }
        // loaded 类型为 Map<Profile, MutablePropertySources>。 一个profile对应一个PropertySource集合
        // 如果存在,则返回,如果不存在,则返回一个新的 MutablePropertySources
        MutablePropertySources merged = this.loaded.computeIfAbsent(profile, (k) -> new MutablePropertySources());
        // 传入 MutablePropertySources::addFirst 或者 MutablePropertySources::addLast
        // merged 参数自动转化为 MutablePropertySources 中的 addFirst或者addLast的目标,将 document.getPropertySource() 添加到 loaded 中
        addMethod.accept(merged, document.getPropertySource());
    };
}
《Java 核心技术卷一 _ 第 6 章 _ 接口、lambda 表达式与内部类.docx》中的
方法引用 method reference小节提到的第三种情况
Class::instanceMethod,第一个参数会自动成为方法的目标
两个 Document 过滤器:
// 正向 Document过滤器,
// 如果传入 profile 为空,document中的profile也为空,则返回true,否则返回false
// 如果传入 profile 不为空,document中的profile要包含传入的profile,而且document中的profile只要有一个是environment中激活的profile则返回true,否则返回false
private DocumentFilter getPositiveProfileFilter(Profile profile) {
    return (Document document) -> {
        if (profile == null) {
            return ObjectUtils.isEmpty(document.getProfiles());
        }
        return ObjectUtils.containsElement(document.getProfiles(), profile.getName()) && this.environment.acceptsProfiles(Profiles.of(document.getProfiles()));
    };
}

// 反向的Document过滤器
// 如果传入 profile 为空,document中的profile不为空,而且document中的profile只要有一个是environment中激活的profile,则返回true,
// 否则返回false
private DocumentFilter getNegativeProfileFilter(Profile profile) {
    return (Document document) -> (
        profile == null && !ObjectUtils.isEmpty(document.getProfiles()) && this.environment.acceptsProfiles(Profiles.of(document.getProfiles()))
    );
}
load(Profile profile, DocumentFilterFactory filterFactory, DocumentConsumer consumer) - 第二层 load 方法
获取配置文件的查找路径和配置文件的名称,这一层是用户可以通过配置属性自定义的一层。
private void load(Profile profile, DocumentFilterFactory filterFactory, DocumentConsumer consumer) {
    // 获取我们配置的配置文件的地址
    // 默认结果为:
    // 1. file:./config/
    // 2. file:./config/*/
    // 3. file:./
    // 4. classpath:/config/
    // 5. classpath:/
    // 进行遍历
    getSearchLocations().forEach((location) -> {
        boolean isDirectory = location.endsWith("/");
        // getSearchNames*() 获取我们配置的配置文件名称,默认为"application"
        // 如果是目录,则表示为 NO_SEARCH_NAMES 为Collections.singleton(null);
        Set<String> names = isDirectory ? getSearchNames() : NO_SEARCH_NAMES;
        // 获取所有的配置文件名,在当前指定的location位置进行查找并加载
        // 参数分析
        // profile:若当前解析的不是spring.profiles.active指定的配置文件,则默认为null或者"default"
        // filterFactory 用于过滤器工厂,用于根据profile 生产 DocumentFilter 对加载出来的属性进行过滤
        // consumer:将加载的document添加到Loader#loaded属性集合中,用于最后的配置文件优先级排序。
        names.forEach((name) -> load(location, name, profile, filterFactory, consumer));
    });
}
继续委托给 load(String location, String name, Profile profile, DocumentFilterFactory filterFactory, DocumentConsumer consumer) 方法,此时已经制定了配置文件的查找目录,配置文件的名称(不包含拓展名),指定的 profile 等等信息
分析一下 getSearchLocations 方法,获取配置文件的查找目录
private Set<String> getSearchLocations() {
    // 首先加载(spring.config.location 以外的位置),对应属性名称为: spring.config.additional-location
    // getSearchLocations(String propertyName)方法就不深究了, spring.config.additional-location中还可以使用特殊字符$表示file:开头的路径
    Set<String> locations = getSearchLocations(CONFIG_ADDITIONAL_LOCATION_PROPERTY);
    // 如果用户配置了属性 spring.config.location ,则使用用户的配置,不会使用默认位置配置
    if (this.environment.containsProperty(CONFIG_LOCATION_PROPERTY)) {
        locations.addAll(getSearchLocations(CONFIG_LOCATION_PROPERTY));
    }
    else {
        // 如果用户没有配置属性 spring.config.location ,则使用 searchLocations 中配置的位置,如果searchLocations为空,则使用 默认位置配置
        // 默认位置配置字符串为 "classpath:/,classpath:/config/,file:./,file:./config/*/,file:./config/",asResolvedSet方法会将其反向,
        // asResolvedSet的功能是将字符串以英文逗号分割,然后将结果集合的元素颠倒,最后返回
        // 最终返回结果为:
        // 1. file:./config/
        // 2. file:./config/*/
        // 3. file:./
        // 4. classpath:/config
        // 5. classpath:/
        locations.addAll( asResolvedSet(ConfigFileApplicationListener.this.searchLocations, DEFAULT_SEARCH_LOCATIONS));
    }
    return locations;
}
分析一下 getSearchNames 方法,获取配置文件的名称
private Set<String> getSearchNames() {
    // 配置了属性 spring.config.name ,则不会使用默认的配置文件名,默认的配置文件名为 application
    // spring.config.name 属性可以配置多个名字,用英文逗号分割
    if (this.environment.containsProperty(CONFIG_NAME_PROPERTY)) {
        String property = this.environment.getProperty(CONFIG_NAME_PROPERTY);
        // asResolvedSet的功能是将字符串以英文逗号分割,然后将结果集合的元素颠倒,最后返回
        Set<String> names = asResolvedSet(property, null);
        // 验证配置文件名中是否有*,有的话就报错
        names.forEachassertValidConfigName;
        return names;
    }
    // 如果用户没有配置属性 spring.config.name ,则使用 names 中配置的文件名,如果names为空,则使用 默认配置文件名
    return asResolvedSet(ConfigFileApplicationListener.this.names, DEFAULT_NAMES);
}
在这一层,我们我们知道了三个配置项,及其注意点,这也是我们在写代码层面需要修改的地方
-
spring.config.location:配置文件的查找目录,配置此属性之后,系统默认的查找目录就不会生效了 -
spring.config.additional-location:不管是用户配置的spring.config.location生效还是系统默认的查找目录生效,此配置的目录都会生效。spring.config.additional-location中还可以使用特殊字符$表示file:开头的路径。 -
spring.config.name:配置文件的名称,属性可以配置多个名字,用英文逗号分割,配置文件名中不能有*,否则报错,配置此属性之后,系统默认的配置文件名就不会生效了
注意,file:./config/*/ 中的 * 只能匹配一层路径。
load(String location, String name, Profile profile, DocumentFilterFactory filterFactory, DocumentConsumer consumer) - 第三层 load 方法
调用所有的 PropertySourceLoader 属性源加载器对特定目录下特定名称(不指定文件拓展名)的配置文件,搭配 PropertySourceLoader 支持的所有文件拓展名,尝试进行查找和解析。
private void load(String location, String name, Profile profile, DocumentFilterFactory filterFactory, DocumentConsumer consumer) {
    if (!StringUtils.hasText(name)) {
        // 如果location不是一个文件夹,是一个文件 ,一般不常见
        // 注意,PropertiesPropertySourceLoader 一般排在 YamlPropertySourceLoader前面,也就是说,后缀的处理顺序是
        for (PropertySourceLoader loader : this.propertySourceLoaders) {
            // 看能不能直接使用 location 这个文件
            if (canLoadFileExtension(loader, location)) {
                // 如果后缀名是 YamlPropertySourceLoader 支持的  "yml", "yaml" 或者是 propertySourceLoaders 支持的 "properties", "xml"那就直接解析
                load(loader, location, profile, filterFactory.getDocumentFilter(profile), consumer);
                return;
            }
        }
        throw new IllegalStateException("File extension of config file location '" + location + "' is not known to any PropertySourceLoader. If the location is meant to reference " + "a directory, it must end in '/'");
    }
    // location是一个文件夹
    Set<String> processed = new HashSet<>();
    for (PropertySourceLoader loader : this.propertySourceLoaders) {
        for (String fileExtension : loader.getFileExtensions()) {
            // 注意,PropertiesPropertySourceLoader 一般排在 YamlPropertySourceLoader前面,也就是说,后缀的处理顺序是
            // 1. "properties"
            // 2. "xml"
            // 3. "yml"
            // 4. "yaml"
            // 成功添加才会返回true,即loader支持的 FileExtension 只会处理一次,避免重复加载同一个位置下的配置文件
            if (processed.add(fileExtension)) {
                //  location + name 为 除了配置文件拓展名以外的部分
                loadForFileExtension(loader, location + name, "." + fileExtension, profile, filterFactory, consumer);
            }
        }
    }
}
loadForFileExtension 方法
针对特定的文件拓展名,把当前 profile,之前 profile,不带 profile 的情况全都遍历一遍,获取配置
private void loadForFileExtension(PropertySourceLoader loader, String prefix, String fileExtension, Profile profile, DocumentFilterFactory filterFactory, DocumentConsumer consumer) {
    // getPositiveProfileFilter下
    // document中不包含profile相关配置即可返回true
    DocumentFilter defaultFilter = filterFactory.getDocumentFilter(null);
    // getPositiveProfileFilter下
    // document中要包含profile参数这个profile
    DocumentFilter profileFilter = filterFactory.getDocumentFilter(profile);
    // prefix 为 location+配置文件名
    if (profile != null) {
        // 如果 profile 不为null, 则尝试查找 location+配置文件名+ -<profile> + fileExtension 这个配置文件
        // Try profile-specific file & profile section in profile file (gh-340)
        String profileSpecificFile = prefix + "-" + profile + fileExtension;
        // 带上 defaultFilter 解析一下,一般我们 配置文件-<profile>中不会再配置profile,因此一般此次调用会正常加载
        load(loader, profileSpecificFile, profile, defaultFilter, consumer);
        // 带上 profileFilter 解析一下
        load(loader, profileSpecificFile, profile, profileFilter, consumer);
        // Try profile specific sections in files we've already processed
        // 已经处理过的profile,有来尝试一下
        for (Profile processedProfile : this.processedProfiles) {
            if (processedProfile != null) {
                String previouslyLoaded = prefix + "-" + processedProfile + fileExtension;
                load(loader, previouslyLoaded, profile, profileFilter, consumer);
            }
        }
    }
    // 不带 -<profile> 的情况也试一下
    // Also try the profile-specific section (if any) of the normal file
    load(loader, prefix + fileExtension, profile, profileFilter, consumer);
}
load(PropertySourceLoader loader, String location, Profile profile, DocumentFilter filter, DocumentConsumer consumer) - 第五层 load 方法
核心解析方法,根据已拼接好的 location 去获取配置文件(例如:classpath:/application-dev.yml)并将其添加到 loaded Map 中。
private void load(PropertySourceLoader loader, String location, Profile profile, DocumentFilter filter, DocumentConsumer consumer) {
    // 获取location位置下的所有资源,location已经是目录+配置文件名+拓展名
    Resource[] resources = getResources(location);
    for (Resource resource : resources) {
        try {
            // 资源不存在,跳过,输出日志
            if (resource == null || !resource.exists()) {
                if (this.logger.isTraceEnabled()) {
                    StringBuilder description = getDescription("Skipped missing config ", location, resource, profile);
                    this.logger.trace(description);
                }
                continue;
            }
            // 资源没有文件拓展名,跳过,输出日志
            if (!StringUtils.hasText(StringUtils.getFilenameExtension(resource.getFilename()))) {
                if (this.logger.isTraceEnabled()) {
                    StringBuilder description = getDescription("Skipped empty config extension ", location, resource, profile);
                    this.logger.trace(description);
                }
                continue;
            }
            // 开始正式开始解析
            // 先生成此文件对应的PropertySource的名称,这个名称是根据配置文件的路径和资源对象而来,也就是说,同一个文件,name会相同
            // 在调用 DocumentConsumer 添加到 loaded 的时候,会根据 checkForExisting 参数决定是否要根据name进行去重
            // 例如 applicationConfig: [file:./config/application.properties]
            String name = "applicationConfig: [" + getLocationName(location, resource) + "]";
            // 通过 PropertySourceLoader 加载 resource 中的属性,将 结果(List<PropertySource<?>>类型)转化为 Document集合 ,带缓存
            // 虽然用list承接,但是一般只有一个Document对象
            List<Document> documents = loadDocuments(loader, name, resource);
            // 如果加载的结果是空,打日志,然后跳过
            if (CollectionUtils.isEmpty(documents)) {
                if (this.logger.isTraceEnabled()) {
                    StringBuilder description = getDescription("Skipped unloaded config ", location, resource, profile);
                    this.logger.trace(description);
                }
                continue;
            }
            // 根据最开始在 FilteredPropertySource.apply()中传入的过滤器过滤解析出来的值
            List<Document> loaded = new ArrayList<>();
            for (Document document : documents) {
                if (filter.match(document)) {
                    // 尝试获取 spring.profiles.active属性
                    // 1、若没有配置该属性值,则在while循环中解析完当前profile(null)之后,接下来解析default这个profile,
                    // 2、若配置了该属性值,则读取该属性值(我们当前配置的是dev),将其添加到Loader#profiles属性中(就是第三步中while循环的那个profiles变量值),同时Loader会将activatedProfiles属性值改为true
                    // 来标记系统已经有active这个属性值了,就算别的配置文件也配置了active这个属性,Loader也不会再去读取这个active值,从这里可知 spring.profiles.active 这个属性值只会被优先级最高的配置文件初始化一次。
                    //
                    // 具体行为是将解析到的spring.profiles.active添加到profiles中,FilteredPropertySource.apply()中的lambda表达式的下一次while循环就解析profile
                    // 比如说这里的active为dev,默认的配置文件名为application,则接下来就拼接并加载application-dev的配置文件
                    // 这里要注意的是,我们把解析到active并添加到profiles中后,Loader会标注已经解析到了active属性,后续就算在后面的配置文件中解析到active属性,也会忽略
                    addActiveProfiles(document.getActiveProfiles());
                    // 尝试获取 spring.profiles.include属性
                    addIncludedProfiles(document.getIncludeProfiles());
                    loaded.add(document);
                }
            }
            // 如果有多个,将进行倒叙,但是实际上一般只有一个
            Collections.reverse(loaded);
            if (!loaded.isEmpty()) {
                // 将加载的document添加到Loader#loaded属性集合中,用于最后的配置文件优先级排序
                loaded.forEach((document) -> consumer.accept(profile, document));
                if (this.logger.isDebugEnabled()) {
                    StringBuilder description = getDescription("Loaded config file ", location, resource, profile);
                    this.logger.debug(description);
                }
            }
        }
        catch (Exception ex) {
            StringBuilder description = getDescription("Failed to load property source from ", location, resource, profile);
            throw new IllegalStateException(description.toString(), ex);
        }
    }
}
addLoadedPropertySources 添加到 environment 中
该方法会将现在 loaded 中保存的配置文件根据其对应的 profile 倒序后依次添加到 environment 中。
注意,倒叙的是
MutablePropertySources,MutablePropertySources中保存的多个PropertySource是不倒叙的,一个PropertySource对应一个配置文件,添加的顺序,就是生效的顺序,先添加的优先级高
private void addLoadedPropertySources() {
    // 获取环境变量中已加载的配置信息
    MutablePropertySources destination = this.environment.getPropertySources();
    // 获取已本次Loader加载到的配置文件
    List<MutablePropertySources> loaded = new ArrayList<>(this.loaded.values());
    // 将已加载的配置文件按照profile倒序,
    // 先加载的是 null 这个profile,后加载的是自定义激活的profile.所以倒叙之后是 spring.profile.active指定的优先级最高
    Collections.reverse(loaded);
    String lastAdded = null;
    Set<String> added = new HashSet<>();
    for (MutablePropertySources sources : loaded) {
        for (PropertySource<?> source : sources) {
            // 一个 PropertySource 对应一个 配置文件,这个是不倒叙的,添加的顺序,就是生效的顺序,先添加的优先级高
            // 通过set对已经添加的PropertySource进行标记,避免重复添加
            if (added.add(source.getName())) {
                // 将已加载的配置文件添加到environment的MutablePropertySources中
                addLoadedPropertySource(destination, lastAdded, source);
                lastAdded = source.getName();
            }
        }
    }
}
private void addLoadedPropertySource(MutablePropertySources destination, String lastAdded,
        PropertySource<?> source) {
    if (lastAdded == null) {
        // 如果系统中存在"defaultProperties"这个配置,则将第一个优先级的配置文件添加到这个配置文件的顺序之前
        // 如果系统中不存在"defaultProperties"这个配置,则将第一个优先级的配置文件添加到environment中的最后一个
        // defaultProperties实际为bootstrap.yml
        if (destination.contains(DEFAULT_PROPERTIES)) {
            destination.addBefore(DEFAULT_PROPERTIES, source);
        }
        else {
            destination.addLast(source);
        }
    }
    else {
        // 将当前配置文件添加到上一个配置文件之后
        destination.addAfter(lastAdded, source);
    }
}
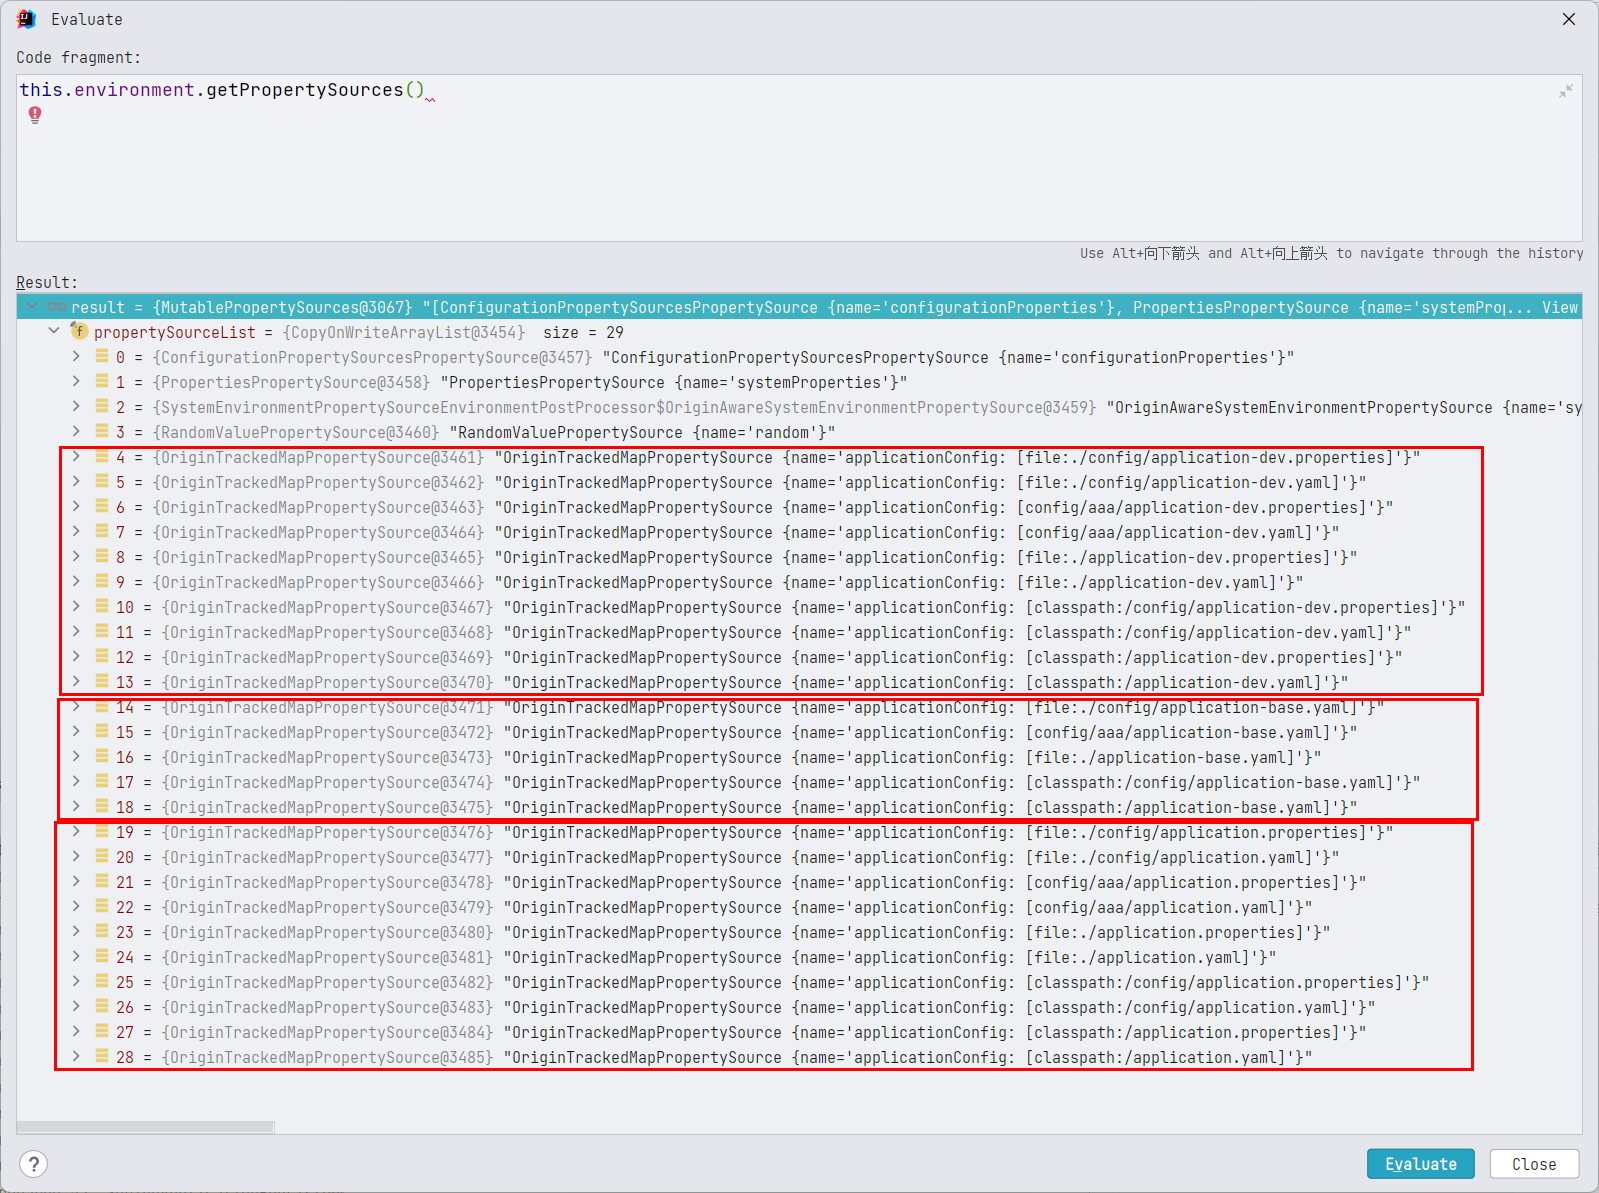
添加结果,未指定 active.profiles.profiles

指定 active.profiles.profiles 为 dev 之后

指定 active.profiles.profiles 为 base,dev 之后,因为 profile 的加载顺序是 null > base > dev,因此倒叙之后,生效的顺序,就是 dev 的配置优先级高于 base 高于非 profile 配置。
《Spring5-IOC 容器.docx》的
Environment变量小节中,我们得知:
environment.getproperty()获取属性值,会按照propertySources中的顺序,依次从每一个PropertySource中进行查找,如果在当前PropertySource中找到了,就返回,不会再去排在后面的PropertySource中去寻找,因此PropertySource注册进environment的propertySources的的顺序就显得很重要,如果同样一个属性值aaa,在 A 这个PropertySource中存在,在 B 这个PropertySource中也存在,同时 A 排在 B 的前面,那么environment.getproperty("aaa")就只会返回 A 中的值,而不会返回 B 中的值,看起来的效果,就像是 A 中的配置覆盖了 B 中的配置。
现在我们知道了,ConfigFileApplicationListener.Loader 这个类的工作的本质,实际上就是将各个位置的配置文件对应的 PropertySource 以合理的顺序添加到 environment 的 propertySources 中。
所谓参数覆盖,实际上就是,配置文件对应的 PropertySource 在 Environment 中的顺序比较靠前,而获取配置的时候,是按照顺序在多个 propertySource 中查找,找到即返回,因此,propertySource 在 Environment 中的顺序,决定了 propertySource 中的属性的优先级。因此 propertySource 的添加顺序非常重要。
Loader 解析配置文件步骤总结 - 重点
首先,我们只分析最常规的情况,即,使用默认的配置文件位置,使用默认的配置文件名,只在默认的配置文件名(application)中配置 active.profiles.profiles,在 application-<profile> 中不进行 active.profiles.profiles 的配置
首先确定一个大的框架,Loader 对配置文件的加载,是按照 Profile 来的,即,Loader 会遍历多个 profile,每指定一个 profile 遍历的结果为一个 MutablePropertySources 对象,会存放到 Map<Profile, MutablePropertySources> loaded 属性中,这是一个 LinkedHashMap,按照添加顺序保存,每遍历一个 profile,都会在所有配置文件目录下遍历 PropertySourceLoader 支持的所有后缀名。当前版本(spring-boot-2.3.4.RELEASE)中的默认的配置文件路径为 classpath:/,classpath:/config/,file:./,file:./config/*/,file:./config/,PropertySourceLoader 默认实现类有 PropertiesPropertySourceLoader(支持的后缀名为 .properties 和 .xml)和 YamlPropertySourceLoader(支持的后缀名为 .yml 和 .yaml),实际的目录遍历顺序为
-
file:./config/ -
file:./config/*/ -
file:./ -
classpath:/config/ -
classpath:/
每个目录下遍历后缀名的顺序是
-
.properties -
.xml -
.yml -
.yaml
这个顺序就是配置文件转化而来的 PropertySource 添加到 environment 中的顺序,也就是配置文件生效的顺序,前面的会覆盖后面的。
profile 的遍历顺序是,
-
第一遍,遍历
null对应的profile,profile 为null的时候,加载的是,文件名为application的配置文件的属性。-
如果在所有文件名为
application的配置文件没有配置spring.profiles.active,那么第二遍遍历的就是一个叫defaul的 profile。 -
如果任意一个文件名为
application的配置文件中配置spring.profiles.active了(可配置多个,用英文逗号分割),那么接下来将按照这个属性配置的多个 profile 的顺序进行遍历 -
如果在多个文件名为
application的配置文件中都配置了spring.profiles.active,那么按照前面的遍历顺序(配置文件目录 + 后缀)进行排序,只有排在第一的配置文件中的spring.profiles.active才会生效。即:spring.profiles.active这个属性值只会被优先级最高的配置文件初始化一次。
-
-
第二遍,遍历指定名称非 null 的 profile,此时,根据
loadForFileExtension方法,我们要根据条件组合,对每一个确定的目录+配置文件名+后缀的组合加载三次,三个条件为filterFactory.getDocumentFilter(null),filterFactory.getDocumentFilter(profile),Profile.name,此时的
filterFactory为this::getNegativeProfileFilter-
文件名为
application-<profile>,以filterFactory.getDocumentFilter(null)去匹配,要求配置文件中不能包含spring.profiles配置信息 -
文件名为
application-<profile>,以filterFactory.getDocumentFilter(profile)去匹配,要求配置文件中必须包含档当前指定的 profile 信息 -
文件名为
application,以filterFactory.getDocumentFilter(profile)去匹配,要求配置文件中必须包含档当前指定的 profile 信息
-
因为我们一般都在不带 -<profile> 的配置文件中配置 spring.profiles,在带 -<profile> 后缀的配置文件中不设置 spring.profiles,因此,一般第一种情况会匹配。
遍历完完所有的 profile 之后,在 addLoadedPropertySources 方法中,开始按照 profile 的读取顺序将结果(MutablePropertySources)倒叙排列,然后依次添加到 environment 中。注意,倒叙的是 MutablePropertySources,MutablePropertySources 中保存的多个 PropertySource 是不倒叙的,即,PropertySource 添加的顺序(一个 PropertySource 对应一个配置文件),就是生效的顺序,先添加的优先级高。
propertySource 在 Environment 中的顺序,决定了 propertySource 中的属性的优先级。因此 propertySource 的添加顺序非常重要。
未解之谜
第一层 load 方法中 while 循环之外的 load(null, this::getNegativeProfileFilter, addToLoadedaddFirst, true); 调用,依然搞不清楚,到底有什么用,TODO,以后遇到问题了,再回来看吧,目前的分析,已经可以解决我的问题了。
EnvironmentPostProcessorApplicationListener
TODO
SpringBoot 2.4.0 之前使用
ConfigFileApplicationListener,2.4.0 之后,使用EnvironmentPostProcessorApplicationListener

ConfigDataEnvironmentPostProcessor
主要是 ConfigDataEnvironment。TODO
默认的配置文件位置的分析和使用
默认的配置文件位置:classpath:/,classpath:/config/,file:./,file:./config/*/,file:./config/
可以很明显地注意到,配置文件的位置,是分成两类的,一类是在项目模块根路径下(以 file:./ 为起点),一类是以编译输出路径下(以 classpath: 为起点),这两种配置文件位置一般不会同时启用,因为 spring-boot-starter-parent 中的 POM 中包含的 <resources> 配置,默认启用以 classpath: 为起点的配置文件位置,即 ${basedir}/src/main/resources 下的配置。且默认不处理 xml 配置。
《SpringBoot 基础篇 -1- 依赖管理.md》中,我们分析过
spring-boot-starter-parent中的 POM 中包含的<resources>配置
<resources>
    <resource>
        <directory>${basedir}/src/main/resources</directory>
        <!-- 支持插值 -->
        <filtering>true</filtering>
        <!-- src/main/resources 路径下任意层路径下的以application开头的,以yml、yaml、properties结尾的文件,都会被识别为有效的配置文件 -->
        <!-- 但是默认只有文件名为application的生效 -->
        <includes>
            <include>**/application*.yml</include>
            <include>**/application*.yaml</include>
            <include>**/application*.properties</include>
        </includes>
    </resource>
    <resource>
        <directory>${basedir}/src/main/resources</directory>
        <excludes>
            <exclude>**/application*.yml</exclude>
            <exclude>**/application*.yaml</exclude>
            <exclude>**/application*.properties</exclude>
        </excludes>
    </resource>
</resources>
但不会处理 ${basedir} 下或者 ${basedir}/config 下的路径,也就是说,${basedir}/src/main/resources 以外的配置,在调试的时候,在指定了 working directory 的时候,是可以正常生效的,但是不会打包到 jar 中。即打包之后就无法生效,除非在 POM 中手动进行 <resources> 配置。
具体如何配置,请查看小节
如何理解 file:./ 的路径
如何理解 file:./ 的路径
工作目录(Working directory)的概念,请查看《Java 中的常见路径和资源获取.md》
Spring 中的资源获取以及
ResourceLoader的相关实践,请查看《Spring 中的资源获取.md》
其实,根据相对路径基于工作目录这一点,默认配置文件位置中的 file:./,file:./config/*/,file:./config/,在 IDEA 中,相对路径的起点是当前工作目录也就是当前模块根目录,将 SpringBoot 项目打包之后,相对路径的起点就变成了执行 java -jar 的目录。所以,这三个路径,本质上,就是外置的配置路径。
这个
外是相对于类路径来说的,在类路径之外
正常的用法是,不为 ${basedir} 下的配置文件在 POM 中配置 <resource> 标签,即不将 ${basedir} 下的配置文件打入 jar 包,保留类路径下(即编译输出路径下)的配置文件,然后将 ${basedir} 下的配置文件复制出来,跟打出的 jar 包放到同一目录下,然后执行 java -jar,这样,就可以让 jar 包在按照 file:./,file:./config/*/,file:./config/ 路径去查找配置文件的时候,找到同路径下的我们复制过去的配置文件,这样在执行一些小脚本的时候,非常有用(可以随意修改配置,同时不需要重新打 jar 包)。我想 file:./,file:./config/*/,file:./config/ 这个默认路径的配置文件,应该就是这么用的。
注意此时,
classpath:/,classpath:/config/下的配置文件也在生效。
如果我们需要让 file:./,file:./config/*/,file:./config/ 在打成 jar 包之后依然生效,就需要添加 <resources> 配置:
<resources>
    <!-- 将项目模块根路径下的配置文件添加到打包文件中 ,会覆盖编译输出路径下的配置文件位置中的同路径下的同名配置文件 -->
    <!-- 默认不添加 xml 格式的配置文件 -->
    <resource>
        <directory>${basedir}</directory>
        <filtering>true</filtering>
        <includes>
            <include>**/application*.yml</include>
            <include>**/application*.yaml</include>
            <include>**/application*.properties</include>
        </includes>
    </resource>
</resources>
实际上,我们为 ${basedir} 下的配置文件在 POM 中配置 <resource> 标签,本质上,是让其覆盖编译输出路径下的配置文件,打成 jar 包实际执行的时候,(如果 jar 包外部没有配置文件)按照路径 file:./,file:./config/*/,file:./config/ 去查找配置文件是找不到的,只能找到 classpath:/,classpath:/config/ 下的配置文件,但是 classpath:/,classpath:/config/ 下的配置已经被替换成了我们在 ${basedir} 下的配置文件,所以,最终看起来,就是 ${basedir} 下的配置文件在生效。简单总结一下就是,根据 POM 文件本身的规则,打包的时候,项目模块根路径下的配置文件位置中的配置文件,会覆盖编译输出路径下的配置文件位置中的同路径下的同名配置文件,注意是同名才覆盖,不同名的不会覆盖,
简单实践
还是之前实践的项目,所有配置文件的内容都是配置 spring.application.name 属性的内容,而且,内容的值为 配置文件路径_profile_文件拓展名 的格式,同时在 classpath:/application.yaml 中配置激活的 profile 为 dev,而且,不将当前工作目录下也就是当前模块根路径下的配置文件通过 <resources> 配置到编译输出路径中,将代码打包,执行,得出的日志是:
PS C:\Users\wwwli\Desktop> java -jar .\SpringBoot-ConfigFile-0.0.1-SNAPSHOT.jar

  .   ____          _            __ _ _
 /\\ / ___'_ __ _ _(_)_ __  __ _ \ \ \ \
( ( )\___ | '_ | '_| | '_ \/ _` | \ \ \ \
 \\/  ___)| |_)| | | | | || (_| |  ) ) ) )
  '  |____| .__|_| |_|_| |_\__, | / / / /
 =========|_|==============|___/=/_/_/_/
 :: Spring Boot ::        (v2.3.4.RELEASE)

2022-11-02 07:50:10.064  INFO 25232 --- [           main] x.x.s.SpringBootConfigFileApplication    : Starting SpringBootConfigFileApplication v0.0.1-SNAPSHOT on LAPTOP-LK with PID 25232 (C:\Users\wwwli\Desktop\SpringBoot-ConfigFile-0.0.1-SNAPSHOT.jar started by wwwli in C:\Users\wwwli\Desktop)
2022-11-02 07:50:10.065  INFO 25232 --- [           main] x.x.s.SpringBootConfigFileApplication    : The following profiles are active: dev
2022-11-02 07:50:10.478  INFO 25232 --- [           main] x.x.s.SpringBootConfigFileApplication    : Started SpringBootConfigFileApplication in 0.765 seconds (JVM running for 1.051)
classpath&config-dev-properties
说明此时生效的配置文件是 classpath:/config/application.properties,激活的 profile 是 dev,
在 jar 包同目录下添加 config 文件夹,然后放入两个配置文件:
application.yaml
spring:
  application:
    name: module&config-null-yaml
  profiles:
    active: base
application-base.properties
spring.application.name=module&config-base-properties
再次执行 java -jar
PS C:\Users\wwwli\Desktop> java -jar .\SpringBoot-ConfigFile-0.0.1-SNAPSHOT.jar

  .   ____          _            __ _ _
 /\\ / ___'_ __ _ _(_)_ __  __ _ \ \ \ \
( ( )\___ | '_ | '_| | '_ \/ _` | \ \ \ \
 \\/  ___)| |_)| | | | | || (_| |  ) ) ) )
  '  |____| .__|_| |_|_| |_\__, | / / / /
 =========|_|==============|___/=/_/_/_/
 :: Spring Boot ::        (v2.3.4.RELEASE)

2022-11-02 07:59:31.264  INFO 38112 --- [           main] x.x.s.SpringBootConfigFileApplication    : Starting SpringBootConfigFileApplication v0.0.1-SNAPSHOT on LAPTOP-LK with PID 38112 (C:\Users\wwwli\Desktop\SpringBoot-ConfigFile-0.0.1-SNAPSHOT.jar started by wwwli in C:\Users\wwwli\Desktop)
2022-11-02 07:59:31.266  INFO 38112 --- [           main] x.x.s.SpringBootConfigFileApplication    : The following profiles are active: base
2022-11-02 07:59:31.675  INFO 38112 --- [           main] x.x.s.SpringBootConfigFileApplication    : Started SpringBootConfigFileApplication in 0.762 seconds (JVM running for 1.044)
module&config-base-properties
说明此时生效的配置文件是 file:./config/application-base.properties,激活的 profile 是 base
你看,完全不需要重新打包代码,我们直接在 jar 包的工作目录下添加配置文件,即可修改 jar 包的配置,非常方便。
最佳实践是
将配置文件的信息放到 classpath:/,classpath:/config/ 这两个目录中,将 SpringBoot 项目打成 jar 包之后,如果有修改配置文件的需求,则在执行 java -jar 的目录中,添加配置文件,覆盖相应的配置即可。
自定义配置文件路径和配置文件名称
其实完全没有必要自定义配置文件位置和名称。
有需要再研究吧。
打印 ConfigFileApplicationListener 中的日志
参考博客:【Log日志】在日志系统初始化之前如何打印日志_51CTO博客_java打印log日志
通过前面的源码分析可知,在初始化一个 SpringApplication 实例的过程中,ConfigFileApplicationListener比LoggingApplicationListener 先加载,因此ConfigFileApplicationListener 加载的时候,日志还没有加载,那想看 ConfigFileApplicationListener 中的日志怎么办?使用 DeferredLog 缓存日志;并在合适的时机回放日志。
首先在任意一个生效的配置文件中开启 TRACE 级别的日志
# 开启TRACE级别的日志
logging.level.root=trace
然后在 src/main/resources 下新建 META-INF 文件夹,并新建 spring.factories 文件
org.springframework.boot.env.EnvironmentPostProcessor=xyz.xiashuo.springbootconfigfile.NacosEnvPostProcessor
org.springframework.context.ApplicationListener=xyz.xiashuo.springbootconfigfile.NacosEnvPostProcessor
在 xyz.xiashuo.springbootconfigfile 包下新建类 NacosEnvPostProcessor,别的名字也可以
/**
 * 注意,在高版本的SpringBoot中,这个操作可能不行,比如在2.7.4中,就不行
 * 在 2.7.4 ConfigFileApplicationListener 甚至开始被弃用
 */
public class NacosEnvPostProcessor implements EnvironmentPostProcessor, ApplicationListener<ApplicationEvent>, Ordered {

    /**
     * 这个时候Log系统还没有初始化  使用DeferredLog来记录  并在onApplicationEvent进行回放
     */
    private static final DeferredLog LOGGER = new DeferredLog();

    @Override
    public int getOrder() {
        return 0;
    }

    @Override
    public void postProcessEnvironment(ConfigurableEnvironment environment, SpringApplication application) {
        LOGGER.info("打印日志");
    }

    @Override
    public void onApplicationEvent(ApplicationEvent event) {
        LOGGER.replayTo(NacosEnvPostProcessor.class);
    }
}
然后在控制台中,我们就可以看到 LoggingApplicationListener 加载之前记录的各种详细的日志了。
听说
ConfigFileApplicationListener要被弃用,说实话感觉这个类的代码写的不是很好,调理不清晰,看的很累。可能这就是被弃用的原因吧。
配置文件的其他问题
- 使用
JRebel插件启动SpringBoot的时候,有可能会出现配置文件不生效的情况,此时启动的时候生效的还是过时的配置,而且把配置文件删除了,那些过时的配置依然存在,而用正常的 Debug 启动是可以获得最新的配置的,那基本上就可以判断为jrebel.xml的问题,只需要重新生成一下 Jrebel 的配置文件即可,
