SpringBoot 基础篇:容器功能
SpringBoot 基础篇:容器功能
其实就是 Spring IOC 和 AOP 相关的功能,都烂熟于心了的东西
参考之前学习的笔记,
《Spring5-IOC 容器.docx》
《Spring5-AOP.docx》
准备工程模块
按照搭建实验项目,直接参照《SpringBoot 基础篇 -0- 搭建简单的 SpringBoot 应用.md》即可,注意不需要在 POM 中引入 spring-boot-starter-web,启动日志如下:
  .   ____          _            __ _ _
 /\\ / ___'_ __ _ _(_)_ __  __ _ \ \ \ \
( ( )\___ | '_ | '_| | '_ \/ _` | \ \ \ \
 \\/  ___)| |_)| | | | | || (_| |  ) ) ) )
  '  |____| .__|_| |_|_| |_\__, | / / / /
 =========|_|==============|___/=/_/_/_/
 :: Spring Boot ::        (v2.3.4.RELEASE)

2022-10-11 09:30:55.002  INFO 33476 --- [           main] xyz.xiashuo.MainApplication              : Starting MainApplication on LAPTOP-LK with PID 33476 (E:\IDEAProject\SpringBoot\SpringBoot-IOC\target\classes started by wwwli in E:\IDEAProject\SpringBoot)
2022-10-11 09:30:55.003  INFO 33476 --- [           main] xyz.xiashuo.MainApplication              : No active profile set, falling back to default profiles: default
2022-10-11 09:30:55.220  INFO 33476 --- [           main] xyz.xiashuo.MainApplication              : Started MainApplication in 0.356 seconds (JVM running for 0.946)
组件添加
其实 @SpringBootApplication 注解继承了 @Configuration 注解,我们可以在 @SpringBootApplication 注解修饰的类中编写 @Bean 注解修饰的方法来向 IOC 容器中注册 Bean,也可以在 @SpringBootApplication 注解修饰的类上添加 @Import 等注解,但是一般我们不这么干,为了层次清晰,我们一般只在 @SpringBootApplication 注解修饰的类中保留一个 man 方法,另外创建一个类用 @Configuration 修饰,并在其中注册 Bean。
@Configuration
其实这就是《Spring5-IOC 容器.docx》中提到的基于注解配置 Spring 的内容,这里就不过多深入了,只写简单的实践。
Full 模式与 Lite 模式
proxyBeanMethods 参数:代理 bean 的方法,proxyBeanMethods 参数是从 springframework5.2 之后才有的配置
-
proxyBeanMethods=true,对应 full 模式
configuration 会被代理成为一个增强对象,比如
com.liangkang.config.MyConfig$$EnhancerBySpringCGLIB$$7712299a@430fa4ef,其中的方法也会被代理,所以调用其中的方法,先检查容器中是否已经有对象了,如果已经有了直接返回对象,没有就新建,这样就保持了组件单实例, -
proxyBeanMethods=false,对应 lite 模式
configuration 类就是普通的类,com.liangkang.config.MyConfig@11a82d0f,
full 和 lite 配置解决什么问题呢?组件依赖
首先定义一下什么是组件依赖,组件是一个实例,一个组件依赖另一个组件,意思是一个实例依赖于另一个实例,容器中有 A 实例和 B 实例,A 实例有一个 B 类型的属性,如果你想要保证 A 实例的 B 类型的属性的值就是容器中的 B 实例,那你最好就设置 proxyBeanMethods=true,然后不管怎么调用配置类中生产 B 实例的 bean 方法获得的都是容器中的 B 组件,这样就非常方便而且不会有歧义,否则 A 实例的 B 类型的属性的值将只是一个简单的实例,每次调用都会是一个新的实例,而不是容器中的单例的 B 组件。所以说 full 模式解决了组件依赖的问题,很简单。
如果你这个组件就是一个独立的单独使用的没有被别的组件依赖的组件,那这个组件的配置类就可以设置为 lite 模式,这样可以跳过判断容器中是否存在此组件的过程,提高 SpringBoot 的运行速度。
最佳实战
-
配置 类组件之间无依赖关系用 Lite 模式加速容器启动过程,减少判断
-
配置类组件之间有依赖关系,方法会被调用得到之前单实例组件,用 Full 模式
其实这个问题在《Spring5-IOC 容器.docx》的
proxyBeanMethods 字段 - Lite Mode对比Full Mode小节中已经研究过了。
bean 是不是单例模式,要看 bean 的作用域(Scope),具体请查看《Spring5-IOC 容器.docx》的
@Scope注解。当然默认就是单例的
实践
测试码如下:
Bean 类型,
Pet
public class Pet {
    private String name;

    public String getName() {
        return name;
    }

    public void setName(String name) {
        this.name = name;
    }

    public Pet(String name) {
        this.name = name;
    }

}
User
public class User {
    private String name;
    private Integer age;

    private Pet pet;

    public User(String name, Integer age) {
        this.name = name;
        this.age = age;
    }

    public Pet getPet() {
        return pet;
    }

    public void setPet(Pet pet) {
        this.pet = pet;
    }

    public String getName() {
        return name;
    }

    public void setName(String name) {
        this.name = name;
    }

    public Integer getAge() {
        return age;
    }

    public void setAge(Integer age) {
        this.age = age;
    }
}
@Configuration 配置类
/**
 * 1、配置类里面使用@Bean标注在方法上给容器注册组件,默认也是单实例的
 * 2、配置类本身也是组件
 * 3、proxyBeanMethods:代理bean的方法
 * Full(proxyBeanMethods = true)、【保证每个@Bean方法被调用多少次返回的组件都是单实例的】
 * Lite(proxyBeanMethods = false)【每个@Bean方法被调用多少次返回的组件都是新创建的】
 * 组件依赖必须使用Full模式默认。其他默认是否Lite模式
 */
//告诉SpringBoot这是一个配置类 == 配置文件
@Configuration(proxyBeanMethods = true)
public class MyConfig {

    //给容器中添加组件。以方法名作为组件的id。返回类型就是组件类型。返回的值,就是组件在容器中的实例
    @Bean
    public User User01() {
        User zhagnsan = new User("zhagnsan", 18);
        zhagnsan.setPet(Tom());
        return zhagnsan;
    }

    @Bean
    public Pet Tom() {
        return new Pet("tomcat");
    }

}
SpringBoot 的 Main 类
/**
 * 主程序类
 * @SpringBootApplication:这是一个SpringBoot应用
 */
@SpringBootApplication
public class MainApplication {
    public static void main(String[] args) {
        //ConfigurableApplicationContext 实际上就是IOC容器
        final ConfigurableApplicationContext context = SpringApplication.run(MainApplication.class, args);
        // 打印容器里的所有组件
        final String[] names = context.getBeanDefinitionNames();
        for (String name : names) {
            // System.out.println(name);
        }
        System.out.println("-----------------------------------------------------------------------------------------");

        //配置类也是一个对象
        //注意类声明bean的时候的默认bean名称时类目的首字母转成小写之后的结果,@Component的特性
        MyConfig myConfig = context.getBean("myConfig", MyConfig.class);
        System.out.println(myConfig);

        //这段代码很关键,体现出了被代理和没被代理的区别
        //从容器中拿呢?还是直接调用普通的方法新建呢?
        //如果proxyBeanMethods = true ,这个myConfig本身就是一个代理对象com.liangkang.config.MyConfig$EnhancerBySpringCGLIB$7712299a@430fa4ef,代理对象调用方法也是代理方法
        User configUser01 = myConfig.User01();
        User configUser02 = myConfig.User01();

        System.out.println("通过配置类获取bean:" + (configUser01 == configUser02));

        Pet tom01 = context.getBean("Tom", Pet.class);
        Pet tom02 = context.getBean("Tom", Pet.class);
        System.out.println("从容器中获取的两个tom:" + (tom01 == tom02));

        User user01 = context.getBean("User01", User.class);
        User user02 = context.getBean("User01", User.class);
        System.out.println("从容器中获取的两个user:" + (user01 == user02));

        User user03 = context.getBean("User01", User.class);
        System.out.println("从容器中获得的User中获取的Pet和容器中的Pete是否相等" + (user03.getPet() == tom02));

        //结果
        // proxyBeanMethods = false
        //    com.liangkang.config.MyConfig@11a82d0f
        // 通过配置类获取bean:false
        // 从容器中获取的两个tom:true
        // 从容器中获取的两个user:true
        // 从容器中获得的User中获取的Pet和容器中的Pete是否相等false

        //proxyBeanMethods = true
        //    com.liangkang.config.MyConfig$EnhancerBySpringCGLIB$7712299a@430fa4ef
        // 通过配置类获取bean:true
        // 从容器中获取的两个tom:true
        // 从容器中获取的两个user:true
        // 从容器中获得的User中获取的Pet和容器中的Pete是否相等true

    }
}
@Bean、@Component、@Controller、@Service、@Repository
直接回看《Spring5-IOC 容器.docx》的
基于注解方式实现对象创建即可,这几个注解都有解释
@ComponentScan、@Import
直接回看《Spring5-IOC 容器.docx》的
@Import或@ImportResource即可
简单实践
为方便测试,在 POM 中引入 spring-boot-starter-test
<dependency>
    <groupId>org.springframework.boot</groupId>
    <artifactId>spring-boot-starter-test</artifactId>
</dependency>
配置两个基础 bean,注意要有无参构造函数
public class Pet {
    private String name;

    public String getName() {
        return name;
    }

    public void setName(String name) {
        this.name = name;
    }

    public Pet() {
    }

    public Pet(String name) {
        this.name = name;
    }

}
public class User {
    private String name;
    private Integer age;

    private Pet pet;

    public User(String name, Integer age) {
        this.name = name;
        this.age = age;
    }

    public User() {
    }

    public Pet getPet() {
        return pet;
    }

    public void setPet(Pet pet) {
        this.pet = pet;
    }

    public String getName() {
        return name;
    }

    public void setName(String name) {
        this.name = name;
    }

    public Integer getAge() {
        return age;
    }

    public void setAge(Integer age) {
        this.age = age;
    }
}
@Configuration 配置类
@Import({Pet.class, User.class})
@Configuration
public class TestImportConfig {
}
测试类,
@SpringJUnitConfig(classes = TestImportConfig.class)
class MyConfigTest {

    @Autowired
    ApplicationContext context;

    @Test
    public void test() throws Exception {
        Pet pet = context.getBean(Pet.class);
        User user = context.getBean(User.class);
        assertNotNull(pet);
        System.out.println("Pet 组件的名称:"+ Arrays.toString(context.getBeanNamesForType(Pet.class)));
        System.out.println("Pet 组件的内容:"+pet);
        assertNotNull(user);
        System.out.println("User 组件的名称:"+Arrays.toString(context.getBeanNamesForType(User.class)));
        System.out.println("User 组件的内容:"+user);
    }

}
输出
Pet 组件的名称:[xyz.xiashuo.domain.Pet]
Pet 组件的内容:xyz.xiashuo.domain.Pet@4748a0f9
User 组件的名称:[xyz.xiashuo.domain.User]
User 组件的内容:xyz.xiashuo.domain.User@4b14918a
IOC 容器会调用这两个类的无参构造函数来构造 bean 实例,如果没有无参构造,IOC 容器会尝试查找构造函数的参数的类型的组件,如果找得到则注入,找不到则报错。同时需要注意,@Import 注册的 bean 的名称为 bean 类型的全限定性类名。
@Conditional
@Conditional注解的源码注释看《Spring5-IOC 容器.docx》,简单摘抄如下:
@Conditional注解可以用以下任何一种方式使用:
作为类级注解使用在任何直接或间接使用@Component 注解(包括@Configuration 类)注释的类上,
作为方法级注解用在任何@Bean 方法上
作为元注注解被使用在其他注解上,用于组成自定义注解
如果一个
@Configuration类被标记为@Conditional,那么所有与该类相关的@Bean方法、@Import注解和@ComponentScan注解都将受到@Conditional注解中的条件的控制。
SpringBoot 通过添加 Condition 接口的多种实现,拓展了 @Conditional注解,额外引入了几个注解。这些新引入的注解主要用于自动装配。
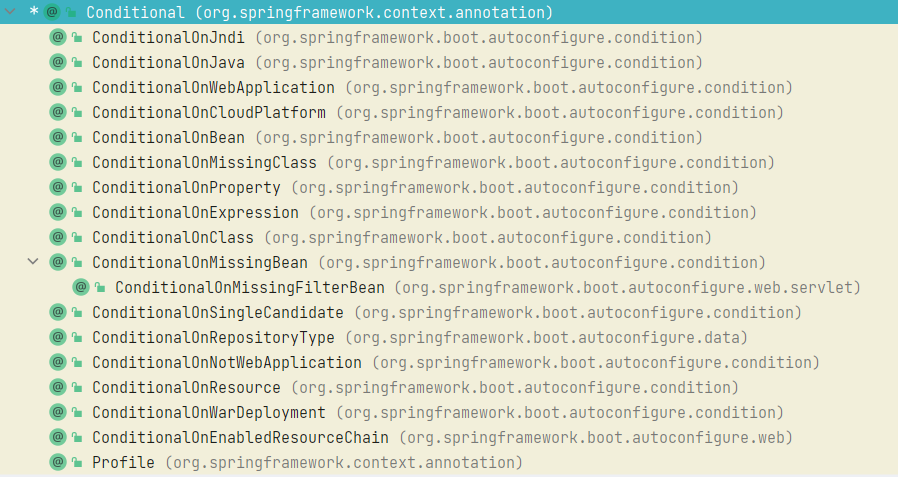
简单列出这些 @Conditional 子注解的功能:
-
@ConditionalOnJndi:JNDI 的InitialContext的可用或者能找到特定位置(value 字段指定)才能匹配。 -
@ConditionalOnJava:需要当前应用运行的 JVM 的版本在某一个范围之内才能匹配 -
@ConditionalOnWebApplication:需要当前应用是一个 web 应用才能匹配,默认任何 web 应用程序都可以匹配,但可以使用 type() 属性缩小范围。 -
@ConditionalOnNotWebApplication:只有当应用程序上下文不是 web 应用程序上下文时才匹配。 -
@ConditionalOnCloudPlatform:当激活指定的云平台时才能匹配 -
@ConditionalOnBean:只有当满足所有指定需求的 bean 已经包含在 BeanFactory(即 IOC 容器)中时才匹配。必须满足所有的条件才能最终匹配,但所有的条件不一定要由同一个 bean 满足。- 非常好用
-
@ConditionalOnMissingBean:只有在 BeanFactory(即 IOC 容器)中没有满足指定要求的 bean 时才匹配。必须不满足所有的条件才能最终匹配,但所有的条件的不满足不一定要由同一个 bean 实现。 -
@ConditionalOnClass:仅当指定的类在类路径上时才匹配- 非常好用
-
@ConditionalOnMissingClass:只在指定的类不在类路径上时才匹配 -
@ConditionalOnProperty:检查指定属性是否具有特定值。默认情况下,这些属性必须出现在Environment中,且不等于 false。havingValue()和matchIfMissing()属性允许进一步的自定义。- 非常好用
-
@ConditionalOnExpression:依赖于 SpEL 表达式值(true或者false)进行匹配 -
@ConditionalOnSingleCandidate:仅当指定类的 bean 已经包含在 BeanFactory(即 IOC 容器)中并且可以确定单个候选时才匹配。如果 BeanFactory 中已经包含了多个匹配的 bean 实例,但其中一个已经定义了@Primary注解,则条件也将匹配; 本质上,如果特定类型的 bean 的自动装配是成功的,则条件匹配。 -
@ConditionalOnRepositoryType:只在启用特定类型(RepositoryType)的 Spring 数据仓库(Spring Data repository)时匹配。 -
@ConditionalOnResource:仅当指定的资源在类路径上时匹配。- 非常好用
-
@ConditionalOnWarDeployment:当应用程序是传统 WAR 部署时匹配的条件。对于具有嵌入式服务器(比如 embedded Tomcat)的应用程序,此条件将返回 false -
@ConditionalOnEnabledResourceChain:检查 Spring 资源处理链是否被启用的条件。匹配ResourceProperties.Chain.getEnabled()为 true 或者webjars-locator-core在类路径上。
实践
@ConditionalOnBean 一般用于组件依赖,@ConditionalOnClass 和 @ConditionalOnProperty 和 @ConditionalOnResource 也很常用
引入一个简单的 Java Bean
public class MyBean {

    private String name;

    private Integer age;

    private String gender;

    @Override
    public String toString() {
        return "MyBean{" +
                "name='" + name + '\'' +
                ", age=" + age +
                ", gender='" + gender + '\'' +
                '}';
    }

    public String getName() {
        return name;
    }

    public void setName(String name) {
        this.name = name;
    }

    public Integer getAge() {
        return age;
    }

    public void setAge(Integer age) {
        this.age = age;
    }

    public String getGender() {
        return gender;
    }

    public void setGender(String gender) {
        this.gender = gender;
    }
}
在 src/main/resources 的 application.properties 中添加
system.beanFlag = 2
同时在 src/main/resources 下新建文件 /testConfig/aaa.properties,内容就为空即可
创建 @Configuration 配置类,
注意:这里手动导入
@PropertySource("classpath:application.properties")是为了方便测试类执行的时候获取application.properties,在通过@SpringBootApplication注解修饰的类MainApplication启动的时候,是不需要手动导入的,
一般不建议在 @Configuration 上使用 @ConditionalOnBean,因为 @Configuration 的加载顺序不好控制,如果 @ConditionalOnBean 检查的 bean 名称在别的 @Configuration 类中配置,则还需要调整 @Configuration 的加载顺序,这个可以通过下一小节 控制@Configuration类的加载顺序 进行调整。
@Configuration
//这里手动导入 "classpath:application.properties" 是为了方便 测试
// 在通过 MainApplication 启动的时候,不需要手动导入,
@PropertySource("classpath:application.properties")
// 一般不建议在 @Configuration 上使用 @ConditionalOnBean, 因为@Configuration的加载顺序不好控制,
@ConditionalOnClass(value = MyBean.class)
public class ConditionalConfig {

    @Bean("myBean1")
    @ConditionalOnBean(name = "Tom333")
    public MyBean getMyBean1() {
        MyBean myBean = new MyBean();
        myBean.setName("myBean1");
        return myBean;
    }

    @Bean("myBean2")
    @ConditionalOnClass(value = Pet.class)
    public MyBean getMyBean2() {
        MyBean myBean = new MyBean();
        myBean.setName("myBean2");
        return myBean;
    }

    @Bean("myBean3")
    @ConditionalOnProperty(prefix = "system", name = "beanFlag", havingValue = "2")
    public MyBean getMyBean3() {
        MyBean myBean = new MyBean();
        myBean.setName("myBean3");
        return myBean;
    }

    @Bean("myBean4")
    @ConditionalOnResource(resources = "testConfig/aaa.properties")
    public MyBean getMyBean4() {
        MyBean myBean = new MyBean();
        myBean.setName("myBean4");
        return myBean;
    }


}
测试类
@SpringJUnitConfig(classes = ConditionalConfig.class)
class ConditionalConfigTest {

    @Autowired
    ApplicationContext context;

    @Test
    public void setUp() throws Exception {
        String[] beanNamesForType = context.getBeanNamesForType(MyBean.class);
        System.out.println(Arrays.toString(beanNamesForType));
    }

}
执行结果:
[myBean2, myBean3, myBean4]
可以看到第一个条件不支持,但是后面三个条件都支持,所以相应的 bean 被注入了
控制@Configuration 类的加载顺序
-
手动:构建 ApplicationContext 时由构建者手动传入,可手动控制顺序。
-
自动 1:被
@ComponentScan自动扫描进去,无法控制顺序。 -
自动 2:自动扫描,运用 SpringBoot 的 3 大注解:
@AutoConfigureBefore、@AutoConfigureAfter、@AutoConfigureOrder,可以控制顺序。
在传统的 Spring Framework 里,一个 @Configuration 注解标注的类就代表一个配置类,当存在多个 @Configuration 时,他们的执行顺序是由使用者靠手动指定的,就像这样:
// 手动控制Config1 Config2的顺序
ApplicationContext context = new AnnotationConfigApplicationContext(Config1.class, Config2.class);
SpringBoot 控制配置类加载顺序:
-
把
Config1和Config2挪动到 Application 扫描不到的包内,切记:一定且必须是扫描不到的包内(可以放到启动类扫描不到的目录)。 -
当前工程的资源路径
src/main/resources增加配置META-INF/spring.factories,内容为(配置里Config1和Config2前后顺序对结果无影响):org.springframework.boot.autoconfigure.EnableAutoConfiguration=xyz.xiashuo.Config1,xyz.xiashuo.Config2 -
通过 SpringBoot 自动配置顺序相关的三大注解
@AutoConfigureBefore、@AutoConfigureAfter、@AutoConfigureOrder作用于自动配置类。@AutoConfigureBefore(Config1.class) @Configuration public class Config2 { Config2() { System.out.println("配置类Config2构造器被执行..."); } }
重点:
-
SpringBoot 自动配置三大注解不能作用于被启动类扫描的配置类中。
-
Spring Boot 的自动配置均是通过
spring.factories来指定的,它的优先级最低(执行时机是最晚的);相反,通过@ComponentScan自动扫描进来的优先级是最高的。 -
Spring Boot 的自动配置是通过
@EnableAutoConfiguration注解驱动的,默认是开启状态。你也可以通过spring.boot.enableautoconfiguration = false来关闭它,回退到 Spring Framework 时代。
在 SpringBoot 2.7.0 开始引入注解 @AutoConfiguration,继承了 @AutoConfigureBefore 和 @AutoConfigureAfter,主要用来配置自动配置类的加载顺序。
原生配置文件引入
@ImportResource
指示一个或多个包含要导入的 bean 定义的资源。(一般指 XML 配置文件),比如
@ImportResource("classpath:beans.xml")
直接回看《Spring5-IOC 容器.docx》的
@Import或@ImportResource即可
配置绑定
之前,我们经常将一些配置信息,比如数据库的连接信息,redis 的配置信息,放到 xxx.properties 中,然后通过 @PropertySource("classpath:xxx.properties") 将其读取到 IOC 的 Environment 组件中,然后通过 @Value("${abc}") 来获取配置信息,在注册组件的时候或者别的时候使用。这毕竟还是有点麻烦,现在我们可以通过 @ConfigurationProperties 注解,直接将 xxx.properties 中配置的信息,映射到组件属性中。这样就更加方便了。
@ConfigurationProperties
用于外部化配置的注释。如果您想绑定和验证一些外部属性 (例如来自 .properties 文件),则将此注解添加到类定义或 @Configuration 类中的 @Bean 方法中。
绑定要么通过调用注解修饰的类上的 setter 来执行,要么通过绑定到构造函数参数来执行 (如果使用了 @ConstructorBinding)。
注意,与 @Value 相反,SpEL 表达式不会计算,因为属性值是外部化的。(意思是由外部计算好,外部提供什么,我就用什么)
这个注解的功能有点像是,将一个或者多个组件的所有属性值分离出来成为一个独立的概念,比如叫初始值配置,组件在初始化的时候,可以根据一个名称去找到适用于自己一组属性初始值来初始化组件,这个名称就是 xxx.properties 中的属性值前缀,而且,针对同一个组件,还可以保留不同版本的初始值配置,实际配置的时候可通过结合 @Conditional 注解实现根据不同的环境进行不同初始值的初始化。
这些知识都是为了后面学习 SpringBoot 的自动配置做准备。
实践
@Component + @ConfigurationProperties
配置 Bean
@Component
@ConfigurationProperties(prefix = "myprop")
public class MyPropertyMapBean {

    private String name;

    private Integer age;

    private String gender;

    public String getName() {
        return name;
    }

    public void setName(String name) {
        this.name = name;
    }

    public Integer getAge() {
        return age;
    }

    public void setAge(Integer age) {
        this.age = age;
    }

    public String getGender() {
        return gender;
    }

    public void setGender(String gender) {
        this.gender = gender;
    }

    @Override
    public String toString() {
        return "MyPropertyMapBean{" +
                "name='" + name + '\'' +
                ", age=" + age +
                ", gender='" + gender + '\'' +
                '}';
    }
}
在 src/main/resources 的 application.properties 中添加
myprop.name = xiashuo
myprop.age = 20
myprop.gender = female
MainApplication 的 main 方法
@SpringBootApplication
public class MainApplication {

    public static void main(String[] args) {
        final ConfigurableApplicationContext context = SpringApplication.run(MainApplication.class, args);
        MyPropertyMapBean myPropertyMapBean = context.getBean("myPropertyMapBean", MyPropertyMapBean.class);
        System.out.println(myPropertyMapBean.toString());

    }
}
输出
MyPropertyMapBean{name='xiashuo', age=20, gender='female'}
@Bean + @ConfigurationProperties
在 src/main/resources 的 application.properties 中添加
myprop1.name = aaaa
myprop1.age = 19
myprop1.gender = female
添加配置类
@Configuration
public class ConfigurationPropertyConfig {

    @Bean("MyPropertyMapBean1")
    @ConfigurationProperties(prefix = "myprop1")
    public MyPropertyMapBean getBean() {
        return new MyPropertyMapBean();
    }

}
测试类
@SpringBootApplication
public class MainApplication {

    public static void main(String[] args) {
        final ConfigurableApplicationContext context = SpringApplication.run(MainApplication.class, args);
        MyPropertyMapBean MyPropertyMapBean1 = context.getBean("MyPropertyMapBean1", MyPropertyMapBean.class);
        System.out.println(MyPropertyMapBean1.toString());
    }
}
输出
MyPropertyMapBean{name='aaaa', age=19, gender='female'}
此种配置方法等同于,常用于为第三方类注册组件的时候配置初始值
@Component
@ConfigurationProperties(prefix = "myprop")
public class MyPropertyMapBean {}
@EnableConfigurationProperties + @ConfigurationProperties
@EnableConfigurationProperties 的作用有两个:
-
开启特定类的配置绑定功能
-
把这个类的实例自动注册到容器中
常用于为第三方类注册组件的时候配置初始值
在 src/main/resources 的 application.properties 中添加
myprop2.name = bbb
myprop2.age = 51
myprop2.gender = female
组件 Bean
@ConfigurationProperties(prefix = "myprop3")
public class MyPropertyMapBean2 {

    private String name;

    private Integer age;

    private String gender;

    public String getName() {
        return name;
    }

    public void setName(String name) {
        this.name = name;
    }

    public Integer getAge() {
        return age;
    }

    public void setAge(Integer age) {
        this.age = age;
    }

    public String getGender() {
        return gender;
    }

    public void setGender(String gender) {
        this.gender = gender;
    }

    @Override
    public String toString() {
        return "MyPropertyMapBean{" +
                "name='" + name + '\'' +
                ", age=" + age +
                ", gender='" + gender + '\'' +
                '}';
    }

}
在配置类中添加此注解
@Configuration
@EnableConfigurationProperties(MyPropertyMapBean2.class)
public class ConfigurationPropertyConfig {


}
测试
@SpringBootApplication
public class MainApplication {

    public static void main(String[] args) {
        final ConfigurableApplicationContext context = SpringApplication.run(MainApplication.class, args);
        MyPropertyMapBean2 bean = context.getBean(MyPropertyMapBean2.class);
        System.out.println(bean.toString());
    }
}
输出:
MyPropertyMapBean{name='bbb', age=51, gender='female'}
级联属性设置
MyPropertyMapBean2 依然保留 @ConfigurationProperties(prefix = "myprop2") 的配置,同时在 MyPropertyMapBean2 中添加 Bean 类型的字段
private User userProperty;
getter、setter 方法省略,toString 方法的修改省略。
User 类型有三个字段,getter、setter 方法省略,toString 方法的修改省略。
private String name;
private Integer age;

private Pet pet;
Pet 类型有一个字段,getter、setter 方法省略,toString 方法的修改省略。
private String name;
现在,我们想要通过 @ConfigurationProperties 注解,进行深层级的字段配置。
在 src/main/resources 的 application.properties 中以 myprop2 开头的属性添加内容,最终以 myprop2 开头的配置的内容如下
myprop2.name = bbb
myprop2.age = 51
myprop2.gender = female
myprop2.userProperty.name = xiashuo
myprop2.userProperty.age = 12
myprop2.userProperty.pet.name = yufei
注意,核心是通过字段变量名匹配需要配置的对象初始化字段。
运行测试
@SpringBootApplication
public class MainApplication {

    public static void main(String[] args) {
        final ConfigurableApplicationContext context = SpringApplication.run(MainApplication.class, args);
        MyPropertyMapBean2 bean = context.getBean(MyPropertyMapBean2.class);
        System.out.println(bean.toString());
    }
}
输出
MyPropertyMapBean2{name='bbb', age=51, gender='female', userProperty=User{name='xiashuo', age=12, pet=Pet{name='yufei'}}}
可以看到 MyPropertyMapBean2 的 User 类型的字段 userProperty 也被成功配置,userProperty 中的 Pet 类型的 pet 字段的 name 字段也被匹配